HOW TO USE
Assembly:
1. Before each use wash all parts with warm soapy water before assembly.
2. Ensure that the grinder is unplugged before performing any assembly.
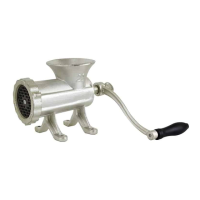
3. Loosen the grinder head clamp knob (I) and install auger head (E) into
grinder body until completely engaged with drive mechanism.
4. While holding the auger head with one hand, turn grinder head clamp knob
clockwise until tight.
5. Insert auger (D) into auger head and align spindle with internal gear drive.
6. Install the cutting blade (C) onto the square drive of the auger with the at
cutting surface facing away from the grinder body.
7. Position the cutting plate (B) onto spindle at end of auger so plate sits
ush against the at portion of cutting blade. Ensure that the notches
on the cutting plate line up with notches on auger head. Plate should sit
approximately ush with end of auger head.
8. Install the grinder head collar (A) over the cutting plate by turning clockwise
on the threads of the auger head.
9. Install the die-cast hopper (G) on top of the auger head.
10. Use the food pusher (F) to gently feed food, one piece at a time. Do not force
the food into the grinder/feeder head.
Please do not return product to the store you purchased it from.
For questions or concerns please contact customer service at
1-800-288-4545 or visit chardproducts.com.
2