37
lithium battery using an external bat-
tery charger. Follow the instructions
in this manual to recharge the lithium
battery.
- Keep the battery and the battery
contacts clean and dry. In the event
that the contacts become dirty, clean
the terminals with a soft, dry cloth.
Do not use abrasives, chemicals or
solvents to clean the battery and its
contacts.
- Lithium batteries require charging
prior to use. Always refer to the in-
structions for correct charging proce-
dures.
- Do not keep charging the lithium
battery when not in use.
- Always remove the lithium battery
from the product when not in use.
- Dispose of properly according to the
information in this manual.
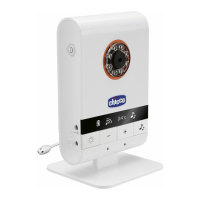
5.1 Installing alkaline batteries (not
included) in the child unit (primar-
ily in image and sound transmitter
mode)
5.1 Installing alkaline batteries (not
included) in the child unit (primarily
in image and sound transmitter mode)
Remove the alkaline battery compart-
ment closing panel (10) placing your
finger near the arrow and gently pull-
ing the panel upward (fig. 1).
Insert four 1.5 V alkaline AA/LR6 bat-
teries, respecting the proper insertion
polarity as indicated in the battery
compartment.
Reposition the alkaline battery com-
partment closing panel (10) first in-
serting the lower panel hooks in their
battery compartment housing and
gently pushing the panel downward
(fig. 2).
5.2 Replacing alkaline batteries (not
included) in the child unit (primar-
ily in image and sound transmitter
mode)
Remove the alkaline battery compart-
ment closing panel (10) placing your
finger near the arrow and gently pull-
ing the panel upward (fig. 3).
Remove the four 1.5V alkaline AA/LR6
batteries and replace them with four
similar batteries, taking care to re-
spect the proper insertion polarity as
indicated in the battery compartment.
Reposition the alkaline battery com-
partment closing panel (10) first in-
serting the lower panel hooks in their
battery compartment housing and
gently pushing the panel downward
(fig. 4).
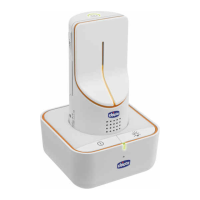
5.3 Installing the lithium-ion battery
(included) with the parent unit (pri-
marily in receiver mode)
Upon purchase, the 3.7 V 1800 mAh
rechargeable lithium-ion battery (13)
in the parent unit is kept separately in
the product packaging.
Carefully remove the lithium-ion bat-
tery from its packaging.
Remove the rechargeable battery
compartment closing panel (10), gen-
tly pushing it outwards following the
direction of the arrow (Fig. 5).
Insert the lithium-ion battery (13), re-
specting the proper insertion polarity
as indicated in the battery compart-
ment.
Reposition the rechargeable battery
compartment closing panel (13), in-
serting the hooks in their battery com-
partment housing and gently pushing
in the opposite direction to the one
shown by the arrow (fig. 6).
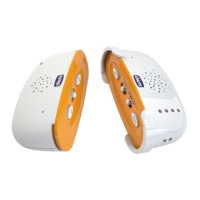
5.4 Replacing the lithium-ion bat-
tery (included) with the parent unit
(primarily in receiver mode)
If the duration of the rechargeable
lithium-ion battery is reduced exces-
sively, this means that it has run out
and therefore must be replaced (this
is to be considered normal because
rechargeable batteries run out over
time).
Remove the rechargeable battery
compartment closing panel (10), gen-
tly pushing it outwards following the
direction of the arrow (fig. 7).
Remove the flat rechargeable bat-
tery (13) and replace with another
rechargeable 3.7V 1800 mAh battery
that is identical to the one supplied
with the product (code 20256600100
to be requested directly from Artsana
S.p.A.) taking care to place them with
the correct insertion polarity indicated
on the battery compartment.
Reposition the rechargeable battery
compartment closing panel (10), in-
serting the hooks in their battery com-
partment housing and gently pushing
in the opposite direction to the one
shown by the arrow (fig. 8).
 Loading...