Do you have a question about the Chicco FastLock 360 and is the answer not in the manual?
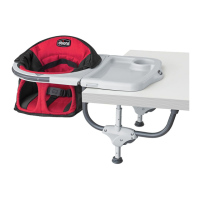
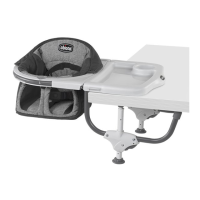
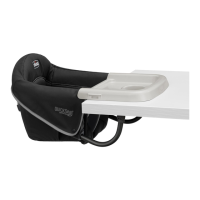
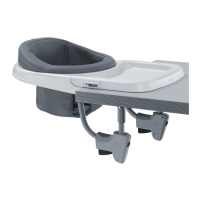
Identifies the main frame component of the hook-on chair.
Refers to the seat part designed for the child.
Components that attach the chair to the table edge.
Parts used for securing the chair to the table underside.
Detachable tray for food or toys.
Steps for connecting the child seat to the hook-on chair frame.
Instructions for inserting the chair arms into the frame.
Steps for attaching the lower locking arms to the seat base.
Lowering the clamp bar before attaching the chair to a table.
Twisting the locking clamps inward to prepare for attachment.
Placing the chair onto the table edge.
Rotating clamps upright to lock the chair onto the table.
Ensuring lower arms clear the table apron before securing.
Verifying no gap at table edge and arms are flat for secure fit.
Securing the tray by aligning and pushing down side tabs.
Detaching the tray by grasping side tabs and pulling upwards.
Sliding waist clips into the crotch strap buckle.
Pressing the buckle button to release the waist clips.
Modifying strap length by pressing tab and pulling strap.
Rotating the seat to one of the four available positions.
Pressing release buttons on lower arms to unlock clamp bars.
Rotating clamps down and sliding chair off the table.
Rotating locking clamps to their upright position.
Pressing the snap lock button when the chair is upside down.
Rotating locking arms downwards for compact storage.
Releasing the child seat by sliding a button and pushing up.
Lifting the seat board from its pocket to extract the fabric.
Pushing fabric down through the frame, guiding the wire carefully.
Finding and releasing eight plastic rings on the inside of the seat frame.
Pulling or flipping rings to detach the straps.
Extracting rings and straps by manipulating openings.
Detaching the edge of the seat fabric from the frame.
Final step to remove the complete fabric seat covering.
Reversing the removal steps to reattach the seat cover.
Guidelines for cleaning the fabric seat and plastic parts.
Checking for wear, damage, or missing components periodically.
| Brand | Chicco |
|---|---|
| Model | FastLock 360 |
| Category | Baby & Toddler Furniture |
| Language | English |