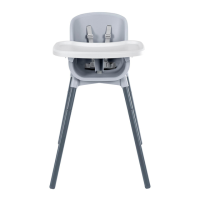
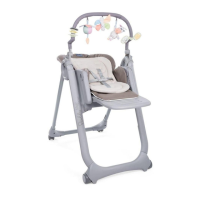
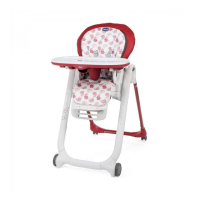
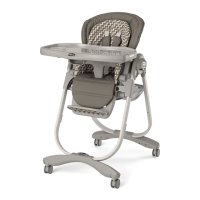
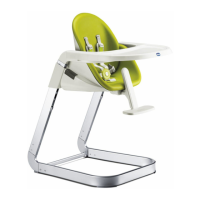
I-Sit
WARNINGS
•IMPORTANT:KEEPFORFUTUREREFERENCE.READTHESEIN-
STRUCTIONS CAREFULLY BEFORE USINGTHE PRODUCT,TO
GUARANTEEYOURCHILD’SSAFETYATALLTIMES.
•WARNING:BEFOREUSE,REMOVEANDDISPOSEOFALLPLA-
STICBAGSANDPACKAGINGMATERIALSANDKEEPTHEMOUT
OFREACHOFCHILDREN.
Configuration modes:
a.Highchair:6months-12months
b.Highchair:12months-36months
c.Chair:36monthsandover.
Warnings:
• WARNING:Donotleavethechildunattended.Itcouldbedan-
gerous.
• WARNING:Donotusethehighchairuntilthechildisabletosit
uprightwithoutassistance.
• WARNING:Usingthisproductinhighchairmodeisrecommen-
dedforchildrenbetween6and36monthsofage,weighingno
morethan15kg.
• WARNING:Usingthis product as a seat isrecommendedfor
childrenaged3yearsandover.
• WARNING:Whenusingthehighchairinthe6m-12mmode,al-
waysensuretheseatisttedinthehighestslotposition!
• WARNING:Whenusingthehighchairinthe12m-36mmode,
neverusethehighchairwiththeseatinthetwolowestpositions
(Diag.H).
• WARNING:Beforeassembly,checkthattheproductandallof
itscomponentshavenotbeendamagedduringtransportation.
Shouldanypartbedamageddonotuseandkeepoutofreach
ofchildren.
• WARNING:Donotusethehighchairifsomeofitspartsarebro-
ken,tornormissing.
• WARNING:Ensurethatthepersonusingthehighchairknows
howtouseitsafely.
• WARNING:The highchair must only be assembled, adjusted
anddismantledbyanadult.
• WARNING:Keepthetoolsusedtoassembletheproductoutof
thereachofchildren.
• WARNING:Donot usethehighchair unlessallthepartsand
componentsarettedandadjustedcorrectly.
• WARNING: When opening and closing the highchair, ensu-
rethatyourchildisatasafedistance.Ensurethatduringthe
adjustmentoperations(ttingthefootrest,ttingthebackrest,
adjustingtheactivitytray),themovablepartsofthehighchair
donotcomeintocontactwithyourchild.
• WARNING:Donotusethehighchairunlessallcomponentsare
correctlyttedandadjusted.
• WARNING:Makesurethatanyharnessiscorrectlyttedbefore
use.
• WARNING:Thefabricsafetyharnessandcrotchstrapmustbe
correctlyttedtotheseatandtherigidcrotchbarinorderto
guaranteethesafetyofyourchildwhenusingthisproductasa
Highchair.
• WARNING:Theactivitytrayalonedoesnotguaranteesecure
restraintofyourchild.Alwaysusethesafetyharnessandthe
restraintsystems!
• WARNING:Nevermovethehighchairwhenthechildisseated
inside.
• WARNING:Donotallowchildrentoplayunsupervisednearthe
highchair,orclimbontoit.
• WARNING:Donotusethehighchairformorethanonechildat
atime.
• WARNING:Topreventtheriskofburnsorre,neverplacethe
highchairnearelectricalappliances,gascookersorotherheat
sources.Keepthehighchairawayfromelectricalcables.
• WARNING:Donotplacethehighchairnearwindowsorwalls,
wherestrings,curtainsorotherobjectsmaybeusedbythechild
toclimboutofthehighchair,andtopreventtheriskofsuffoca-
tionand/orchoking.
• WARNING:Donotplacethehighchairnearwindowsorwalls,
topreventthechildfrompushingwithhisfeetagainstthewall
whichmayaffectthestabilityofthehighchairandmakeittop-
pleover.
• WARNING:Whenthechild is seatedinthe highchair,always
placethechaironahorizontal,stablesurface.Neverplacethe
highchairnearstairs,stepsoronamatorrug.
• WARNING:Bagsorweightsmustnotbeplacedontheactivity
trayorhungonthehighchairframe,astheymightaffectthe
stabilityofthehighchair.
• WARNING:Ifthehighchairisleftexposedtodirectsunlightfor
alongtime,allowittocoolbeforeplacingyourchildinit.
• WARNING:Donotleavethehighchairunderthesunforalong
time:prolongedexposuretodirectsunlightmaycausethefabric
covertofade.
• WARNING:Donotattempttoassemble,dismantleorchange
theusermodeofthehighchairwithachildsatinside.
• WARNING:Whennotinuse,thehighchairmustbekeptoutof
thereachofchildren.
• WARNING:Donotuseaccessoriesorsparepartswhicharenot
suppliedorapprovedbyArtsanaS.p.A.astheymaycompromise
thesafetyofyourchild.
COMPONENTS
a.Assemblykitwith4screwsandAllenkey
b.Base
c.Seat
c1Frontfoot-restseat
c2Rearfoot-restseat
c3Backrest/rigidcrotchbarconnectioncompartmentX
c4Backrest/rigidcrotchbarconnectioncompartmentY
c5Adjusterbuttons
d.ActivityTray
d1Sidereleasebuttons
e.Backrest
e1Backrestreleaselever
e2Releasehandle
f.Safetyharness
f1Safetyharnessbuckle
f2Lapbeltconnector
f3Upperharnessbeltconnector
f4Ringsusedtofastentheharnessstrapstothebackrest
f5Rigidcrotchbarcoverandcrotchstrapring
f6Shoulderpads
g.Footrest
g1Rigidcrotchbar
g2Footrestconnectorbutton
g3Footrestadjustmentbutton
CLEANING AND MAINTENANCE
Wipethe highchairwithacleandampcloth,removeany
excesswaterwithadrycloth.Donotexposethehighchair
todirectsunlighttopreventmaterialsfromfading.
WARNING:Regularlycheckandtightenallthescrewsused
toconnectthehighchairbasetotheframe;keeptheAllen
keysuppliedwiththeproductforfutureassembly,disman-
tlingandadjustmentoperations.
ASSEMBLING THE FRAME
Afterremovingtheframeandbasefromthebox,proceedwith
theassemblyoperations asfollows:approach andinsertthe
baseintothelowersectionoftheframe,asseeninDiagram
1,checkingthatthefeetonthe base arefacingdownwards.
Theninserttheconnectorscrewsintotherelativeholes,mak-
ingsureyouinsertthepinscrewrstandthentheotherscrew
(Diagram2and3),usetheAllenkeyandascrewdriver(notin-
cluded)totightenthemasfaraspossible(Diagram4).Repeat
thisoperationforall4screwsonbothsides.Thiscompletesthe
frameassemblyoperation(Diagram5).
WARNING:Checkthatallthescrewsarermlytightenedbe-
GB
 Loading...