• Do not use the chair booster seat
in proximity of curtain cords, win-
dows or heat sources..
• Never use the product as a swim-
ming aid or oating chair in a swim-
ming pool.
• Do not use the chair booster seat
positioned directly on the oor.
• Prolonged exposure to direct sun-
light can cause the colours of the
fabric to fade.
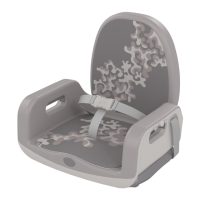
• Do not use the chair booster seat
without seat and/or backrest pad-
ding.
• After a prolonged exposure of the
product to high temperatures, wait
a few minutes before placing your
child in it.
• When not in use, the chair booster
seat must be kept out of the reach
of children.
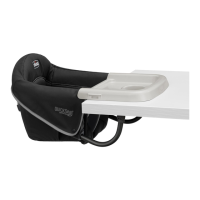
INSTALLATION AND USE 36-60 m:
WARNING: To use the chair booster seat in this congu-
ration and ensure the child’s safety, the legs (J) shall not
be extracted, the chair mounted seat must be completely
lowered.
To use it in this conguration, follow the following steps:
19. Remove the activity tray as indicated in point 2.
20. Remove the backrest (A) pressing the button (D) on the
back, and turn the backrest towards the front part of the
chair, paying attention to keep the button pressed (D). At
this point, when the backrest is in horizontal position it is
possible to remove it by extracting the insert (S) from the
corresponding housing (T) (g. 25). Now the button (D) can
be released.
WARNING: When not in use, keep the backrest and the
activity tray out of the reach of the child.
21. In this conguration, after having removed the seat pad-
ding (R), as indicated in points 15, the safety harness (waste-
line strap) of the child (E) must be placed back in the corre-
sponding compartments (Z) on the seat frame (g. 26-27).
22. Fix the padding again (R) to the frame, ensuring to also
have properly inserted the crotch strap in the housing
compartment (g. 26).
23. To attach the chair to the seat follow the steps indicated
in point 5 (g. 28-29).
WARNING: Then the free ends of the straps (M) and (I)
must be pulled to adjust the length so they are well pulled
and that the seat is well fastened to the chair.
WARNING: Make sure that the anti-slip feet (L) are well t-
ted to the seat surface of the seat.
WARNING: For a correct and safe functioning of the fasten-
ing straps, make sure that they are not twisted.
24. Open the buckles of the lower (I) and rear (M) straps to
25. Close the buckles of both straps, at this point press the
booster seat to correctly rewind the straps (g. 31).
26. To complete the operation, lock the rewinding of the
that it falls due to its weight (g. 33).
for use. The warranty shall not therefore apply in the case
events. For the duration of warranty on conformity defects
cable in the country of purchase, where provided.
 Loading...