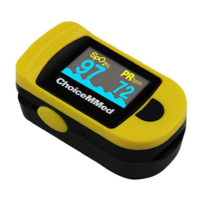
Fingertip
Pulse Oximeter
USER MANUAL
This document is applicable to US.
General Description
Oxygen binds to hemoglobin in red blood cells when moving through the lungs. It is transported throughout the body as arterial
blood. A pulse oximeter uses two frequencies of light (red and infrared) to determine the percentage (%) of hemoglobin in the blood
that is saturated with oxygen. The percentage is called blood oxygen saturation, or SpO
2
. A pulse oximeter also measures and
displays the pulse rate at the same time it measures the SpO
2
level.
Measurement Principle
Principle of the oximeter is as follows: The pulse oximeter works by applying a sensor to a fingertip. The sensor contains a dual light
source and photo detector. The one wavelength of light source is 660nm, which is red light; the other is 905nm, which is infrared-red
light. Skin, bone, tissue and venous vessels normally absorb a constant amount of light over time. The photo detector in finger
sensor collects and converts the light into electronic signal which is proportional to the light intensity. The arteriolar bed normally
pulsates and absorbs variable amounts of light during systole and diastole, as blood volume increases and decreases. The ratio of
light absorbed at systole and diastole is translated into an oxygen saturation measurement. This measurement is referred to as
SpO
2
.
Diagram of Operation Principle
1. Red and Infrared-ray
Detector
2. Red and Infrared-ray
Light Source
Precautions for Use
1. Before use, carefully read the manual.
2. Operation of the pulse oximeter may be affected by the use of an electrosurgical unit (ESU).
3. The pulse oximeter must be able to measure the pulse properly to obtain an accurate SpO
2
measurement. Verify that nothing is
hindering the pulse measurement before relying on the SpO
2
measurement.
4. Do not use the pulse oximeter in an MRI or CT environment.
5. Do not use the pulse oximeter in situations where alarms are required. The device has no alarms. It is not for continuous
monitoring.
6. Do not use the pulse oximeter in an explosive atmosphere.
7. The pulse oximeter is intended only as an adjunct in patient assessment. It must be used in conjunction with other methods of
assessing clinical signs and symptoms.
8. In order to ensure correct sensor alignment and skin integrity, the maximum application time at a single site for our device should
be less than half an hour.
9. Do not sterilize the device using autoclaving, ethylene oxide sterilizing, or immersing the device in liquid. The device is not
intended for sterilization.
10. Follow local ordinances and recycling instructions regarding disposal or recycling of the device and device components,
including batteries.
11. This equipment complies with IEC 60601-1-2:2014 for electromagnetic compatibility for medical electrical equipment and/or
systems. However, because of the proliferation of radio-frequency transmitting equipment and other sources of electrical noise in
healthcare and other environments, it is possible that high levels of such interference due to close proximity or strength of a source
might disrupt the performance of this device.
12. Portable and mobile RF communications equipment can affect medical electrical equipment.
The portable and mobile RF communications equipment should be used no closer than 30cm (12 inches) to
any part of the device,
including cables specified by the manufacturer. Otherwise, degradation of the performance of this equipment could result.
13. This equipment is not intended for use during patient transport outside the healthcare facility.
14. The patient is an intended operator. The patient can safely use all functions of the device.
15. It may be unsafe to:
—use accessories, detachable parts and materials not described in the instructions for use
—interconnect this equipment with other equipment not described in the instructions for use
—disassemble, repair or modify the equipment
16. The material that contact with the patient’s skin has passed the ISO10993-5 Tests for invitro cytotoxicity and ISO10993-10 Tests
for irritation and delayed-type hypersensitivity.
17. Use of this equipment adjacent to or stacked with other equipment should be avoided because it could result in improper
operation. If such use is necessary, this equipment and the other equipment should be observed to verify that they are operating
normally.
18. The use of accessories, transducers and cables other than those specified or provided by the manufacturer of this equipment
could result in increased electromagnetic emissions or decreased electromagnetic immunity of this equipment and result in
improper operation.
19. When the signal is not stable, the reading may be inaccurate. Please do not refer to it.
20. The material of the device has no nature latex.
21. The pulse oximeter equipment is calibrated to display functional oxygen saturation.
22. Products contain small parts; Keep the equipment away from children and pets.
23. This equipment’s electrical wire may cause strangulation due to excessive length.
24. This equipment may cause allergy.
25. Do not, under any circumstance, perform any testing or maintenance on the pulse oximeter while it is being used to oximeter a
patient.
26. The waveform we provide is normalized.
Rx only: “Caution: Federal law (USA) restricts this device to sale by or on the order of a licensed practitioner.”
Contraindication
Not yet found.
Inaccurate measurements may be caused by
1.Significant levels of dysfunctional hemoglobin (such as carbonyl - hemoglobin or methemoglobin).
2.Intravascular dyes such as indocyanine green or methylene blue.
3.High ambient light. Shield the sensor area if necessary.
4.Excessive patient movement.
5.High-frequency electrosurgical interference and defibrillators.
6.Venous pulsations.
7.Placement of a sensor on an extremity with a blood pressure cuff, arterial catheter, or intravascular line.
8.The patient has hypotension, severe vasoconstriction, severe anemia, or hypothermia.
9.The patient is in cardiac arrest or is in shock.
10.Fingernail polish or false fingernails.
11.Weak pulse quality (low perfusion).
12.Low hemoglobin.
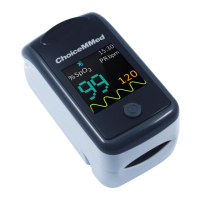
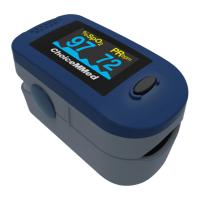
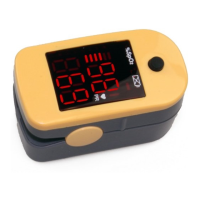
Product Features
1.Simple to operate and convenient to carry.
2.Small volume, light weight and low power consumption.
3.Colorful color OLED displays SpO
2
, PR and waveform.
4.2 display modes.
5.2pcs AAA-size alkaline batteries; battery-low indicator.
6.Smart BLE 4.0 for data transmission.
7.Automatically power on/off.
8.Weak or unstable signal prompt provides more accurate measurements.
9.When no signal or low signal is detected, it will display “finger out” and will power off automatically in 8 seconds.
Intended Use
The Fingertip Pulse Oximeter is a handheld non-invasive device intended for spot-checking of oxygen saturation of arterial
hemoglobin (SpO
2
) and Pulse Rate of adult, adolescent and child patients in hospitals, hospital-type facilities and homecare
environment.
Operation Instructions
1.Install two AAA batteries according to the Battery Installation instructions.
2.Place one of your fingers into the rubber opening of the Pulse Oximeter. The device will turn on
automatically. It goes from the startup screen to the measurement interface.
3.Keep your hands still for the reading. Do not shake your finger during the test. It is recommended that
you do not move your body while taking a reading.
4.Read the data.
5.Press the power button to switch the display mode.
Reading Your Results
Notes:
* If the display shows “?”, it means the signal is unstable, please keep your hands still and retry.
* If the measurement exceeds the limit (SpO
2
<90%, PR<60bpm or PR>100bpm), the color of the measurement becomes orange.
Setting
The default work mode of the device is spot check and the default language is English.
Press and hold the power button to enter the setting interface and then press the power button to choose the item.
Press and hold the power button to enter the submenu. Press the power button to choose the item you need.
Press and hold the power button to confirm and return to the setting interface.
Work mode of Bluetooth: Real-time, Spot check.
1. When the Bluetooth icon stops flashing, it means the Pulse Oximeter sync with the APP successfully.
2. Under the real-time mode: the readings are uploaded to the APP continually. When you plug out your finger, the device will
display “finger out” and will power off automatically in 8 seconds.
Under the spot check mode: the stable readings are uploaded to the APP automatically. The Pulse Oximeter will power off
automatically after the data shows on the screen about 8 seconds.
Language: The Pulse Oximeter supports Chinese and English for users to choose.
Return: Press the power button to choose “Return”, press and hold the power button return to the measurement interface.
Note
Under the setting interface, when on operation is detected, it will return to the measurement interface automatically 8 seconds later.
Battery Installation
1. Push the battery door horizontally along the arrow to open the battery door.
2. Install two AAA batteries into the battery compartment (inside of the battery door). Match the plus (+) and minus (-) signs in
the compartment. If the polarities are not matched, damage may be caused to the oximeter.
3. Close the battery door.
Notes:
Please remove the batteries if the pulse oximeter will not be used for long period of time.
Please replace the battery when the power indicator starts flickering.
Using the Lanyard
1. Thread thinner end of the lanyard through the hanging hole.
2. Thread thicker end of the lanyard through the threaded end before pulling it tightly.
Warnings!
Keep the oximeter away from young children. Small items such as the battery door, battery, and lanyard are choking hazards.
Do not hang the lanyard from the device’s electrical wire.
Please notice that the lanyard which is tied to the oximeter may cause strangulation due to excessive length.
Maintenance and Storage
1. Replace the batteries in a timely manner when low voltage lamp is lighted.
2. Clean surface of the fingertip oximeter before it is used in diagnosis for patients.
3. Remove the batteries if the oximeter is not operated for a long time.
4. It is best to store the product in -25℃~+70℃ and ≤93% humidity.
5. Keep in a dry place. Extreme moisture may affect oximeter lifetime and may cause damage.
6. Dispose of battery properly; follow any applicable local battery disposal laws.
Clean and disinfect the device
It is recommended to clean and disinfect the silicone touching the finger inside of device with a soft cloth dampened with
recommended alcohol of 70% isopropyl or 70% ethanol before and after each use.
Excessive disinfection may cause damage to the device and is therefore not recommended for this device unless otherwise
indicated in your hospital’s servicing schedule.
Do not pour or spray liquids onto the device and do not allow any liquid to enter any openings in the device. Allow the device to