EasyManua.ls Logo

Citizen 8989 - User Manual

Citizen 8989
2 pages
Print Icon
To Next Page IconTo Next Page
Loading...
8989
Abbreviated instruction
To see details of specifications and operations, refer to the instruction manual.
English
Component identification
Button
B
Mode
Indication
Analog
indication 1
Button
M
Button
C
Analog
indication 2
Temperature
sensor
Button
A
Digital
indication
Actual appearance may differ from the illustration.
Using the light
1.
Press the lower left button
C
.
The light turns on.
Changing indication of the analog indication 2
1.
Press and release the upper left button
M
repeatedly to change
the mode to any one other than [CHR].
2.
Press and release the upper right button
B
repeatedly to
change the indication.
” on the digital indication shows the current indication of the
analog indication 2.
Indication
SEC The “second” of the time of the mode [TIME]
ALARM The “hour” of the alarm time set
DU. T The “hour” of the dual time
Setting the time
1.
Press and release the upper left button
M
repeatedly to change
the mode to [TIME].
2.
Press and hold the upper right button
B
for 2
seconds or more.
The “second” on the digital indication starts blinking and
becomes adjustable.
3.
Press the lower right button
A
in accordance with a reliable
time source.
4.
Press and release the upper right button
B
repeatedly to
change the target to be set.
Each time you press the button, the target changes as follows:
Second
Minute Hour
12/24 hour basisAnalog indication 1Analog indication 2
5.
Press and release the lower right button
A
to adjust the target.
Pressing and holding the button changes indication continuously when
adjusting “hour” and “minute.
A” or “P” is displayed to indicate AM or PM in 12-hour basis indication.
When setting the analog indication 1, set it to the same time as that of
the digital indication. Pressing and holding the button changes indication
continuously.
When setting the analog indication 2, set its hand to the 12 oclock position.
Pressing and holding the button changes indication continuously. Pressing
button
B
after setting the analog indication 2 finishes time setting.
6.
Repeat steps 4 and 5 to set other targets.
7.
Press and release the upper left button
M
to finish the
procedure.
Question and Answer IconNeed help?

Do you have a question about the Citizen 8989 and is the answer not in the manual?

Summary

Component Identification

Setting the Time

Time Setting Procedure

Change to TIME mode, adjust seconds, minutes, and hours, and set analog hands.

Using the Light

Changing Analog Indication 2

Analog Indication Switching

Switch modes and cycle through different analog indication displays.

Setting the Calendar

Calendar Adjustment Process

Set month, date, and year, and finalize calendar settings.

Resetting the Watch

Using and Setting Dual Time

Dual Time Operations

Display and adjust the dual time, including setting the hour and minute.

Overview

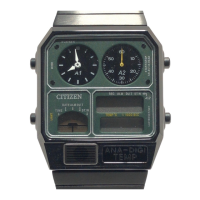
This document provides an abbreviated instruction manual for the Citizen 8989 watch, detailing its components, functions, and various setting procedures.

Function Description

The Citizen 8989 is a multi-function watch featuring both analog and digital indications. It includes capabilities for displaying time, date, alarm, and dual time. The watch is designed for ease of use with multiple buttons controlling different functions and settings.

Important Technical Specifications

While specific technical specifications like water resistance or battery life are not detailed in this abbreviated instruction, the manual highlights several functional specifications:

  • Calendar: The watch's calendar is designed to automatically adjust until December 31, 2099, including leap years, meaning manual date adjustments are rarely needed. The year and month are displayed only during calendar setting.
  • Time Display: The watch supports both 12-hour and 24-hour time formats for its digital indication. The analog indications can be set independently.
  • Dual Time: The dual time function allows users to track time in another location, adjustable in 10-minute increments.
  • Alarm: The watch includes an alarm function, with the alarm time's hour being an adjustable setting.
  • Light: A built-in light function illuminates the display for visibility in low-light conditions.
  • Indications: The watch features two analog indications (Analog indication 1 and Analog indication 2) and a digital indication. The digital display shows seconds, minutes, hours, and can also display alarm, dual time, and calendar information. Mode indication helps identify the current function.
  • Temperature Sensor: The watch is equipped with a temperature sensor, though its specific display or function is not detailed in this excerpt.

Usage Features

The watch's operation is primarily controlled through four buttons: M (upper left), B (upper right), C (lower left), and A (lower right).

  • Mode Navigation: Pressing and releasing button M repeatedly cycles through different modes, such as [TIME], [DATE], [DU. T] (dual time), and [CHR] (chronograph, though not detailed in this excerpt).
  • Setting Procedures:
    • Setting the Time:
      1. Navigate to [TIME] mode using button M.
      2. Press and hold button B for 2 seconds or more to enter setting mode; the "second" on the digital display will blink.
      3. Press button A to synchronize with a reliable time source (this will set the seconds to 00).
      4. Press button B repeatedly to cycle through targets (second, minute, hour, analog indication 2, analog indication 1, 12/24 hour basis).
      5. Press button A to adjust the blinking target. Holding button A allows for continuous adjustment of hours and minutes.
      6. For analog indication 1, set it to match the digital time. For analog indication 2, set its hand to the 12 o'clock position.
      7. "A" or "P" indicates AM/PM in 12-hour format.
      8. Press button M to exit setting mode.
    • Setting the Calendar:
      1. Navigate to [DATE] mode using button M.
      2. Press and hold button B for 2 seconds or more; the "month" on the digital display will blink.
      3. Press button B repeatedly to cycle through targets (month, date, year). The day of the week is set automatically.
      4. Press button A to adjust the blinking target. Holding button A allows for continuous adjustment.
      5. Press button M to exit setting mode.
    • Setting Dual Time:
      1. Navigate to [DU. T] mode using button M. "L" appears next to the second on the digital display.
      2. Press and hold button B for 2 seconds or more; the "hour" on the digital display will blink.
      3. Press button A to adjust the hour. Holding button A allows for continuous adjustment.
      4. Press button B to switch to minute setting; the tens digit of the "minute" will blink.
      5. Press button A to adjust the minute. Holding button A allows for continuous adjustment.
      6. Press button M to exit setting mode.
  • Changing Analog Indication 2:
    1. Navigate to any mode other than [CHR] using button M.
    2. Press button B repeatedly to cycle through the indications for analog indication 2: "SEC" (seconds of the current mode time), "ALARM" (hour of the alarm time set), and "DU. T" (hour of the dual time). The digital display will show "A" next to the second to indicate the current setting of analog indication 2.
  • Using the Light: Pressing button C turns the light on.

Maintenance Features

  • All Reset: To perform an "All Reset," press and release buttons A, B, C, and M simultaneously. This action will execute an alarm sound and reset all settings. After an All Reset, the time, calendar, and other settings must be reconfigured.
  • Calendar Longevity: The calendar is designed to be maintenance-free until December 31, 2099, automatically handling leap years, reducing the need for manual adjustments.

Citizen 8989 Specifications

General IconGeneral
BrandCitizen
Model8989
CategoryWatch
LanguageEnglish

Related product manuals