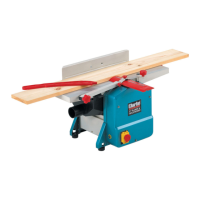
The device is a Clarke Planer/Thicknesser, Model No: CPT800, Part No: 6462135, designed for DIY use. It is a woodworking machine primarily used for planing and thicknessing timber.
Function Description
The Clarke CPT800 Planer/Thicknesser is a dual-function woodworking machine. In its planing mode, it is used to flatten and smooth one face of a workpiece, and to square an edge, preparing timber for further processing or assembly. In its thicknessing mode, it is used to reduce the thickness of a workpiece to a uniform dimension, ensuring parallel faces. The machine features a cutter block with blades that remove material from the timber as it passes over or through the machine. A dust/chip extraction system is integrated to manage wood waste.
Important Technical Specifications
- Model: CPT800
- Voltage: 230V~ @ 50Hz
- Rated Input Power: 1250W
- Input Wattage - Max: 3.7 Amps
- Maximum Depth of Cut: 2 mm
- Max Planing Width: 204 mm
- Min Timber Size - Thicknesser: 5-120 mm
- Fence Angular Movement: 90° - 135°
- Cutter Speed: 8500 rpm
- Dust Extraction Port Diameter: 63 mm
- Weight: 24.5 kg
- Dimensions: 770 x 449 x 405 mm
- Table Dimensions: 737 x 210 mm
- Sound Power Level (measured): 99.7 dBLwA
Usage Features
The CPT800 offers several features for safe and effective operation:
Work Area Safety:
- It is crucial to keep the work area clean and well-lit to prevent accidents.
- The machine should not be operated in explosive atmospheres, or in the presence of flammable liquids, gases, or dust, as power tools can generate sparks.
- Children and bystanders must be kept away during operation to avoid distractions and potential injury.
Electrical Safety:
- The power tool plugs must match the outlet, and no modifications should be made to the plug. Adapter plugs should not be used with earthed power tools.
- Users should avoid body contact with earthed or grounded surfaces to reduce the risk of electric shock.
- The machine should not be exposed to rain or wet conditions.
- The power cable should be handled with care, kept away from heat, oil, sharp edges, or moving parts, and not used for carrying, pulling, or unplugging the tool.
- When operating outdoors, an extension cable suitable for outdoor use must be employed.
- If operating in a damp location is unavoidable, a residual current device (RCD) protected supply should be used.
Personal Safety:
- Operators must remain alert, focused, and use common sense, avoiding operation while tired or under the influence of drugs, alcohol, or medication.
- Personal protective equipment, including eye and ear protection (ear defenders are essential due to the machine's noise), dust masks, and non-skid safety shoes, should always be worn.
- Unintentional starting is prevented by ensuring the switch is in the off position before connecting to the power source.
- Any adjusting key or wrench must be removed before turning on the power tool.
- Operators should maintain proper footing and balance, and avoid overreaching.
- Loose clothing, jewelry, and long hair should be kept away from moving parts.
- If dust extraction and collection facilities are provided, they should be connected and used correctly.
Power Tool Use and Care:
- The machine should not be forced; the correct power tool for the application should be used.
- If the switch fails to turn the power tool on and off, it must be repaired.
- The plug should be disconnected from the power source before making adjustments, changing accessories, or storing the tool.
- Idle power tools should be stored out of reach of children and untrained persons.
- Regular maintenance is necessary to check for misalignment, binding, breakage, or other conditions affecting operation.
Planer Specific Safety Warnings:
- The planer must always be started before the blade contacts the workpiece, allowing the blade to reach full speed to prevent vibration, chatter, or kickback.
- Workpieces must be checked for nails or screws, which should be removed or set well below the intended surface to prevent kickback, blade damage, and personal injury.
- After changing blades, the blade drum should be rotated to ensure blades do not hit the housing and that locking screws are tight.
- Fingers or objects should not be placed into the shavings exhaust port or used to clean shavings while the tool is running.
- The machine must be disconnected from the power source before removing woodchips.
- Dull or damaged blades should not be used, and sharp blades must be handled with care.
- The anti-kickback pawls should be regularly checked for correct operation.
- A piece of wood should never be planed without the Cutter Guard completely covering any exposed cutter blade.
- Blades must always be properly secured in the cutter block before use.
Assembly and Installation:
- The planer should be located in an area with adequate light and a suitable power supply, ensuring extension cables do not create tripping hazards.
- Sufficient room must be available for the workpiece to move through its entire length, and the operator should not stand in line with the wood during planing.
- For stability, it is recommended to bolt the planer to a strong, firm workbench. Mounting hole dimensions are provided for this purpose (350mm x 240mm). Alternatively, it can be mounted on a plywood platform (at least 15mm thick, 550mm long, 380mm wide) and clamped to a workbench.
Attaching the Angle Fence:
- The peg 'A' locates in slotted hole 'B'. The hex. socket head screw with washers secures the fence to the table through slot 'C' into threaded hole 'D'.
- The fence can be set and locked at any angle, with a template or angle gauge recommended for accuracy.
Attaching the Table Adjustment Handle:
- The handle slides onto the shaft to raise or lower the thicknesser table. Turning anticlockwise lowers the table, and clockwise raises it.
Attaching the Dust/Chip Extraction Chute:
- The dust chute MUST ALWAYS be in place for the machine to operate.
- For Planing: The thicknesser table is lowered fully anticlockwise. Two locking keys are pulled out, and the chute is maneuvered into the space beneath the table, ensuring both keys are firmly pushed into the slots.
- For Thicknessing: The Angle Fence is removed. The Cutter Guard is pushed out of its holder to attach the chute to the table, ensuring locking keys are firmly in place.
Operation - Planing:
- Ensure timber is free of nails, screws, and staples.
- Set the depth of cut using the Depth of Cut Setting Knob (anti-clockwise to increase, clockwise to decrease). A maximum depth of cut of 2mm is possible, with an initial cut recommended at no more than 1mm.
- Ensure the fence is at the correct angle (90 degrees for normal planing).
- Slide the cutter guard out of the way, place the workpiece on the table against the fence, with the lead edge a short distance from the cutter. Feed direction is right to left.
- Slide the cutter guard up to lightly touch the workpiece, covering any exposed cutter, and tighten the lock knob.
- Raise the ON/OFF switch cover, press the green 'I' button, and allow the machine to reach full speed.
- Apply firm downwards pressure, keeping the workpiece against the fence, and feed it over the cutter, avoiding feeding too quickly.
- ALWAYS use the push stick to finish a piece.
- To switch OFF, press the red 'O' button and close the cover.
- Remove all shavings and sawdust after use, as accumulation is a fire hazard.
- In an emergency, firmly and quickly hit the switch cover to latch it down and switch off the motor.
- The ON/OFF switch is a "No Volt Release" type, preventing automatic restart after a power failure.
Operation - Thicknessing:
- Lower the thicknessing table to insert the workpiece beneath the cutter blade (blade at 6 o'clock). Work enters from the left and exits from the right.
- Raise the table until there is slight resistance (work just touches the blade).
- Withdraw the workpiece, then wind the table upwards (clockwise) to the desired cutting depth. One turn equals 3mm. Do not exceed 2mm depth of cut to prevent kickback, damage, or motor overheating.
- For rough or warped wood, start with very small depths of cut (1mm).
- Support the workpiece horizontally and feed it into the cutter from the left. Rollers will automatically feed the work past kick-back pawls and into the cutter blade. Ensure it is well supported at the outlet side.
- DO NOT remove chips or shavings from the table until the machine has stopped completely and is isolated from the mains supply.
- Workpieces should be 2-3 inches longer than the finished length as ends tend to be uneven.
- The table should be lubricated with wax frequently for smooth operation.
Reset Button:
- The planer has a thermal overload protector. If the motor stops or fails to start, close the safety switch cover, allow the motor to cool for five minutes, press the reset button, then raise the ON/OFF switch cover and press the green 'I' button.
Maintenance Features
-
General Maintenance: Always disconnect the machine from the mains supply before cleaning or maintenance. Cleanliness is essential; keep the table free of shavings/dust and clean the machine thoroughly after use. Use a low-pressure air supply to blow dust from air vents. Apply a thin film of wax to the table periodically to keep it clean and allow workpieces to slide easily. Do not use solvents to clean the machine as they can damage plastic components.
-
Cutting Blade Removal: Blades require sharpening or replacement. Handle them with care as they are very sharp. Blades must be fitted as a pair and be of the same type, recommended by Clarke International.
- Switch OFF and isolate from mains supply.
- Turn the cutter height adjuster to zero (clockwise).
- Remove the angle fence.
- Raise the Cutter Guard arm.
- Turn the cutter block to reveal the four hex. socket head screws securing the blade, then carefully remove them.
- Turn the cutter block by 180 degrees and repeat.
- ALWAYS hone/replace cutter blades as a pair.
- Replace in reverse order, using a straight edge to ensure cutting edges are level and in line with the table at 12 o'clock. Tighten securing screws carefully to avoid over-tightening or damaging hex. sockets. Professional sharpening with a jig is recommended to ensure blades are balanced and prevent vibration.
-
Periodical Maintenance:
- Wipe infeed and outfeed rollers with a damp cloth to remove contaminants.
- Wax the thicknesser table frequently for smooth and reliable feed.
- Inspect kickback pawls before each operation to ensure they are intact and operate loosely.
- Remove the front cover (3 dome head nuts), and lightly oil all pivots, linkages, and bearings with good quality machine oil. Ensure the enclosure and all components are perfectly clean before replacing the cover.
-
Drive Belt Replacement:
- Remove the front cover (3 nuts).
- Remove the worn or broken drive belt.
- Place the new drive belt over the small belt wheel.
- Position part of the drive belt over the large belt wheel.
- Rotate the large belt wheel by hand clockwise while guiding the belt onto the belt wheel.