English
B
A
Ver.20231106
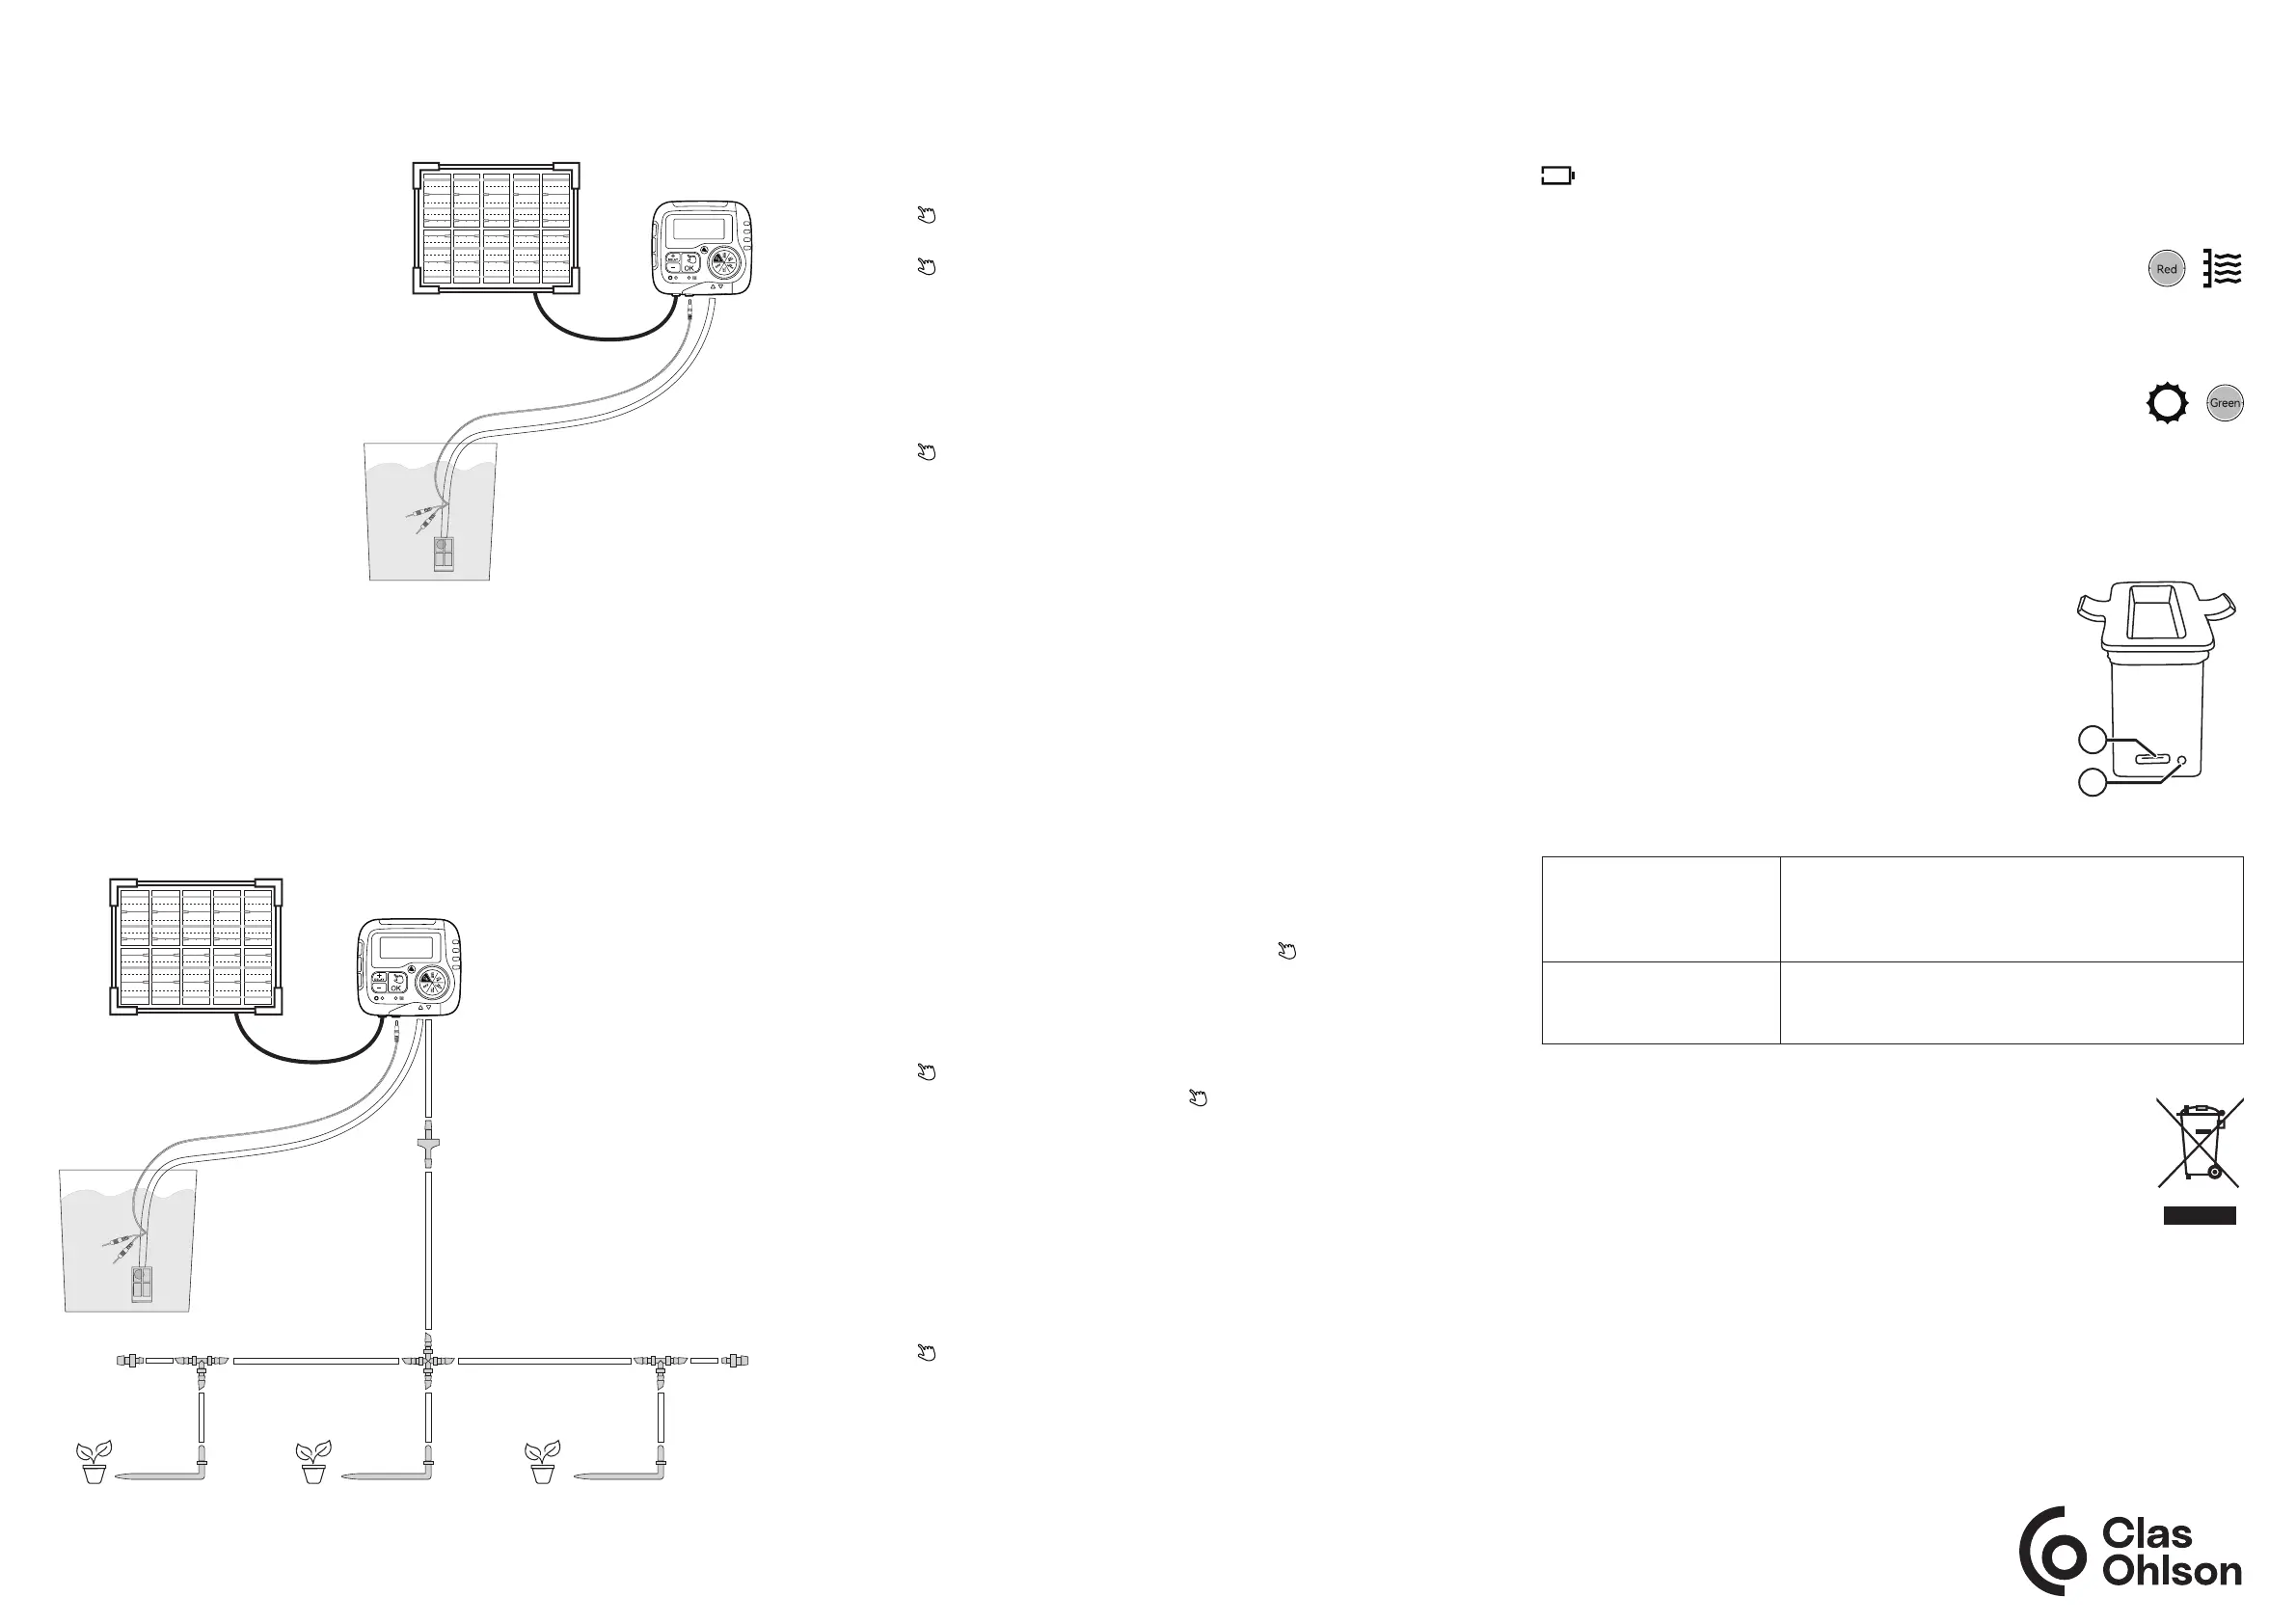
Irrigation system
Connecting the irrigation pump to the water container
Using the system
Setting the clock
1. Turn the selector knob to SET CLOCK.
2. Press [ +/ DELAY ] or [ – ] to toggle between a 12h and 24h clock.
3. Press [ OK/ ] to confirm the setting. The hours will begin flashing.
4. Press [ +/ DELAY ] or [ – ] to select the correct time.
5. Press [ OK/ ] to confirm the setting. The minutes will begin flashing.
6. Press [ +/ DELAY ] or [ – ] to select the correct time.
7. Turn the selector knob to save the setting.
Setting the start time
1. Turn the selector knob to START TIME. The hours will begin flashing.
2. Press [ +/ DELAY ] or [ – ] to select the hour.
3. Press [ OK/ ] to confirm the setting. The minutes will begin flashing.
4. Press [ +/ DELAY ] or [ – ] to select the minutes.
5. Turn the selector knob to save the setting.
Setting the watering period
1. Turn the selector knob to HOW LONG. 00 will begin flashing.
2. Press [ +/ DELAY ] or [ – ] to select the desired time (00, 15 sec, 30 sec,
45 sec, 1–30 min).
3. Turn the selector knob to save the setting.
Setting the irrigation frequency
1. Turn the selector knob to HOW OFTEN. 01 will begin flashing.
2. Press [ +/ DELAY ] or [ – ] to select how often to water (every day = 1,
every two days = 2, every three days = 3, every four days = 4, every five days = 5,
every six days = 6, every seven days = 7, every 12 hours = twice daily)
3. Turn the selector knob to ON to activate the program.
Manual control
The pump has a manual setting that you can use to bypass the program occasionally.
1. With the selector knob set to ON, press and hold [ OK/ ] for three seconds.
01 will begin flashing.
2. Press [ +/ DELAY ] or [ – ] to select the desired amount of time you want to bypass
the program for (1–30 min, 15 sec, 30 sec, 45 sec). Note: If you do not press a
button within 3 seconds, settings mode will end.
3. Press [ OK/ ] to start manual control.
4. To end manual control, press and hold [ OK/ ] for three seconds or
turn the selector knob to any position.
Delaying the program start
The pump has a setting that you can use to delay the program start.
1. With the selector knob set to ON, press and hold [ +/DELAY ] for three seconds.
00 will begin flashing.
2. Press [ +/ DELAY ] or [ – ] to choose whether you want to delay the start by
24, 48 or 72 hours. Note: If you do not press a button within 5 seconds,
settings mode will end.
3. Press [ OK/ ] to confirm.
4. To end the delay, follow the steps above and select 00 hours.
1. Cut a piece of hose of a suitable
length (f) to connect the pump
and the water container.
2. Fit the filter (i) onto the end of
the hose.
3. Fasten the water level sensor
around the hose immediately
above the filter with a cable tie (k).
4. Put the hose with the filter and
sensor as far down as possible
into the water container without
the hose touching the bottom.
Note: The filter and water
sensor should be as near to
vertical as possible in the water
container.
Connecting the irrigation pump to the hose system
1. Measure and cut a piece of hose of a suitable length to reach the first junction.
2. Cut around one-third of the length of the hose off and fit the non-return valve (l)
between the two pieces with the shorter piece closest to the pump. Note: Make
sure that the filter is fitted in the right hole. The flat part must be facing towards
the pump. See the figure.
3. Assemble your hose system by cutting pieces of hose to the appropriate length
and connecting them using the various couplings. See the figure for examples.
4. When you are happy with the system, connect the hose to the pump.
Other features
Low battery warning
If the battery does not have enough charge, the pump will not start.
will flash on the display.
Water level warning
If the water level in the container gets too low, the water level
indicator light (8) will be red.
Solar panel charging
When the pump is being charged by a solar panel, the solar panel
charging indicator light (4) will be green.
Responsible disposal
This symbol indicates that the product should not be disposed of
with general household waste. This applies throughout the entire EU.
To prevent any harm to the environment or health hazards caused by
incorrect waste disposal, the product must be handed in for recycling
so that the materials can be disposed of in a responsible way.
To recycle the product, take it to your local recycling facility or contact
the retailer. They will ensure that the product is disposed of in a way
that does not harm the environment.
Charging
Make sure that the solar cell is exposed to direct sunlight for efficient charging.
If there is not enough sunlight, the battery can be charged using the USB
charging cable provided.
1. Remove the battery from the pump and connect
the USB-C cable to the USB-C port (A) on the battery.
2. Connect the USB cable to a charger (sold separately).
3. The indicator light (B) is red when the battery is
charging and blue when the battery is fully charged.
Troubleshooting guide
The irrigation system is
not working.
• Double-check that the battery is charged. If it is
not charged, see the Charging section.
• Double-check that the system is not clogged with
dirt. Clean it if necessary.
Condensation in
the display in the
morning/evening.
This is the result of changes in temperature and will
disappear of its own accord.
 Loading...