EasyManua.ls Logo

ClearClick Video 2 Digital - User Manual

ClearClick Video 2 Digital
3 pages
Print Icon
To Next Page IconTo Next Page
Loading...
1
ClearClick Video 2 Digital Converter
User Guide
Notice: Extra instructions and other details are available in the manual provided with
the device.
Function of Buttons
Power button: Used to turn the device on and off
Menu button: Used to access and back out of the Menu screen.
Note: The menu screen can only be accessed while in Recording or Picture
mode.
Mode button: Used to change between Recording, Picture, and Playback
modes.
Record/Stop button: Used to start and stop recording, as well as take pictures
in Picture mode.
OK button: Used to select menu items, as well as start and stop playback of
recordings in Playback mode.
Up and Down arrow buttons: Used to navigate up and down in the Menu
screen, as well as adjust volume up and down.
Left and Right arrow buttons: Used to navigate left and right, as well as fast
forward and rewind in Playback mode.
Getting Started
1. Power the Device: Use the provided USB cable and power adapter to plug the
ClearClick into a power outlet.
Note: The device should automatically turn on once it is connected to power. If it
does not, press and hold the Power button for several seconds to turn it on.
Question and Answer IconNeed help?

Do you have a question about the ClearClick Video 2 Digital and is the answer not in the manual?

Summary

ClearClick Video 2 Digital Converter User Guide

Function of Buttons

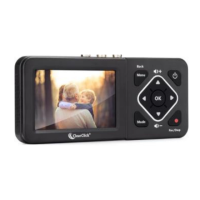
Details the operational buttons of the ClearClick device, including Power, Menu, Mode, Record/Stop, OK, and arrow buttons.

Power the Device

Instructions for connecting the ClearClick to a power outlet using the provided USB cable and adapter.

Getting Started and Setup

Hook Up a Video Source

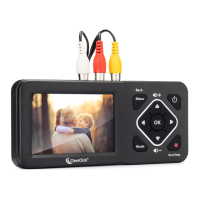
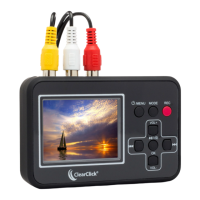
Connect the ClearClick to a video source using RCA/AV or S-Video cables.

Change Video Source

Guide on selecting the video input source through the device's menu system.

Plug in Storage Device

Instructions for inserting a USB flash drive or SD card (up to 128 GB) into the ClearClick.

Time Watermark Feature

Details on enabling or disabling the time watermark function for recordings.

Setting Date and Time

Procedure for setting the device's date and time, necessary for the Time Watermark feature.

Recording Mode

Information that the ClearClick defaults to recording mode upon initial power-on.

Device Modes and Operations

Recording Mode Operation

Instructions for starting, pausing, resuming, and stopping recordings on the ClearClick.

Picture Mode Operation

How to switch to Picture mode and capture still images from a video source.

Playback Mode Operation

Guide to viewing recorded files and pictures, including navigation, playback controls, and volume adjustment.

ClearClick Video 2 Digital Specifications

General IconGeneral
BrandClearClick
ModelVideo 2 Digital
CategoryMedia Converter
LanguageEnglish

Related product manuals