2
3
Installation
Preparation
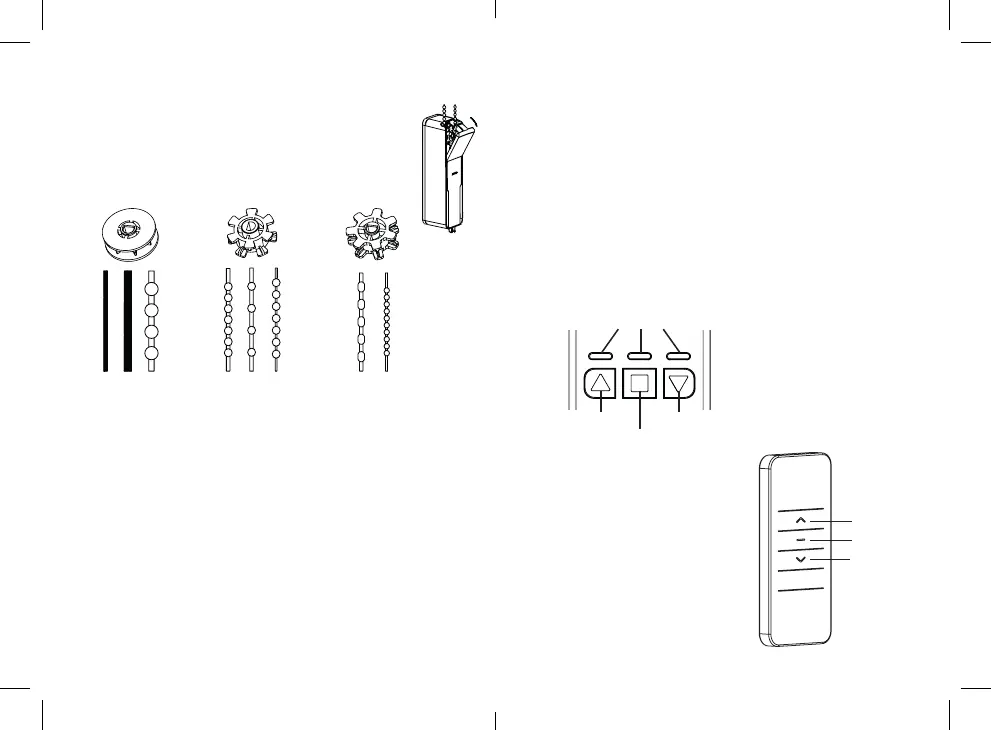
1. Open the lid on the back of the motor to expose
the gear holder.
2. Choose the suitable gear for the type of pull cord or chain
your blind has. Place the pull cord or chain on the gear.
3. Attach the gear on the gear holder in the motor and close the lid.
4. Look for a suitable mounting spot for the unit. Make sure you have a
wall outlet nearby and that the pull cord or chain is mounted straight.
Keep a suitable tension in the cord or chain. It must not be too loose,
but still have some flexion.
4. Mount the motor bracket. It can be mounted with either screws
or adhesive tape:
Mounting with screws
Place the pull cord or chain on the mounting template marked with L and R.
Place the template at the suitable mounting spot. If you are mounting the
motor on the right-hand side of the window, mark the holes marked R on
the template. If you are mounting the motor on the left-hand side, mark the
holes marked with L.
EN
EN
For pull cords with
diameter 2-4 mm and
beaded chains 6 mm.
For beaded chains
4x6 mm, 4.5x12 mm
and metal chains.
For beaded chains
with diameter
3.2 mm.
Up button
Indicators
Down button
Stop button
Up button
Stop button
Down button
To be able to use the remote control,
you must pair the motor with the remote.
1. Press and hold the Stop button on
the main unit until the Stop button
indicator flashes red.
2. Press the Up button on the
remote control.
3. The pairing is successful when the
Up and Down button indicators are
flashing.
Remove the template and align the bracket with the markings. Use the plugs
and screws to mount the bracket. Place the pull cord or chain on the gear in
the motor again and slide the motor on the mounted bracket.
Mounting with adhesive tape
Attach the adhesive tape on the back of the bracket. For stronger hold, let
it stick on the bracket ideally for 12 hours before mounting the bracket and
the motor.
Slide the motor on the bracket. Remove the protective cover on the
adhesive tape and attach the unit at the suitable spot.
5. When the mounting is finished, connect the power adapter to the
power port on the bottom of the motor and to a wall outlet.
Control panel
Remote control
 Loading...