Do you have a question about the CleverMade TAMARACK and is the answer not in the manual?
Lay Seat (A) flat, noting the CleverMade logo. Loosen nuts on the connecting rod.
Place Thin Slats (D) into Seat (A) gaps, aligning top holes with the seat.
Thread Endcap Screw (F) into Connection Rod (E), then slide on Thick Slat (C).
Thread Connection Rod (E) with Thick Slat (C) through Seat (A) and Thin Slats (D).
Slide last Thick Slat (C) onto the rod and hand-tighten Endcap Screw (F).
Fan out Back (B), ensuring Thick Slats (C) are on the outside. Loosen nuts.
Hand tighten Endcap Screw (F) to Connection Rod (E) for the back section.
Slide Connection Rod (E) through the outer Thick Slat (C) and Back (B) planks.
Hand tighten Endcap Screw (F) to secure the connection rods.
Tighten all Endcap Screws (F) with Allen Wrenches (G) for secure assembly.
Tighten hex bolts and insert Plugs (H) to cover exposed holes on Back (B) and Seat (A).
Sit back and enjoy your newly assembled Tamarack Chair.
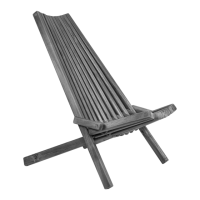
The CleverMade Tamarack Chair is a portable, foldable outdoor chair designed for relaxation and ease of assembly. This manual provides detailed instructions for its setup, highlighting the components and steps required to build the chair.
The Tamarack Chair serves as a comfortable seating solution for outdoor environments. Its design suggests a reclined posture, ideal for lounging. The chair is constructed from multiple wooden slats, forming a seat and a backrest, supported by a sturdy wooden frame. The assembly process involves connecting these slats and frame components using rods, screws, and wrenches, all provided with the product. The chair's design emphasizes portability and straightforward assembly, making it suitable for various outdoor activities such as camping, beach trips, or backyard relaxation.
While specific dimensions and weight capacity are not explicitly stated in the provided pages, the components list gives an indication of the chair's construction:
The Tamarack Chair is designed for user-friendly assembly and comfortable use.
The manual provides implicit guidance on maintenance through its assembly instructions and warnings.
In summary, the CleverMade Tamarack Chair is a thoughtfully designed outdoor seating solution, prioritizing ease of assembly, secure construction, and a comfortable user experience, with implicit considerations for maintenance through its assembly guidelines.
| Brand | CleverMade |
|---|---|
| Model | TAMARACK |
| Category | Indoor Furnishing |
| Language | English |