23
Starting up the system
3.1.1 Refrigerant charge
The unit is factory pre-charged with a sufficient quantity
of refrigerant for pipe length up to 5 metres.
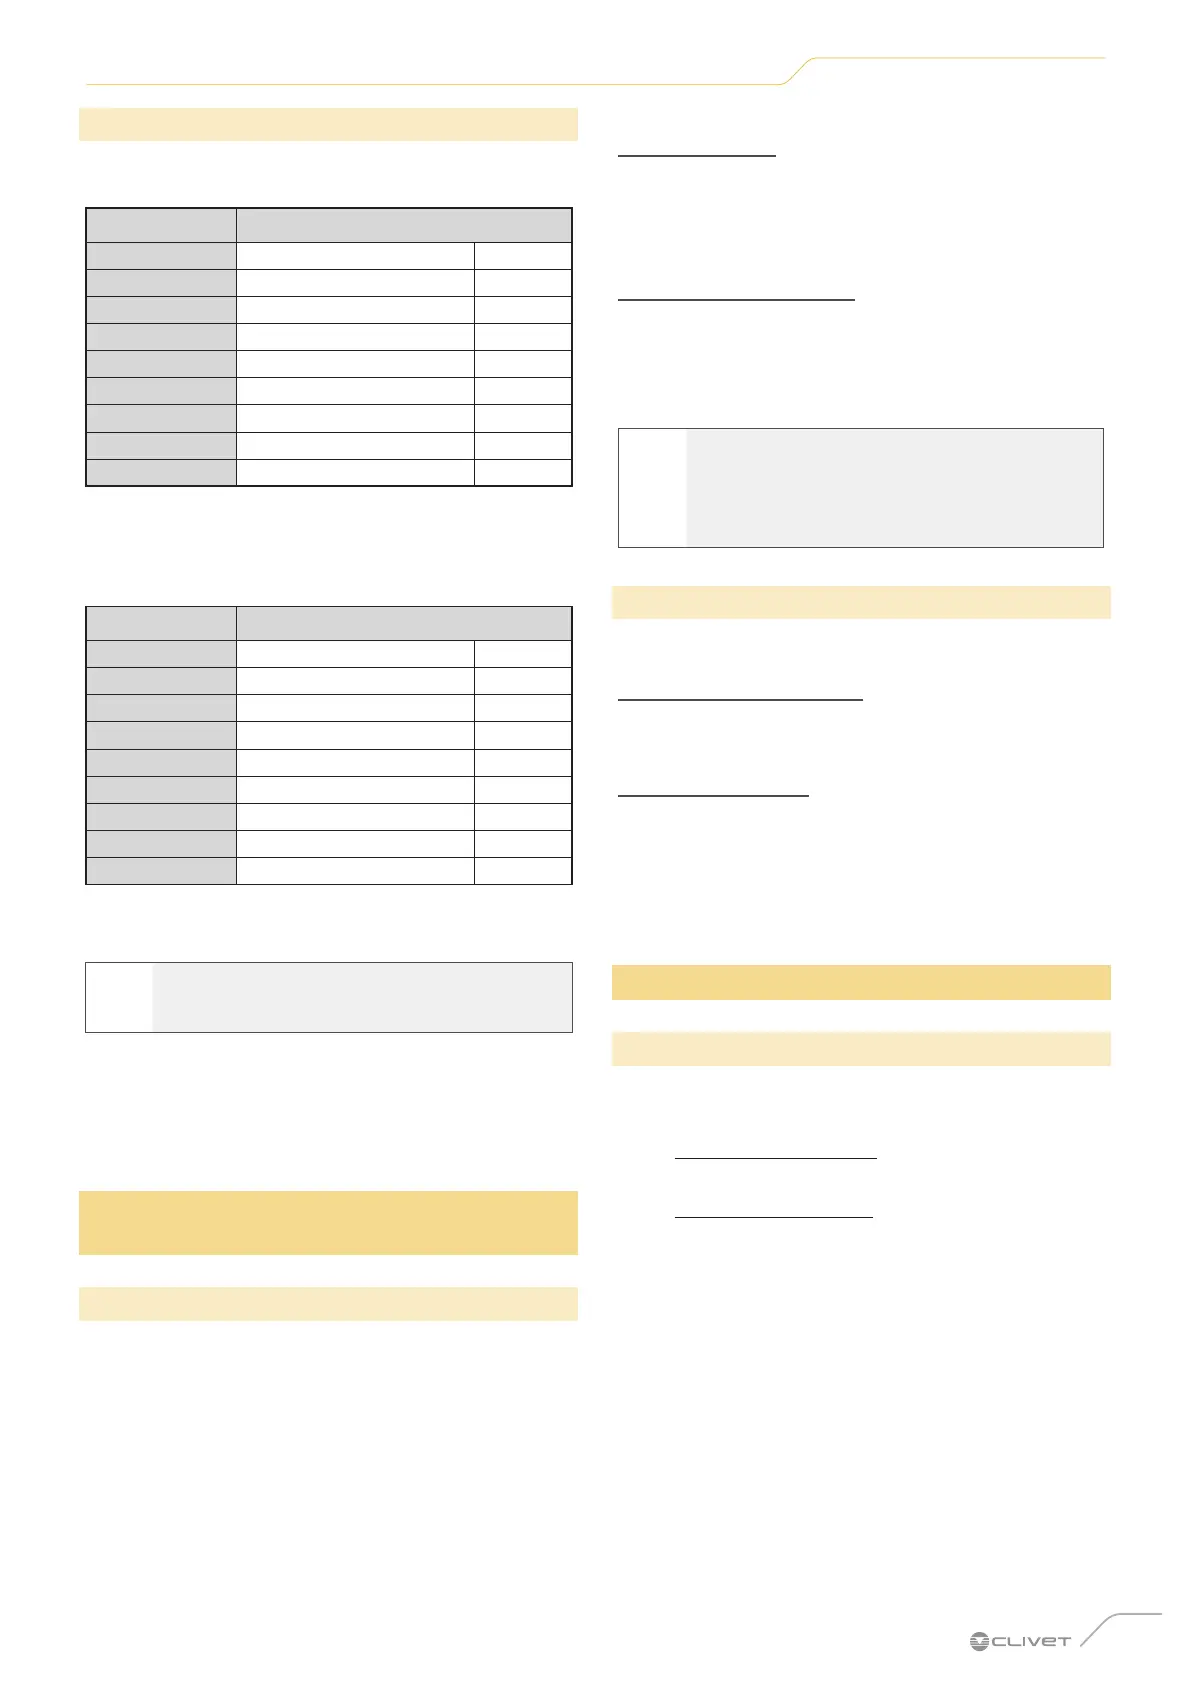
Outdoor unit Refrigerant pre-charge
35M 0.87 kg
53M 1.15 kg
70M 1.15 kg
88M 2.0 kg
105M 2.4 kg
105T 2.4 kg
120M 2.8 kg
140T 2.8 kg
160T 2.95 kg
If the length of the pipes is longer than 5 metres, an
additional charge of refrigerant is required.
For each additional metre, the following quantity of
refrigerant must be added:
Outdoor unit Additional charge
35M 12 g/m
53M 12 g/m
70M 24 g/m
88M 24 g/m
105M 24 g/m
105T 24 g/m
120M 24 g/m
140T 24 g/m
160T 24 g/m
The refrigerant must be charged through the low pressure
valve of the outdoor unit.
d
IT IS PROHIBITED TO
mix different types of refrigerant
FULL REFRIGERANT RECHARGE
If a full charge of refrigerant is required (e.g. after moving/
replacing the unit or after a leak), the total refrigerant
charge will be the sum of the factory refrigerant pre-charge
+ the additional charge for pipes longer than 5 metres.
3.2 Electrical dispersion and gas leakage
control
3.2.1 Electrical safety controls
After installation, check that:
– all electrical cables are installed according to
national and local codes and according to the
instructions in the Installation Manual.
– the earth wires are connected properly.
– the system’s electrical voltage is correct for the air
conditioner.
BEFORE THE OPERATING TEST
Checking earthing
Measure the earthing resistance with visual detection
and a specific tester. The earthing resistance must be
less than 0.1Ω.
DURING THE OPERATING TEST
Electrical dispersion control
During the operating test, use an electrode and multimeter
to conduct a complete electrical leakage test.
If an electrical leakage is detected, turn the unit off
immediately and consult a qualified electrician to identify
and resolve the cause of the problem.
f
ATTENTION ELECTRIC DANGER
All electrical connections must be done by a
licensed electrician according to the provisions
of national and local electrical codes.
3.2.2 Checking for gas leaks
There are two different methods of checking gas leaks.
Method with soap and water
Using a soft brush, apply soapy water or liquid detergent to
all pipe joints of the indoor and outdoor units. The bubble
formation will indicate a leak.
Leak detector method
If using a leak detector, follow the instructions in the user
manual of the device.
AFTER CHECKING FOR GAS LEAKS
After checking that the pipe joints are NOT leaking,
re-apply the valve assembly cover to the outdoor unit.
3.3 Operating test
3.3.1 Preliminary checks
The operating test shall be carried out only after the
following procedures have been completed:
– Electrical safety checks - Check that the electrical
system is safe and functioning properly
– Check for gas leaks - Check all joints with
countersunk nuts and check the system for leaks
– Check that the valves on the gas and liquid side
(high and low pressure) are fully open
Also check that:
– there are no obstacles near the unit’s inlet/outlet
that can limit performance or cause the product to
malfunction.
– the drain system is not blocked and the water
flows into a safe place.
– the heat insulation is installed properly.
– the length of the pipes and the amount of
refrigerant added have been recorded.
 Loading...