CA Series Installation & User Guide v1.0
10
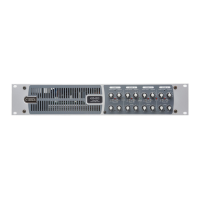
Rear Panel DescriptionRear Panel Description
12
412
1110
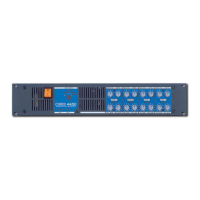
285 7 6 931
1. INPUTS CH 1 ... CH n – one 3-pin, 3.5 mm-pitch screw-
terminal connector per amplier channel. The inputs are
balanced. Connect the audio sources here.
2. INPUT ROUTING – a 2-, 4-, 6- or 8-way DIP switch
depending on model; exception is Model CA2250 which
uses SW4 (CH2 INPUT ROUTING) of the single 8-pole
DIP switch. The factory default setting is with all switch
sections up: in this state each amplier channel will be fed
by the same-numbered input connector. See page 13
for full description of function. Note that section SW1 on
Models CA2500/4250/6160/8125 has a different purpose.
3. LEVEL – one recessed preset-type control per channel:
adjusts the output level of the channel.
4. SPEAKER OUTPUTS – one 2-pin, 5 mm-pitch screw-
terminal connector per amplier channel. Connect the
feeds to the loudspeaker systems here. Note that the
same connectors are used for both low impedance and
high impedance (70/100 V-line) operation.
5. 65Hz FILTER – a 2-, 4-, 6- or 8-way DIP switch
depending on model; exception is Model CA2250 which
use SW1 and SW2 (CH1/CH2 65Hz HPF) of the single
8-pole DIP switch. The factory default setting is with all
switches down and lters active. The lter frequency is
65 Hz: frequencies below this will be attenuated.
6. SPEAKER LOAD: HIGH Z/LOW Z - a 2-, 4-, 6- or 8-way
DIP switch depending on model; exception is Model
CA2250 which use SW7 and SW8 (CH1/2 Hi-Z/Lo-Z)
of the single 8-pole DIP switch. In the HIGH Z position
(up), the channel’s output stage is congured for driving
70/100 V-line systems. In the LOW Z position (down),
the channels output stage is congured to drive low
impedance speakers (4 or 8 ohms).
7. SPEAKER LOAD: 4Ω/70V / 8Ω/100V – a 2-, 4-, 6- or
8-way DIP switch depending on model; exception is
Model CA2250 which uses SW5 and SW6 (CH1/CH2
4Ω/70v or 8Ω/100V) of the single 8-pole DIP switch. The
function of these switches depend on the setting of the
HIGH Z/LOW Z switch [6]. In high impedance mode, the
switches congure the channel’s output stage for either
70 V-line (up) or 100 V-line (down) operation. In low
impedance mode, the switches congure the channel’s
output stage for either a minimum load of four ohms (up)
or a minimum load of eight ohms (down).
8. AUTO POWER DOWN ON/OFF - set this switch to ON
(down) to enable the amplier’s Automatic Power Down
(APD) function. When enabled, channels will mute after
15 minutes if no input signal is detected; if no signal is
detected for 25 minutes, the channels will enter Standby
Mode. Note that the APD ON/OFF switch uses the rst
pole of the INPUT ROUTING DIP switch bank on Models
CA2500, CA4250, CA6160 and CA8125; on Model CA2250 it
uses SW3 of the single 8-pole DIP switch (APD ON/OFF).
9. REMOTE POWER DOWN – a 2-pin, 5 mm-pitch screw-
terminal connector allowing remote control of the
amplier’s Automatic Power Down (APD) function. A
contact closure at this connector will force APD, placing
the amplier in Standby Mode, resulting in low power
consumption. Note that the REMOTE POWER DOWN
input is always operative, i.e., regardless of the setting
of the AUTO POWER DOWN switch
8
.
10. Expansion bay – for retrotting an optional Dante®
input card, Part Nos.: CDI-CA2 (2 channels),
CDI-CA4 (4 channels) or CDI-CA8 (8 channels).
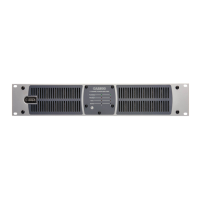
11. AC input – standard IEC receptacle. Use the AC power
cable supplied with the amplier.
12. Ventilation exhausts - these should always be
unobstructed when the amplier is in use.
12
1110
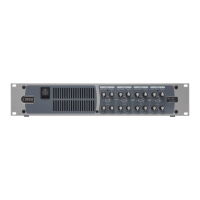
31 12 945 7 68 2
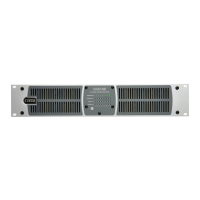
Model CA8125 illustrated: Models CA6160, CA4250 and CA2500 differ only in the number of channels and DIP switch sizes
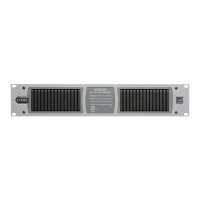
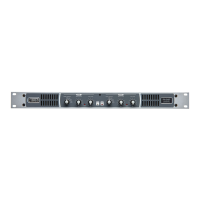
Model CA2250