9 / 26
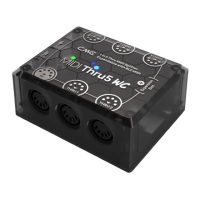
2. Using a 5-pin MIDI cable, connect the MIDI OUT or MIDI
THRU of the MIDI device to the MIDI IN socket of the MIDI
Thru5 WC. Then connect the MIDI THRU (1-5) sockets of
the MIDI Thru5 WC to the MIDI IN of the MIDI device.
3. At this point, the MIDI messages received by the MIDI
Thru5 WC from the MIDI IN port will be fully forwarded to
the MIDI devices connected to the THRU 1-5 ports.
Note: MIDI Thru5 WC has no power switch, just power on to start
working.
⚫ Daisy-chain multiple MIDI Thru5 WCs
In practice, if you need more MIDI Thru ports, you can easily
daisy chain multiple MIDI Thru5 WCs by connecting the MIDI Thru
port of one MIDI Thru5 WC to the MIDI IN port of the next using a
standard 5-pin MIDI cable.
Note: Each MIDI Thru5 WC must be powered separately (use of USB
Hub possible).
EXPANDED BLUETOOTH MIDI
MIDI Thru5 WC can be equipped with CME's WIDI Core module
to add bi-directional Bluetooth MIDI functionality over 16 MIDI
channels.
⚫ Install WIDI Core to MIDI Thru5 WC
1. Remove all external connections from the MIDI Thru5 WC.
 Loading...