6/38
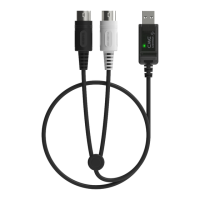
- Connect the plug-and-play USB MIDI device to the USB-A port via a
USB cable or USB hub (please purchase the cable according to the
device specifications). When the connected USB MIDI device is
powered on, the H4MIDI WC will automatically identify the device
name and the corresponding port, and automatically route the
identified port to the 5-pins DIN MIDI ports 1 and 2 and the USB-C
port. At this time, the connected USB MIDI device can perform MIDI
transmission with other connected MIDI devices.
Note 1: If H4MIDI WC cannot recognize the connected device, it may be a
compatibility issue. Please contact support@cme-pro.com to get technical support.
Note 2: If you need to change the routing configuration between connected
MIDI devices, connect your computer to the USB-C port of the H4MIDI WC and
reconfigure using the free HxMIDI Tools software. The new configuration will be
automatically stored in the interface.
- When the USB-A port receives MIDI messages, the USB-A INPUT
green indicator will flash accordingly.
- When the USB-A port sends MIDI messages, the USB-A OUTPUT
green indicator will flash accordingly.
Presets Button
- The H4MIDI WC comes with 4 user presets. Each time the button is
pressed in the power on state, the interface will switch to the next
preset in a cyclic order. All LEDs flash the same number of times
corresponding to the preset number to indicate the currently selected
preset. For example, if switched to Preset 2, the LED flashes twice.
- Also when the power is on, press and hold the button for more than 5
seconds and then release it, and H4MIDI WC will be reset to its factory
 Loading...