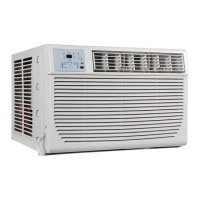
This document is an installation and operation instruction manual for Coast Air Room Air Conditioners, specifically models CEG-81A and CEG-123A. It provides comprehensive guidance on safe handling, installation, operation, and maintenance of the units.
Function Description:
The Coast Air Room Air Conditioner is designed to provide cooling and, for some models, heating, as well as dehumidification and air circulation for indoor spaces. It aims to maintain a comfortable room temperature and improve air quality. The unit can be controlled either directly via its control panel or remotely using a supplied remote control.
Important Safety Instructions:
The manual emphasizes critical safety precautions to prevent injury, property damage, fire, and electric shock. It categorizes warnings into "WARNING" (possibility of death or serious injury) and "CAUTION" (possibility of injury or property damage).
Key safety points include:
- Electrical Safety:
- Plug in the power plug properly and do not damage or use an unspecified power cord.
- Always install a circuit breaker and a dedicated power circuit.
- Ensure effective grounding to prevent electric shock.
- Do not operate or stop the unit by inserting or pulling out the power plug.
- Unplug the unit if strange sounds, smell, or smoke occur.
- Do not modify power cord length or share the outlet with other appliances.
- If the power cord is damaged, it must be replaced by the manufacturer or an authorized service center.
- Do not use an extension cord or adapter plug.
- The power supply cord contains a current detection device to reduce fire risk. Users are instructed to test this device using the "TEST" and "RESET" buttons on the plug head. If the device fails to reset, the power supply must be replaced.
- The appliance must be installed in accordance with national wiring regulations.
- Do not clean the unit with water when power is on.
- Operational Safety:
- Do not operate with wet hands or in a damp environment.
- Do not allow water to run into electrical parts.
- Do not use the socket if it is loose or damaged.
- Keep firearms away from the unit.
- Do not use the power cord close to heating appliances or near flammable gas/combustibles.
- Ventilate the room if there is a gas leakage from another appliance before operating the air conditioner.
- Do not open or disassemble/modify the unit during operation.
- Do not direct airflow at room occupants.
- Do not put pets or house plants in direct airflow.
- Do not use the air conditioner for preserving precision devices, food, pets, plants, or art objects.
- Ensure the installation bracket of the outdoor appliance is not damaged.
- Turn off the main power switch when not using the unit for a long time.
- Do not drink water drained from the air conditioner as it contains contaminants.
- Handling and Installation Safety:
- Air conditioners are heavy; two or more people are needed for moving and installation.
- Wear protective gloves to avoid cuts from sharp metal fins.
- Carefully inspect the installation location to ensure it supports the unit's weight.
- Use caution when unpacking and installing due to sharp edges.
- Children should be supervised to ensure they do not play with the appliance.
- The appliance is not intended for use by persons with reduced physical, sensory, or mental capabilities or lack of experience and knowledge unless supervised or instructed.
- Contact an authorized service technician for repair/maintenance and an authorized installer for installation.
Important Technical Specifications:
- Window Opening Measurements for Installation:
- Width: 26-7/8" to 36" (68.3 cm to 91.4 cm) minimum.
- Height: 16-1/2" (41.9 cm) minimum.
- Through-the-Wall Cabinet Installation Dimensions (Wood Frame):
- Width: 22-5/8" (57.5 cm) plus twice the thickness of wood used for the frame.
- Height: 16" (40.6 cm) plus twice the thickness of wood used for the frame.
- Depth: 2-1/2" (6.4 cm) minimum to 6-1/2" (16.5 cm) maximum.
- Operating Temperature Conditions:
- Cooling operation: Indoor temp: 62-90°F (17-32°C).
- Heating operation: Outdoor temp: 23-76°F (-5-24°C), Indoor temp: 32-80°F (0-27°C).
- Performance may be reduced outside these ranges.
- Weight: Air conditioner weighs between 70 and 85 lbs (32 to 40 kgs).
- Power Cord: Contains a current detection device.
- Electrical Rating: Stated on the serial plate.
Usage Features:
- Control Panel: Electronic control with buttons for various functions.
- Remote Control: Allows for remote operation and includes a "Follow Me" feature.
- ON/OFF Button: To turn the unit on or off.
- Temperature Setting: UP/DOWN buttons to change the desired temperature (62°F/17°C to 86°F/30°C).
- Operating Modes:
- Auto Mode: Automatically selects cooling, heating (for models with heating), or fan-only operation based on selected temperature and room temperature. Fan speed is automatically controlled.
- Cool Mode: Provides cooling.
- Dry Mode: Operates as a dehumidifier; some cooling will occur in a closed space. Fan speed is automatically set to Low.
- Heat Mode (Electric Heating Models): Provides heating. Fan speed may not be adjustable in this mode.
- Fan Only Mode: Circulates room air without cooling/heating. Allows selection of fan speed. The display shows actual room temperature.
- Fan Speed Adjustment: Button to select Auto, Low, Med, or High fan speeds (not adjustable in Auto mode or Dry mode, and possibly not in Heat mode).
- Sleep Feature: Increases (cooling) or decreases (heating) the set temperature by 2°F/1°C after 30 minutes, and again after another 30 minutes. This new temperature is maintained for 6 hours before returning to the original setting.
- Energy Saver Feature: Available in Cool, Dry, and Auto (Auto-Cooling and Auto-Fan) modes. The fan runs for 3 minutes after the compressor shuts off, then cycles on for 2 minutes at 10-minute intervals until the room temperature rises above the set temperature.
- Timer (Auto Start/Stop): Allows setting a time for the unit to automatically turn on or off. Adjustable in 0.5-hour increments up to 10 hours, then 1-hour increments up to 24 hours.
- Follow Me Feature (Remote Control Only): The remote control acts as a remote thermostat, sending actual temperature readings to the unit every 3 minutes for precise temperature control at the remote's location.
- Air Directional Louvers: 4-way adjustable louvers to direct airflow (Up/Down and Left/Right).
- Display: Shows set temperature (°C or °F) or room temperature (in Fan only mode) and Auto-timer settings.
- Error Codes:
- "AS": Room temperature sensor error.
- "-": Evaporator temperature sensor error.
- "HS": Electric heating sensor error.
- Troubleshooting steps involve unplugging and re-plugging the unit, or calling for service.
- Power Loss Memory: The unit restarts with previous function settings after an unexpected power loss.
- 3-Minute Time Delay: The Cool circuit has an automatic 3-minute time-delayed start to prevent compressor overheating and circuit breaker tripping. The fan continues to run during this time.
- Temperature Unit Conversion: Press and hold the Left and Right Temp/Timer buttons simultaneously for 3 seconds to switch between Fahrenheit and Celsius.
Maintenance Features:
- Air Filter Cleaning:
- Check at least once a month.
- Check Filter Feature: An LED illuminates after 250 hours of operation as a reminder to clean the filter. Press the Check Filter button to reset the light.
- To clean: Open the front panel, pull out the filter, wash with liquid dishwashing detergent and warm water, rinse thoroughly, gently shake off excess water, and dry completely. Alternatively, vacuum the filter.
- Do not use hot water over 40°C (104°F) or operate the unit without the air filter.
- Cabinet Cleaning:
- Unplug the unit before cleaning.
- Dust with an oil-free cloth or wash with a cloth dampened in warm water and mild liquid dishwashing detergent. Rinse and wipe dry.
- Avoid harsh cleaners, wax, or polish.
- Wring excess water from the cloth before wiping around controls to prevent damage.
- Winter Storage:
- If storing for winter, remove the unit from the window according to installation instructions.
- Cover it with plastic or return it to the original carton.
Installation Instructions:
The manual provides detailed steps for both window and through-the-wall installations.
- Tools Needed: Flat-blade and Phillips screwdrivers, level, tape measure, drill (3/16", 1/8", 3/32" or smaller bits), saw, caulk, 1" (2.5 cm) or thicker lumber.
- Parts Supplied: Includes various screws, top channel, window sash seal, foam seal, window lock bracket, safety lock (for vinyl-clad windows), weather seals, side curtains, remote control, and remote battery.
- Window Installation:
- Remove packaging materials and shipping screws.
- Slide the air conditioner out of the cabinet.
- Attach the top channel and side curtains to the cabinet.
- Attach foam adhesive seal to the bottom of the curtain bottom channel.
- Center the empty cabinet in the window, ensuring the lower rail is behind and against the window sill.
- Attach the cabinet to the window frame using specified screws (different instructions for wooden and vinyl-clad windows).
- Ensure the cabinet is tilted back about 1/4" to 1/2" (3° to 4° downward) to the outside for proper condensate drainage.
- Extend side curtains against the window frame and secure with screws.
- Trim and plug weather seals into gaps.
- Insert window sash seal, window-lock bracket, and secure.
- Insert the air conditioner into the cabinet, attach the front panel, plug into a grounded outlet, and press RESET.
- Through-the-Wall Cabinet Installation:
- Two options: wood, metal, or plastic molding, or plastered wall with no molding.
- Construct a wood frame according to specified dimensions (width, height, depth).
- Cut the opening through the wall, remove insulation, apply wood preservative.
- Insert and secure the frame in the wall opening, ensuring it is square and level.
- Insert the cabinet into the framed wall opening, ensuring it extends 3/4" (19.1 mm) into the room.
- Use a level to check for side-to-side levelness and a slight tilt towards the outside for drainage.
- Reuse insulation to seal openings.
- Attach the cabinet to the frame using wood screws.
- Caulk all outside wall openings.
- Insert the air conditioner into the cabinet, attach the front panel, plug into a grounded outlet, and press RESET.
- Install molding around the room side of the cabinet if needed.
Troubleshooting Tips:
The manual includes a troubleshooting section to help users diagnose common issues before calling for service. This covers problems like:
- Air conditioner not starting (disconnected plug, blown fuse, tripped current device, power off).
- Air from unit not feeling cold enough (room temperature too low, temperature sensor issue, set temperature too low, compressor delay).
- Ice forming on cooling coil (outdoor temperature too low, dirty air filter, thermostat set too cold).
- Air conditioner cooling but room too warm (dirty air filter, set temperature too high, improper louver position, blocked unit front, open doors/windows, unit recently turned on in hot room).
- Air conditioner turning on and off rapidly (dirty air filter, extremely hot outside temperature).
- Noise when unit is cooling (air movement sound, window vibration).
- Water dripping inside (improper installation, unit not tilted).
- Water dripping outside (normal in humid conditions).
- Remote sensing deactivating prematurely (remote out of range, signal obstructed).
- Room too cold (set temperature too low).
- Limited One (1) Year Express Warranty: Covers defects in workmanship and materials for normal use and maintenance for one year from the purchase date.
- Conditions: Unit must be operated according to instructions, not subjected to accident, alteration, improper repair, neglect, misuse, or acts of God. Serial numbers/rating plate must not be altered. Performance must not be impaired by unauthorized products or adjustments. Damage must not result from inadequate wiring, voltage conditions, brown-out, or circuit interruptions. Airflow must not be restricted. Unit must remain in original installation.
- Remedy: Replacement of the defective unit (labor, diagnostic, transportation, refrigerant, filters not covered).
- Limitations: No other express or implied warranties. No warranty of merchantability or suitability for particular purposes. Implied warranties are limited to one year. Not liable for consequential or incidental damages. Rights may vary by state. No warranties for units sold outside continental US and Canada. Not liable for delays due to events beyond control.
- Claim Submission: Notify installer or dealer promptly.
- Registration: Users are encouraged to visit www.coastair-ac.com to register their product. A record of purchase (model number, serial number, date of purchase, installer name, phone number, date installation completed) should be kept.