EasyManua.ls Logo

CODELOCKS CL100 - User Manual

CODELOCKS CL100
2 pages
Print Icon
To Next Page IconTo Next Page
Loading...
DIAGNOSTICS
Use these simple guides to diagnose any issues you
may have with your lock.
For full information on all mechanical and electronic locks in our range visit www.codelocks.com
1
2
3
4
5
6
7
8
On latch locks only. The outside knob and inside handle
retract the latch when turned TOWARDS the door frame.
The spindle is positioned at the wrong angle.
The knob will not turn after entering the original code.
The code does not match the card.
The knob will not turn after entering a newly changed code.
One or more of the code tumblers are the wrong
way around.
The latchbolt does not move smoothly in and out.
The lock is installed incorrectly.
The inside and outside knobs do not return easily to the
centre position after use.
The spindle is too long for the door thickness.
The inside handle does not retract the latch.
The spindle is too short for the door thickness.
The inside lever handle does not return to the upright
position after operating.
The lever return spring is broken.
The latch does not engage and so the door remains
unlocked after use.
The latch is not entering the strike.
Refer to the installation instructions. Remove lock from door and reposition the
spindle as shown in the instructions. On hold open locks ensure that the blue
handing screw on the lever handle plate is in the correct hole.
Remove the lock from the door, turn the lock case upside down and check
that the coloured tumblers correspond with the code on the card.
NB: the ‘C’ tumbler is not coloured - but MUST start every code.
Re-read the code change instruction and check that the square notches
on the tumblers face to the outside edge of the lock with the square edge
on top.
Check that the lock is square on the door and positioned
accurately over the latch. Check that the latch is positioned
horizontally and parallel to the door surfaces.
The spindle must not project more than 30mm (1
3
/
16
”) into the inside handle.
If it does then it will be trapped between the front and back handles and
prevent them moving easily. The spindle must be shortened.
The spindle must project from the inside face of the door by at least 8mm (
5
/
16
”)
so as to engage the handle. The spindle may have been cut too short during
installation. Call the Helpline to obtain a longer spindle.
Replacement spring required.
Your door or frame may have warped since the lock was installed. Check that
the latchbolt is lined up with the strike aperture and adjust the position of the
strike as necessary. Make sure the deadlocking plunger cannot enter the strike
aperture alongside the latch bolt when the door is closed.
CC-CL100/200-v2:1017
www.codelocks.com
CODELOCKS UK
HEADQUARTERS
Tel: +44 (0) 1635 239645
Fax: +44 (0) 1635 239644
sales@codelocks.com
www.codelocks.com
Helpline, service & spares
Freephone: 0800 393 405
CODELOCKS INC US
Tel: +1 714 979 2900
Fax: +1 714 979 2902
sales@codelocks.us
www.codelocks.us
Helpline, service & spares
Toll free: 1.877.codelock
CODELOCKS
(Australia) PTY LTD
Tel: +61 2 9882 1009
Fax: +61 2 9882 6030
sales@codelocks.com.au
www.codelocks.com.au
Helpline, service & spares
Toll free: 1800 052 131
Code Change
Instructions
CL1O O
CL2OO
Question and Answer IconNeed help?

Do you have a question about the CODELOCKS CL100 and is the answer not in the manual?

Summary

Lock Diagnostics and Troubleshooting

Incorrect Spindle Angle on Latch Locks

On latch locks, if the outside knob/inside handle turn TOWARDS the door frame, the spindle is at the wrong angle.

Knob Wont Turn After Original Code Entry

The knob fails to turn after entering the correct code; the code does not match the card.

Knob Wont Turn After New Code Entry

Knob fails to turn after a new code entry; tumblers may be incorrectly positioned.

Knobs Do Not Return to Centre

Inside and outside knobs do not return to centre; spindle may be too long for door thickness.

Inside Handle Fails to Retract Latch

The inside handle fails to retract the latch, possibly due to a short spindle.

Spindle Too Short for Door Engagement

The spindle must project at least 8mm (5/16") to engage the handle; it may be cut too short.

Latchbolt Movement or Installation Issues

Latchbolt does not move smoothly; lock may be installed incorrectly or out of square.

Latch Fails to Engage Strike

Latch does not engage; it may not be entering the strike aperture, or the door/frame has shifted.

Code Change Instructions

Removing the Lock

Remove the CL100 or CL200 lock from the door by unscrewing the 2 screws in the back plate.

Resetting and Preparing for Code Change

Press 'C' button to reset, place lock case down on a flat surface.

Accessing and Checking Tumblers

Remove 2 red screws, lift code chamber plate, check springs and tumbler positions.

Repositioning Tumblers for New Code

Hold lock, depress 'C' button, use tweezers to reposition tumblers with square notches facing outwards.

Replacing Code Chamber Plate

Carefully replace the code chamber plate with the 2 red screws.

Verifying New Code and Spindle Insertion

Check new code operation, make a note, and insert spindle with spring on the code side.

Maintenance and Guarantee

Lock Maintenance Guidelines

No lubrication needed. Clean finish with soft cloth; use silicone spray for protection.

Mechanical Lock Guarantee

Codelocks mechanical locks are covered against manufacturing faults, repairable free of charge.

Overview

This document provides a comprehensive guide for the Codelocks CL100 and CL200 mechanical locks, covering their functions, technical specifications, usage, and maintenance.

Function Description:

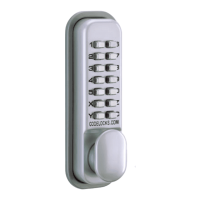
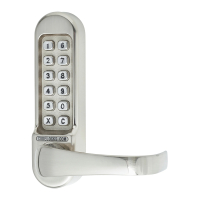
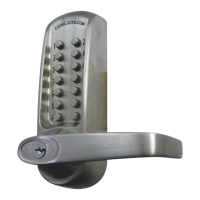
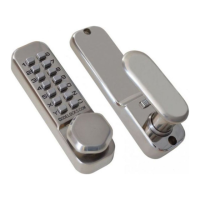
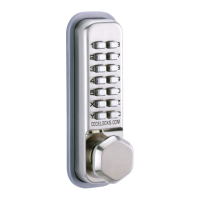
The Codelocks CL100 and CL200 are mechanical push-button locks designed for restricted access. They are suitable for various applications, including doors at home, garages, garden sheds, offices, workshops, and storerooms. These locks operate without the need for electricity, relying purely on a mechanical code entry system. The core function involves entering a specific code using a set of buttons to retract the latch or deadbolt, allowing access. The locks are available in Silver Grey, Polished Brass, and Stainless Steel finishes.

Important Technical Specifications:

The code chamber for both CL100 and CL200 models consists of 13 numbered buttons and a 'C' button. The 'C' button serves two critical functions: it resets the chamber after an incorrect entry and must always be the first digit of any code. Buttons can only be used once within a single code (e.g., "1212" is not possible). Codes can be entered in any order or sequence (e.g., "1234" can be "4321" or "1342"). With 13 buttons, the system offers a total of 8,191 possible codes.

The number of digits in a code can vary:

  • C + 1 digit = 13 codes
  • C + 2 digits = 78 codes
  • C + 3 digits = 286 codes
  • C + 4 digits = 715 codes
  • C + 5 digits = 1,287 codes
  • C + 6 digits = 1,716 codes
  • C + 7 digits = 1,716 codes
  • C + 8 digits = 1,287 codes
  • C + 9 digits = 715 codes
  • C + 10 digits = 286 codes
  • C + 11 digits = 78 codes
  • C + 12 digits = 13 codes
  • C + 13 digits = 1 code

The factory default code is a randomly selected 6-digit code starting with the 'C' button, and this code is not recorded by the factory. While codes can range from 1 to 13 digits, generally, codes are set between 4 and 7 digits, offering 5,434 combinations within this range. Shorter codes are not recommended for security reasons. The lock mechanism includes tumblers (coloured for code, silver for non-code) with square notches that must face outwards with the square tips on top during code changes. The spindle length is crucial for proper operation; it must not project more than 30mm (13/16") into the inside handle and must project at least 8mm (5/16") from the inside face of the door to engage the handle.

Usage Features:

The primary usage feature is the ability to change the access code. This process involves several steps:

  1. Removal: Unscrew the two screws in the back plate to remove the lock from the door.
  2. Reset: Press the 'C' button to reset the chamber and place the lock case with buttons down on a flat surface.
  3. Access Chamber: Remove the two red screws and carefully lift off the code chamber plate, ensuring all 14 springs remain in place.
  4. Identify Tumblers: Observe the coloured code tumblers, which correspond to the existing code. Silver non-code tumblers fill the other positions. The 'C' tumbler is not coloured.
  5. Reposition Tumblers: Hold the lock and depress the 'C' button. While keeping the 'C' button depressed, use tweezers to reposition the tumblers to match the new code. All tumblers' square notches MUST face outwards, with the square tips on top. It is crucial NOT to force the tumblers and NOT to attempt to reposition the 'C' tumbler while the 'C' button is depressed, as this can damage the internal mechanism.
  6. Reassemble: Carefully replace the code chamber plate and secure it with the two red screws.
  7. Test: Check the operation of the new code and make a written note of it before re-installing the lock.
  8. Spindle Installation: Insert the spindle with the spring on the code side. For latchbolt locks, the spindle must engage the latch correctly, with specific orientations for doors hung on the right or left.

The manual also provides a diagnostics guide for common issues:

  • Spindle Position: If the outside knob and inside handle retract the latch when turned towards the door frame, or if the latchbolt does not move smoothly, the spindle may be positioned incorrectly or the lock installed improperly. The solution involves removing the lock and repositioning the spindle as per instructions, ensuring the blue handing screw is in the correct hole for hold-open locks.
  • Code Mismatch: If the knob does not turn after entering the original code, the code does not match the card. If it doesn't turn after entering a newly changed code, one or more code tumblers are wrongly positioned. The solution involves checking that coloured tumblers match the code card and that square notches on tumblers face the outside edge with the square edge on top.
  • Spindle Length: If knobs/handles do not return easily to the center, the spindle may be too long and needs shortening. If the inside handle does not retract the latch, the spindle may be too short and requires a longer replacement.
  • Lever Return Spring: If the inside lever handle does not return to the upright position after operating, the lever return spring is broken and requires replacement.
  • Latch Engagement: If the latch does not engage and the door remains unlocked, the latch is not entering the strike. This may be due to a warped door or frame, requiring adjustment of the strike's position to ensure proper alignment and prevent the deadlocking plunger from entering the strike aperture alongside the latch bolt.

Maintenance Features:

Codelocks CL100 and CL200 require minimal maintenance.

  • No Oiling: The working parts do not require oiling.
  • Cleaning: To maintain the finish, the lock should be cleaned regularly with a soft cloth. A silicone spray or similar product can be used to provide a protective film against grit and grime.
  • Guarantee: Codelocks offers a guarantee on its mechanical locks. If any manufacturing fault develops, customers are advised to call the Codelocks Helpline to arrange for a free repair.

CODELOCKS CL100 Specifications

General IconGeneral
BrandCODELOCKS
ModelCL100
CategoryLocks
LanguageEnglish

Related product manuals