L
Lisa SummersJul 31, 2025
What to do if Comfort Stat CP1717 continues to operate in the off position?
- SSandra NolanJul 31, 2025
Replace the Comfort Stat Thermostat unit.

What to do if Comfort Stat CP1717 continues to operate in the off position?
Replace the Comfort Stat Thermostat unit.
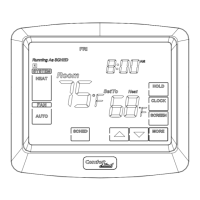
How to fix a Comfort Stat CP1717 Thermostat with no display?
If your Comfort Stat Thermostat shows no display, try checking the battery connections and replacing the batteries. Also, try removing the batteries, waiting about a minute, and then reinserting them.
Why is my Comfort Stat CP1717 Thermostat display dim?
If the entire display of your Comfort Stat Thermostat dims, try replacing the batteries.
| Power Source | Battery |
|---|---|
| Stages | 1 Heat/1 Cool |
| Display | Digital |
| Hold Feature | Yes |
| Battery Life | Up to 1 year |
| Temperature Range | 45°F to 90°F (7°C to 32°C) |
| Compatibility | Single Stage HVAC Systems |
Lists heating and cooling systems compatible with the digital thermostat, excluding multistage heat pumps.
Defines the settable and displayable temperature ranges and auto cutoff points for heat and cool modes.
Explains the 4-minute delay feature to prevent rapid compressor restarts and potential damage.
Details the low battery warning system, replacement procedure, and system shutdown during critical low battery.
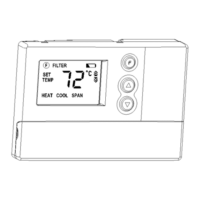
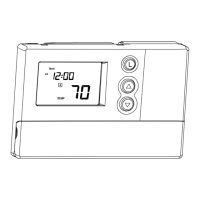
Describes the initial display after startup and how to use the system selector for mode (COOL, OFF, HEAT).
Explains the AUTO and ON modes for the fan, including its behavior with different heating/cooling systems.
Instructions on how to view the current set temperature and adjust it using the up/down keys.
Details the filter change indicator, its 400-hour timer, and how to reset it using the Filter key.
Guide to adjusting the span (cycle differential) to modify system run times for comfort or efficiency.
Describes the display backlighting and its behavior with low battery warnings, including non-operation.
Explains how the thermostat enters Error Mode (E1/E2) and the Auto Cut Off function for temperature extremes.
Details the bimetal switch feature that activates heat around 41°F (5°C) as a backup.
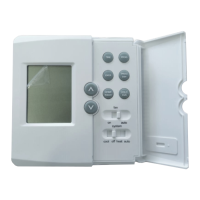
Lists necessary tools and materials for installation and steps for removing the old thermostat.
Instructions on labeling wires according to system type using provided adhesive labels for correct terminal connection.
Steps for positioning the wallplate, drilling holes, installing anchors, and securing the plate to the wall.
Guidance on managing the Rh/Rc jumper wire based on 4-wire vs. 5-wire systems for proper operation.
Procedure for connecting labeled wires to wallplate terminals and physically attaching the thermostat body.
Setting the HG/HE switch for gas/oil (HG) or electric furnace (HE) systems to ensure correct heating operation.
Switching between STANDARD (gas/oil/electric) and HEAT PUMP modes for appropriate system control.
Instructions on how to select between Fahrenheit (F°) and Celsius (C°) temperature display modes.
Solutions for a blank screen or a dim display, primarily involving battery checks and replacements.
Troubleshooting for auto fan not turning on, or heating/cooling not engaging/disengaging properly.
Addresses erratic display behavior, continuous operation in OFF mode, and permanent 'HI', 'LO', or 'Er' readings.