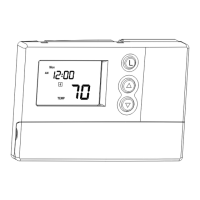
day/time
program
PROGRAMMABLETHERMOSTAT
OwnersManual
Model:CP1819
L
Congratulations!
Your new thermostat will provide years of reliable service. By saving energy, your
thermostatwill payforitselfduring itsfirstseasonofuse.Thanksyoufor buyingour
product!
Please read this manual for complete instructions on installing and operating your
thermostat.Ifyourequirefurtherassistance,pleasefeelfreetocontactus
IMPORTANTINFO RMATION
1.Thisthermostatisdesignedtoworkonthefollowingsystems:
ŸGas–StandingPilot ŸOil–FiredFurnace
ŸGas–ElectronicIgnition ŸSingleStageHeatPumps–
withnoauxiliaryheat
ŸGas–FiredBoilers ŸElectricAirConditioning
ŸGas–MillivoltSystems ŸElectricFurnace
ŸOil–FiredBoilers
This thermostat will NOT control multistage heat pumps or 110/220V baseboard
electricheatingsystems.
2.TemperatureRange
Thisthermostatcanbeprogrammedbetween45˚Fand95˚F(7˚Cand35˚C).However,
it will display room temperatures from 30˚F to 99˚F (0˚C and 37˚C). “HI” will be
displayed if thetemperature is higherthan 99˚F (37˚C),and“LO” will bedisplayedif
thetemperatureislowerthan30˚F(0˚C).
Thisthermostatwillautomaticallycutoffin Heatmodeifthe temperaturerisesabove
95˚F (35˚C), and automatically cutoff in Cool mode ifthe temperature drops below
45˚F(7˚C).
3.CompressorProtection
Thisthermostatprovidesa4minutesdelayaftershuttingoffthecoolingsystembefore
it canbe restarted.This featurewill prevent damage toyourcompressorcausedby
rapid cycling. It does not prevent a rapid compressor restart due to short power
outages.
4.BatteryWarning
TwofreshAAalkalinebatteriesshouldprovidewellaboutoneyearofservice.However,
whenthebatteriesbecomedrained,theLowBatteryIndicatorwillflashonthedisplay.
Whenthismessageoccurs, installnewalkalinebatteries.You haveapproximately1
minutetochangethebatteriesandkeepthethermostat’sclockandprogramsettings.
Oncethebatterieshavebecometoolowtoensureproperoperation,yoursystemwill
beturnedoff,andthedisplaywillbeclearedexceptforflashingLowBatteryIndicator
ontheLCDdisplay.
CAUTION: When only theLow Battery icon flashes on the display,
thethermostatisshutdown,andyoursystemwillnolongeroperate.
Inthiscondition,thereisnotemperaturecontrolofyourdwelling.
NOTE:Thebacklightwillnotfunctionwhenthethermostatisinlowbatterycondition.
NOTE: Ifyou planto beawayfromthe premises over 30days, we recommendthat
youreplacetheoldbatterieswithnewalkalinebatteriespriortoleaving.
5.Powersupply
Thethermostatshallbepoweredby24VACandwithbatteriesasbackup.
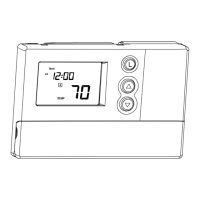
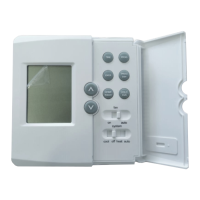
FEATURES
Structureofthermostatandexplanationforthekeypads
hea toffcoo l on auto
day/ time
filter
pro gram
hold
syst em fan
LCDDisplay:Shows
Time,Day,Temperature,
ProgramNumber,and
otherfeatureinformation
asrequired.
L
Backlightkey
BatteryCompartment:
Frontaccessallows
easyinsertionoftwo
AA1.5Vbatteries.
UpandDownKey:Keyfor
changingtheTemperature
setting.Alsousedforincreasing
anddecreasingselectionsinthe
Time,Program,andSpan
functions.
/re turn
FanSwitch:Fan
switchforAutomatic
orContinuousfan
operation.
SystemSwitch:
Selectorswitchfor
Heat,Cool,andOff.
Day/TimeKey:
Usedforentering
theClocksetting
mode.Usewiththe
UpandDownkeys
tosetthetimeandday.
FilterKey:Resets
filterchange
countertozero.
ProgramKey:Used
forenteringandmodifying
Programs.UsewiththeUp
andDownkeystoset
timesandtemperatures.
PresswheninClocksetting
modetoselectbetween12
and24hourclockmodes.
Hold/ReturnKey:Usedfor
settingapermanent(vacation)
hold,andforreturningtothe
normaldisplayfromDay&
Timesetting,Programming,or
Spansettingmodes.
FrontDoor:
Batterycover
Openwithone
fingerfromtop.
FrontDoor: CoverkeysOpenwith onefingerfromleftorright.
OPERATION
SettingDayandTime
Ÿ The LCD will show this information when
batteries are first installed. The temperature will
updateafterafewseconds.
Ÿ During time and day setting mode, the
temperatureandprogramdisplayswillgoblank.
ŸExamples:SettheThermostattothecurrenttimeof2:16pmonSaturday.
RefertotheStepsbelow.
STEP1:
Ÿ Pressto entertime and day setting mode.The
current hour and the AM/PM indicator will be
flashing.
ŸPressupordowntochangetheHourupordown
tothecurrenthour.
NotetheAM/PMindicator,asthedisplaywillchangeat12AMand12PM.
STEP2:
Ÿ Press again to change from hour setting to
minutesetting.Thecurrentminutewillbeflashing.
Ÿ Press up or down to change the Minute up or
downtothecurrentminute.
STEP3:
ŸPressagaintochangefromminutesettingtoday
setting.Thecurrentdayswillbeflashing.
ŸPressupordowntochangetheDayupordown
tothecurrentday.
STEP4:
ŸPressagaintochangebacktothenormaldisplay.
NOTE: You may press /return at any time during Day and Time setting to
returntothenormaldisplay.
12Hr./24Hr.TimeFormat
Yourthermostatissetfromthefactoryinnormal12(AM/PM)timeformat.Tochangeto
24 hour (military) time, press during time and day setting mode to
toggle betweenthe12 hourand 24hour formats. The AM/ PM indicator willnotbe
displayed in24 hour mode.Boththecurrenttimeandall programswillautomatically
changetotheselectedformat.
PROGRAMMING
Thefollowingtimeandtemperaturesettingsarepreprogrammedintothethermostat:
TemperatureinF˚(C˚)
ProgramNumber Time Heat Cool
1 6:00am 68˚F(20˚C) 78˚F(26˚C)
2 8:00am 60˚F(16˚C) 85˚F(29˚C)
3 4:00pm 68˚F(20˚C) 78˚F(26˚C)
4 10:00pm 60˚F(16˚C) 82˚F(28˚C)
ŸAll7daysoftheweekhavethesamedefaultprograms.
PersonalProgramSchedule
ŸYoucanrevisethefactoryprogramstomatchyourownschedule.UsethisPersonal
Program Schedule to determine which times and temperature settings match your
comfortandenergysavingrequirements.Useapencilsoyoucanreviseyourrecords
eachtimeyouchangeyourprogramsettings.
Heating
Day Program1 Program2 Program3 Program4
Monday –
Friday
Time
Temp
Time
Temp
Time
Temp
Time
Temp
Saturday –
Sunday
Time
Temp
Time
Temp
Time
Temp
Time
Temp
Cooling
Day Program1 Program2 Program3 Program4
Monday –
Friday
Time
Temp
Time
Temp
Time
Temp
Time
Temp
Saturday –
Sunday
Time
Temp
Time
Temp
Time
Temp
Time
Temp
RevisingPrograms
ŸFamiliarizeyourselfwithmanuallychangingprograms,sothatyoucaneasilymodify
the programsas yourcomfort needschange.Follow thesteps belowto changethe
programtimesandtemperature.
NOTE:
1)Theprogramtimecanbesetin10minuteincrements.
2)Theprogramtemperaturecanbesetinincrementsof1˚F(1˚C).
3) After15seconds withoutakey press, thethermostat willreturntonormal display
mode.
4)Whensettingtheprogramtime,notetheAM/PMindicator.
STEP1:
ŸSlidetheSystemSwitchtotheHEATorCOOLpositiontoprogramthe
correspondingsystem.
NOTE:iftheSystemSwitchisintheoffposition,
thelastpositionusedwillbeprogrammed.
STEP2:
ŸPresstoenterprogrammode.HEATorCOOLwillbedisplayedonthe
LCD.
STEP3:
ŸTheProgramhourandAMorPMindicatorare
flashing.Presstochangethehour.
STEP4:
ŸPressagaintochangetotheminuteposition.The
currentminutewillbeflashing.
ŸPresstochangetheminute.
STEP5:
Ÿ Press again to change to the program temperature. The
currentprogramwillbeflashing.
ŸPresstochangethetemperature.
STEP6:
ŸPressagaintomovetothenextprogramnumber.
ŸRepeatStep3through5tochangetheremainingWeekdayand
Weekendprograms.(Thereareatotalof8programs)
ŸAftercyclingthroughall8programs,pressagaintoreturnthedisplayto
normal.
ŸPressatanytimetoexittheprogramMode.
ReviewingPrograms
To review your program settings, press repeatedlytocyclethrough
theprograms.Youcanalsomakechangesatanytime.
SystemselectorSwitch
The System Selector switch on the front of the thermostat
determines the operating modeof thethermostat.Youmay select
COOL,OFF,HEAT.
NOTE: Anytime you install or remove the thermostat from the wall plate, slide the
System Selector to the OFF position to prevent the possibility of a rapid system
OnOff.
Fanswitch
TheFan switchshould normallybe locatedin theAUTO position.
The Fan will be turned on along with normal operation of your
system.Inanormalgasoroilfurnace,theFanwillbeturnedonby
yourfurnaceafteritswarmupdelay.Forelectricheat,airconditioning,andheatpump
operation,theFanwillturnonwiththesystem. To runtheFanoncontinuously,slide
theFanswitchtotheONposition.
TemporaryManualOverride
To temporarily change the current set temperature without affecting your
program:
ŸPresstochangetoyourdesiredSetTemperature.
Holdthekeyfor2secondstofastadvancetheSet
Temperature.
ŸPresstoreturntonormalmode,orwait5seconds
forittoreturnautomatically.
ŸThecurrentprogramnumberwillflashtosignifytheTemporaryOverride.
ŸAtthenextprogram changetime,the TemporaryOverride is
cancelled,and the next program temperature becomes the
setpoint temperature.
Ÿ Press to confirm the Temporary
Override,
PermanentOverrideoraDesignatedDayOverride
To hold your Manual Override for vacation or Until a
DesignatedDay.
Ÿ Press to make the current program
temperature the HOLD temperature.
HOLDwillbedisplayedontheLCD,andtheProgramnumber
willdisappear.
ŸFollowtheTemporaryManualOverrideinstructionsabovetochangethe
PermanentManualOverridetemperature.
ŸYoucanconfirmtheheldsettemperaturebypressingforlessthan1
second.
ŸPressagain.Holddaywillbedisplayed
onthelcdandtheclockwilldisappear.
ŸPress Day key to add override days. Press
Programkeytoreduceoverridedays.
Ÿ Follow the Temporary a Designated Day
OverrideinstructionsabovetochangethePermanentManualOverride
temperature.
ToendOverride:
ŸUnder Permanent Override Press hold/return key twice. Under a Designated Day
Overridepress thehold/returnonce.Thethermostatwillreturn
tothecurrentprogram,andtheHOLDdisplaywillbecanceled.
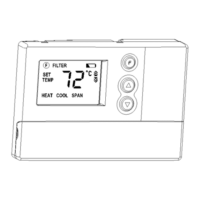
FilterChangeIndicator
Yourthermostatalsokeepsarecordofthenumberofhoursyourfilterhasbeeninuse.
To Maximizeyour system’sperformanceand energyefficiency, changeorcleanyour
filterregularly.
ŸWhen the totalsystem runtime for heat and cool reaches
400 hours, “FILT” willalternate withthe current
time on the LCD display to remind you need
cleanorchangeyoursystem’sfilter.”Filt”willcontinuetoflash
untilthecounterissetbacktozero.
ŸPress toreview total filterusage. The display willblink ”FILT”,then showthe Filter
Monitorcounter.After15seconds,thedisplaywillreturntonormalmode
In this example, the counter is at 410 Hours,
26Minutes.
ŸTo reset the Filter Monitorcounter, depress Filter key for 3
seconds.thedisplaywillblink,andthecounterwillberesetto
zero.
SPANSetting
Your thermostat is set at the factoryto cycle at 2˚F (1˚C) above and belowthe set
temperature.(Span=2)Thissettinghasbeendesignedtoprovideacomfortableroom
temperature undermost allconditions. However, ifyou findyour system
cyclingtoofast ortoo slow, thenthe Spancan beadjustedto modifythe
cycletime.
Ÿ Press and hold BOTH (up and down keys) for
three seconds. The display will flash, and SPAN
willbedisplayedontheLCD.
Ÿ Press to raise the Span to 3. This setting
INCREASEStocycletimebyallowingyoursystem
torunLONGER.
ŸPresstolowertheSpanto1.ThissettingDECREASESthecycletime
bycausingyoursystemtorunSHORTER.
The Span settings remain the same for both HEAT and COOL. The Span can be
changedatanytime,andisindependentofprogramtimesortemperatures.
Backlighting
Your thermostathas anelectroluminescent lamp that backlights thedisplayfor easy
viewinginthedark.
Whenanykeyispressed,thedisplayisilluminated.
Thedisplay willremain illuminated for8 seconds after thelast key is pressed.This
allowsthelighttostayonifyouneedtooperateseveralkeys.
Note: If the thermostat is in Low Battery warning condition, the backlight will not
operate.Replacewith2newAA alkalinebatteriestorestoretheBacklightfunction.
LowBatteryWarning
Your thermostat has a twostage lower batterywarning system.
When thebatteries are firstdetectedto beweak, thefirststage
lowbattery warningis indicated by“BATT” flashingon the LCD
display. At your earliest convenience, you need to replace the
batterieswith2newAAalkalinebatteries.
When the batteries becometoo weak for normaloperation, the
thermostat enters the second stage low battery warning which
shuts down the thermostat. In this condition, “BATT” flashes
aloneonthedisplay,andthethermostatwillturnyoursystemoff.
Yoursystemwillremainshutoffuntilthebatteriesarereplaced.
Note:Thethermostatwillstillkeepthecurrent SetTemperatureandFilterruntimein
memoryuntilnewbatteriesareinstalled. Afterconfirmingthatnewbatterieshavebeen
inserted,thethermostatwillreturntonormaloperation.
AutoRecovery
Auto Recovery calculates how early to turn you system back on, so that the room
temperature is alreadycomfortablebythe start of the comfort temperatureprogram
period.AutoRecoverywork’sinbothHeatandCoolmodes.
ŸWhenthethermostatisinAutoRecoverymode,thedisplaywill
alternate“RECO”withtime,andtheprogramindicatorwillflash.
ŸAutoRecoverycanbedisabledbyslidingtheRecoveryswitch
onthecircuitboardtodisable.
ŸAutoRecoverywillnotoperateifPermanentholdorTemporary
holdisinoperation.
ŸAuto Recovery can be canceled manually if Hold/RETURN is pressed during the
recoveryprocess.
ŸAutoRecoverywillbecanceledandchangetonextperiod.
ErrorMode
If the thermostat is unable to control your system due to an
unexpectedbatteryproblem,thethermostatwillenterErrorMode.
In this condition, the thermostat flashes “E1”or “E2”on the LCD
display, and shuts off your system. To correct this problem,
replacethebatterieswith2newAAalkalinebatteries,evenifyou
haverecentlyreplacedthem.Movethebatteryoutholdanykeythenplacethebattery
again.Youwillneedtoreprogramyourthermostatandconfirmnormaloperation.
IfErrorModereturns,pleasecallusforfurtherinformation.
Lcddisplay information Lcddisplay information
E1 SensorError E2 Systemswitch
AutoCutOff
Your thermostatwill automaticallycutoffin Heatmode ifthe roomtemperature rises
above95˚F(35˚C).ItwillcutoffinCoolmodeiftheroomtemperaturedropsbelow45˚F
(7˚C).
Note: that if your system has malfunctioned and no longer responds to thermostat
controls,theAutoCutOffwillhavenoeffect.
day/time
day/time
hold
/return
heatoff
cool
system
p r o gr a m
day/time
day/time
da y/tim e
pro gram
p r o gr a m
p r o gr a m
heat
off
cool
system
on
auto
fan
hold
/return
filter
p r o gr a m
p r o g r a m
M
H