Do you have a question about the Commax CDV-704MF and is the answer not in the manual?
The COMMAX CDV-704MF is a color video door phone designed for smart home security and communication. This user manual provides comprehensive instructions for its operation, installation, and maintenance, ensuring safe and effective use.
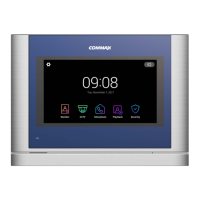
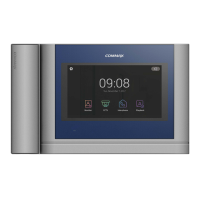
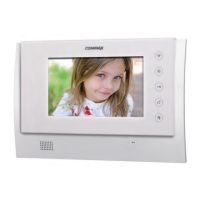
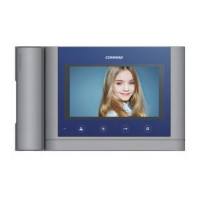
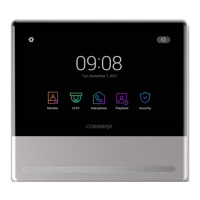
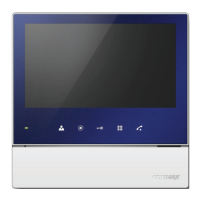
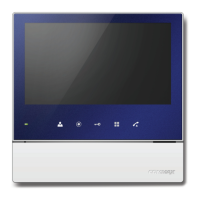
The CDV-704MF serves as a central hub for managing door camera interactions, CCTV monitoring, interphone communication, and security functions within a household. It features a 7-inch full-touch LCD for intuitive control and display.
Main Screen: The main screen displays the current date and time and provides quick access to the device's core functions: Monitor, CCTV, Interphone, Playback, and Security. An "Option" menu allows for further customization. The "Mute Icon" indicates the mute status, and touching the date and time section leads to the "Set-up" menu. It is crucial to set up the date and time before use to ensure proper saving of still-cut images and video clips. If the device reboots, other connected monitors might temporarily stop normal operation.
Monitor Function: When a visitor calls from the door camera or the "Monitor" button is touched, the device displays the door camera's view for 30 seconds. This function is unavailable if the door camera is not connected. If only one monitor is in use, other monitoring, CCTV, or interphone functions cannot be simultaneously accessed. The monitor screen shows the selected camera, current date and time, and storage icons indicating motion detection and recording status. Storage options include images/videos (in motion detection mode) and manual/auto storage. An SD card status icon shows if a card is inserted or full. A split-screen view is available for multiple door cameras, though not with a single camera. Video quality adjustments (brightness, luminosity, chroma) can be made, with a range of 0-20 and an initialization button. Volume control for calling and receiving tones is also available, with adjustable levels for ring (0-3) and speaker (1-3).
Call Connection and Door Opening: The device allows for call connection and answering. Once a call is connected, specific buttons change to "Door open" (No.7) and "End call" (No.8). If "Fast mode" is enabled in the "Open door mode" option, only the "Door open" icon appears, allowing direct door opening. Call cancellation is possible when receiving a call from the door or lobby. CCTV monitoring can be accessed during a call if a CCTV is connected. Video clips can be stored manually by touching a button, or automatically if auto-storage mode is set. Each storage can last up to 90 seconds (30 seconds call connection + 60 seconds calling). A dedicated icon indicates ongoing storage, with remaining time displayed. Still-cut images can also be stored manually.
Calling of Visitors: When a visitor calls, the device rings, and the visitor's image appears on the monitor for up to 30 seconds. If multiple monitors are connected, all monitors will ring and display the visitor's image. When one monitor connects to the door camera, other monitors display the main screen, and their Monitoring, CCTV, and Interphone buttons are deactivated. The door can be opened during a call, provided the screen is on and the door release function is interlocked. Pressing the call-end button returns to the main screen and reactivates other monitor functions. If an additional monitor connects to the door camera, the master monitor (ID1) pauses its current operations (like saving images/video clips) and displays the main screen.
CCTV Function: Touching the "CCTV" button displays the CCTV screen for up to 60 seconds. Video clips can be saved during this time. This function requires cameras to be installed and is limited to one monitor at a time if only one is in use. The CCTV screen shows the current working CCTV, date and time, and icon sets for motion detection and video storage. Users can switch between CCTV 1 and CCTV 2 screens (if multiple cameras are connected) and adjust video quality (brightness, light & shade, chroma). Video clips and still-cut images can be stored manually.
Storage Reference (Door Camera and CCTV): Video clips cannot be stored without an SD card. Images can be stored in the monitor's embedded memory (up to 50 images). To back up embedded images, turn off the monitor, insert an SD card, and then turn on the monitor; images will be automatically stored on the SD card. Files can be checked on a computer, showing date, storage time, and information (camera source, saving format, emergency storage). The file naming convention includes date, time, and codes for camera source and saving mode (manual, auto, motion, always monitoring, alarm). The maximum storage size for images and video clips depends on the SD card's capacity.
Interphone Function: The "Interphone" button leads to the interphone menu, allowing communication between extension monitors (master and slave monitors). This function is also limited to one monitor if only one is in use. The screen displays the current interphone ID and allows selection of other interphones for connection (multiple selections are possible). After selecting an interphone and touching the call connection button, a new screen appears, and a calling tone rings from the selected interphone. Simultaneous calls to all interphones are possible, as is mutual calling among interphones. Unselected interphone buttons are deactivated during mutual calls, and their screens show the main display. The interphone screen displays remaining call connection time (max 30 seconds) and calling time (max 60 seconds), the other party's ID, volume control (1-3 level), and a call end button.
Playback Function: Touching the "Playback" button displays a list of recorded images and videos. Users can select an image to enlarge it or play a video. The screen shows page information (current/total page), allows navigation between pages, and displays file information (image file, video file, new file). Emergency recordings are saved when sensors detect an event. If "Auto Rec" is set in the Security menu, CCTV video is recorded for 10 seconds during an emergency. If no SD card is inserted, only still-cut images are saved, and the sensor must be connected to the CCTV. Visitor calls during an emergency are automatically saved if "Auto Recording" is set or can be saved manually. During emergencies, visitor communication is restricted, and only the visitor's image can be checked. Images and video clips can be verified, with options to move between files, view date and time, and delete files. During video playback, the icon changes to a pause button, and remaining time is displayed. After inserting an SD card, loading time depends on the number of stored files.
Security Function: The "Security" button displays the security screen, which can be used with security sensors. This function detects door events when a sensor is connected. Only the master device (ID1) can set the function (On/Off, save video, log view); extension phones (ID2-ID4) only receive alarms. Users can select Security Sensor 1 or 2, activate selected sensors (which triggers an alarm upon detection), and check the emergency log (up to 255 logs). Auto-recording records CCTV video for 10 seconds during an emergency. CCTV1 records for sensor 1, and CCTV2 for sensor 2. If no SD card is present, a still-cut image is saved. During security mode, the master unit's LED flickers red. To end security mode, press the button and enter a four-digit password (default: 1234). Incorrect passwords prevent deactivation.
Security Alarm: When a sensor detects an event in security mode, an alarm sounds, and the sensor number and time of occurrence are displayed. Pressing "Stop" cancels the alarm if the sensor has recovered. A password input window appears, requiring the four-digit password to turn off the alarm. The alarm sounds for 3 minutes, after which only the alarm screen is displayed. During an alarm, communication with visitors is not possible; the alarm must be turned off first. The calling sound from the camera indicates an emergency.
Option Menu: The "Option" menu allows for various settings. If no action is taken for 30 seconds, the screen returns to the main screen.
Recording:
Volume:
Storage:
Date/Time:
Display:
Etc:
Micro SD Card Information: The device supports SDHC/SDXC cards up to 256 GBytes (Class 10 or higher) formatted to FAT32. Maximum storage capacity is 50 images for embedded memory or up to 10,000 images/movies with an SD card (quantity may be reduced for large file sizes). Video clips are saved in 90-second cuts.
Precautions on using Micro SD Cards: Do not turn on/off, insert, or remove the SD card during playing, saving, or formatting to prevent malfunction or damage. When storage capacity is full, the oldest image is automatically deleted to save the newest. Video file capacity varies by environment. Back up data when the "FULL" icon is displayed. Using a faulty SD card may cause product problems. Check the memory type (SLC, MLC, TLC) as storable time varies.
The CDV-704MF offers a user-friendly interface with its full-touch LCD. The main screen provides intuitive access to all primary functions, making it easy to navigate between monitoring, communication, and security features. The ability to adjust video quality, volume, and various settings through the "Option" menu allows for personalized user experience. The interphone function facilitates seamless communication within the household, while the playback feature provides a clear record of events. The security system, with its sensor integration and auto-recording capabilities, enhances the safety of the premises. The multi-language support makes the device accessible to a wider range of users.
The manual emphasizes several maintenance guidelines to ensure the longevity and proper functioning of the CDV-704MF:
| Display Type | LCD |
|---|---|
| Wiring | 4 wires |
| Type | Video Intercom |
| Night Vision | Yes |
| Weight | 1.2 kg |
| Display | 7 inch |
| Camera | CMOS |
| Audio | 2-way audio |
| Mount Type | Surface mounted |
| Operating Temperature | -10°C to 50°C |