To begin setup, insert the installation CD into your CD-ROM
drive, and the iWizard will start automatically. ( If it doesn’t,
browse the contents of the CD and run the ‘iWizard.exe’). Then,
select the language and the device you wish to set up.
The first step shows how to connect all the cables. Hit [Next]
twice to proceed with the 2nd step in which the iWizard scan
for available cameras on your local network. Then select your
camera from the list, and wait until the live video and camera
information are displayed on the right. (You can double-check
the device name and the MAC ID which are printed on the serial
number sticker on the back of the camera and on the package).
Click [Next] when you’re ready. Meanwhile, if you see the
Windows Security Alert dialog box during the search, please
choose [Unblock].
Choose whether to use Seedonk service to remotely access
your camera via Seednok platform. You may also use a dierent
Seedonk server by clicking on [Advanced Settings]. (If you enable
Seedonk service, you cannot use iDDNS service.)
Choose to obtain IP address automatically (DHCP) or manually
congure IP address. Also congure your connection port and
local power line frequency here. (If you enabled Seedonk service,
you won’t see connection port and power line frequency setting
here.)
The default password is `admin.’ Enter a new password here
(please note down your new password). You can also click
[Next] to skip this process.
Check the camera name, date and time setting.
Please check the package contents on your hand. If anything is
missing, please don’t hesitate to contact your local distributor.
Network Camera RJ-45 LAN Cable
Power Adaptor (5V, 2A) Quick Start Guide
Installation CD
Screw for Ceiling Mount x 3
Screw Anchor x 3
LAN cable from PC to hub/router: If your LAN cable from PC has
been connected to the Cable/ADSL modem, please re-connect it
to the LAN port of your hub/router.
LAN port on camera: Use the bundled RJ-45 LAN cable to
connect the LAN port of the IP camera to the LAN port of your
hub/router.
Wireless adaptor (Optional accessory): If you have purchased
the Compro USB wireless adaptor, plug it into the USB port of IP
camera for wireless reception. The wireless connection port only
supports the wireless adaptors from Compro; please do not use
other USB adaptors on Compro IP camera.
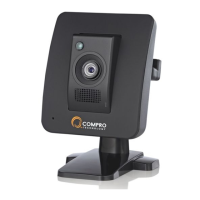
Power: Attach the power adaptor to the camera’s power adaptor
port and connect the power plug to a power outlet.
Follow the steps below to mount the camera on a at surface. Then
adjust the camera to the desired viewing angle.
1. Detach the metal mounting plate from the bracket by inserting a
at blade screwdriver into the rectangular hole on the wide end of
the bracket base and then pressing the screwdriver downward.
2. Place the side of the mounting plate that has protruding screw
holes against the mounting surface. Screw the mounting plate
into the mounting holes on the mounting surface. And fasten the
bracket to the mounting plate by clicking the plate into position.
Note: When dismounting the camera, follow step 1 to detach the
camera from the mounting plate. Do not pull the camera off the
mounting surface by force, as doing so may damage the bracket
base permanently and render future camera mounting impossible.
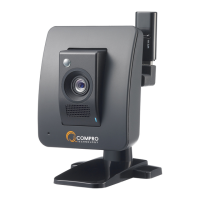
Light sensor (only available
on IP70)
Lens
IR Lamp x 6 (inside, only
available on IP70)
Microphone
Speaker
LED status indicator (dotted
line shows IP70 LED indicator )
USB Wireless adaptor connector
Audio Output
Reset Button
microSD card slot (on the
side)
Microphone Input
Power adaptor port
Ethernet Port
I/O port (2 in / 1 out)
Network Camera
Quick Start Guide
IP55
/
IP60 IP70
Camera Layout Connecting the CablesPackage Contents
Mounting the Camera Installing Camera Software