il est important d’en maintenir l’apparence.
Pour ce faire, vous pouvez utiliser la ton-
deuse pour tailler votre barbe ou moustache
chaque semaine.
Pour obtenir les meilleurs résultats, la barbe
devrait être légèrement humide (non pas
mouillée) avant d’utiliser la tondeuse. Vous
éviterez ainsi de couper trop de poils.
TOUT D’ABORD
CHANGER LA TÊTE DE COUPE
Commencez à la position verrouillée (ill. 1).
Tenez la poignée de la tondeuse tout en
tournant la tête dans le sens antihoraire
jusqu’à ce que le petit triangle sur la tête soit
aligné avec le point sur la poignée (ill. 2). La
tête devrait alors se séparer facilement (ill.
3). Pour poser une autre tête, alignez le petit
triangle de la tête avec le point de la poignée
et tournez dans le sens horaire pour aligner
les deux triangles.
DÉCOUPAGE
1. Il est toujours plus
facile de débuter avec
une barbe propre et
légèrement humide.
2. Une fois la barbe
peignée dans le sens de
la pousse naturelle,
IMPORTANT SAFETY
INSTRUCTIONS
When using electrical appliances, especially
when children are present, basic safety
precautions should always be taken,
including the following:
READ ALL
INSTRUCTIONS
BEFORE USING
KEEP AWAY FROM
WATER
DANGER–
Any appliance is
electrically live, even when the switch is off.
To reduce the risk of death or injury by
electric shock:
1. Always unplug appliance from electrical
outlet immediately after using (except when
charging unit).
2. Do not place or store appliance where it
can fall or be pulled into a tub or sink.
3. Do not use appliance while bathing or in
the shower.
4. Do not place appliance in, or drop into
water or other liquid.
5. If appliance has fallen into water, do not
reach for it. Unplug immediately.
6. Unplug appliance from electrical outlet
immediately before cleaning.
MISES EN GARDE
IMPORTANTES
L’utilisation d’appareils électriques, surtout
en présence d’enfants, demande la prise de
précautions, dont les suivantes :
LIRE TOUTES LES
DIRECTIVES AVANT
L’USAGE
TENIR LOIN DE L’EAU
DANGER–
Un appareil électrique
est sous tension même quand il est éteint.
Pour réduire le risque de mort ou blessure
par choc électrique :
1. Débranchez toujours l’appareil de la prise
de courant après l’usage (sauf pour le
charger).
2. Ne le placez ni ne le rangez là où il peut
tomber ou être tiré dans une baignoire un
évier.
3. Ne l’utilisez pas dans la baignoire ou la
douche.
4. Ne le placez ni ne l’échappez dans l’eau
ou un liquide quelconque.
5. Ne le saisissez pas dans l’eau.
Débranchez-le immédiatement.
6. Débranchez l'appareil de la prise de
courant immédiatement avant de le nettoyer.
NE LE SAISISSEZ PAS
S’IL EST TOMBÉ DANS L’EAU
DO NOT REACH
INTO THE WATER
WARNING–
To reduce the risk
of burns, electric shock, fire, or injury to
persons:
1. Never leave a plugged-in appliance
unattended.
2. Use close supervision when the appliance
is used by, on, or near children or invalids.
3. Use appliance only for its intended use as
described in this manual. Only use attach-
ments recommended by the manufacturer.
Do not use an extension cord to operate the
appliance.
4. Never operate the appliance if it has a
damaged cord or plug, is not working
properly, has been dropped or damaged,
or dropped into water. Return the appliance
to a Conair service centre for examination
and repair.
5. Keep the appliance cord away from
heated surfaces.
6. Do not pull, twist or wrap the cord around
the appliance.
7. Never drop or insert any object into any
opening of the appliance.
8. Do not place the appliance on any surface
while it is operating.
9. Do not use the appliance with a damaged
or broken comb or with teeth missing from
the blades, as injury may result. Before each
use, make certain the blades are aligned
properly and oiled.
10. Do not use the appliance outdoors or
operate where aerosol (spray) products are
being used or oxygen is being administered.
SAVE THESE
INSTRUCTIONS
TROUBLESHOOTING
There are several things to look for if your
trimmer fails to operate:
1. Be sure the trimmer is turned ON.
2. Make sure that the battery is properly
placed in the battery compartment. Test the
battery to be sure it is working. (For MN250
models)
3. Check the blades to see if they are
clogged with hair clippings; if so, use the
cleaning brush to remove hair.
4. If the trimmer still fails to operate, take or
send it to a Conair Service Centre (see war-
ranty procedure and addresses).
If your rechargeable trimmer does not
seem to be taking a charge, take the
following troubleshooting steps before
returning it for repair:
1. Be sure the electrical outlet is working, by
plugging in another appliance to test it.
2. Make sure the electrical plug is not
connected to a switch which turns power off
when lights are turned off.
3. Be sure you have inserted the trimmer
properly into the charging stand, that all
connections are secure, and that the
trimmer switch is in the “OFF” position.
FOR HOUSEHOLD
USE ONLY
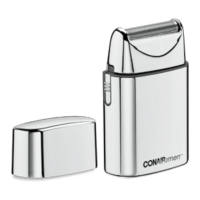
OPERATING INSTRUCTIONS
FOR YOUR MN251 MODELS
RECHARGEABLE TRIMMER
Check to be sure which model
you have purchased.
1. Before using your trimmer for the first
time, insert the trimmer in the charging
base and then plug into wall outlet and
charge it for 16 hours. Always place the
trimmer in the stand with the ON/OFF switch
in the OFF position.
2. Always check to see if the charging light
is on when the cord is connected to the
trimmer and the unit is not in use.
3. Plug unit into any 120V, 60hz wall outlet.
4. The trimmer can remain plugged into the
power source at all times without damage to
the battery.
5. To use your trimmer, push On/Off switch
upwards to “On” position.
6. After you finish using your trimmer, push
down on the On/Off switch to turn the
trimmer off.
7. If, while trimmer is in use, the charge
seems to be running down, simply put
ON/OFF switch in OFF position. Then, insert
the trimmer in the charging base and plug
into wall outlet. Allow battery to recharge for
several hours.
8. To maintain the full charging capacity and
extend the life of the battery, it must be
periodically run down during normal use
until it stops, then recharge.
9. The charge base may become warm
while charging – this is normal.
MN251 MODELS:
BATTERY REMOVAL
C
ONTAINS NICKEL CADMIUM
BATTERY. MUST BE COLLECTED,
RECYCLED OR DISPOSED OF
PROPERLY. DO NOT DISPOSE OF IN
THE MUNICIPAL WASTE.
Bring the batteries with the handle of
trimmer to the nearest collection centre for
proper disposal. DO NOT throw the battery
into the normal municipal waste system.
OPERATING
INSTRUCTIONS
FOR YOUR MN250 MODELS
Battery Version Trimmer
Check to be sure which model
you have purchased.
1. Remove the battery cover by rotating the
bottom cap counter clock wise as below FIG
1, 2, 3 and lifting straight off.
2. Being careful not to bend the clips, insert
the positive end of the battery first, so it will
slip easily into position.
3. Return the battery cover to its original
position by pushing it in and rotating
clockwise until you hear a small click as it
locks into place.
4. To use your trimmer, push ON/OFF switch
upwards to ON position.
5. After you finish using your trimmer, push
down on the ON/OFF switch to turn the
trimmer off.
6. For your convenience, the trimmer comes
with a storage base to hold the trimmer and
accessories.
*The MN250 models requires 1 “AA” battery
(included).
If you are not going to use your trimmer
for a long period of time, or if the battery is dead,
remove the battery from the unit. This will increase
the life of your trimmer.
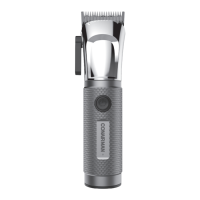
TYPES OF BEARDS/MUSTACHES
GROWING A BEARD
OR MUSTACHE
There are three key factors that determine
which beard or mustache style is most
suitable for your face:
1. The shape and dimensions of your face.
2.The natural growth of your beard/
mustache.
3. The thickness of your beard/mustache.
If you are unsure of the type of beard or
mustache that most suits your face, speak
with a professional hair stylist and ask for
an opinion on what style would be best.
Once your beard or mustache has been
styled, it is essential that you maintain its
appearance. To do this, use your shaper to
trim your beard/mustache weekly.
For the best trimming results, your beard
should be slightly damp (not wet) before
using the trimmer. This will prevent
the trimmer from removing more hair
than desired.
GETTING STARTED
TO SWITCH TRIMMER HEADS
Begin with trimmer in locked position (Fig.
1). Hold the handle of the trimmer while
turning the trimmer head counterclockwise
until the triangle on the trimmer head is
aligned with the dash on the side of the han-
dle (Fig. 2). At this point you should be able
to easily lift the trimmer head from the han-
dle (Fig. 3). To replace a trimmer head, align
the triangle on the trimmer head with the
dash on the side of the handle and turn
clockwise until the two triangles are aligned.
OUTLINING YOUR BEARD
1. It is always best to begin with a clean,
slightly damp beard.
2. After you have
combed through your
beard in the direction it
grows naturally, you will
want to outline the
desired shape, begin-
ning under your jawline.
3.
Attach the 3/4" trimmer head. Begin defin-
ing your beard’s shape under your chin and
work upward on each side of your face
toward your ears. Then define the upper out-
line of your beard across your cheeks, past
your sideburns and toward your hairline.
NOW YOU’RE READY
TO TRIM YOUR BEARD
1. To use the 5-position comb, slide it over
the trimmer blades and snap down into
position. At first, until
you become familiar
with the adjustments,
use the longest comb
and trim setting (5/8”).
(You can always go back
and make your beard a
little shorter.)
2.
Begin trimming your
beard using smooth,
even strokes. Start with
your sideburns and work
downward toward your
chin. (Never attempt to
trim against the natural growth of your
beard, because the hair will be cut too short.)
3. If you decide you want a closer trim, you
Fig. 1 Fig. 2 Fig. 3
ATTENTION–
Pour réduire le
risque de brûlure, choc, incendie ou
blessure :
1. Ne laissez jamais l’appareil branché, sans
surveillance.
2. Assurez une surveillance étroite s’il est
utilisé par, sur ou près d’enfants ou de per-
sonnes invalides.
3. Ne l’utilisez que pour l’usage prévu dans
ce livret. N’utilisez que les accessoires
recommandés par le fabricant. N’utilisez pas
de rallonge avec le produit.
4. N’utilisez jamais l’appareil si le cordon ou
la fiche est endommagée, s’il ne fonctionne
pas bien, s’il a été échappé, endommagé ou
s’il est tombé dans l’eau. Présentez-le à un
service après-vente où il sera inspecté et
réparé.
5. Tenez le cordon loin des surfaces chauf-
fées.
6. Ne tirez, tordez ni enroulez le cordon
autour de l’appareil.
7. N’insérez ni n’échappez d’objets dans les
ouvertures.
8. Ne le déposez pas sur une surface alors
qu’il est en marche.
9. Ne l’utilisez pas avec un peigne brisé ni
avec dents manquantes car vous risquez de
vous blesser. Avant de l’utiliser, assurez-
vous que les lames sont bien alignées et
huilées.
10. Ne l’utilisez pas à l’extérieur ni là où l’on
utilise des aérosols ou administre de
l’oxygène.
CONSERVEZ CES
DIRECTIVES
DÉPISTAGE DES PROBLÈMES
Il y a plusieurs points à considérer si la ton-
deuse ne fonctionne pas :
1. Assurez-vous qu’elle est en marche (ON).
2. Assurez-vous que la pile est bien posée
dans le logement. Testez-la pour vous
assurer qu’elle possède une charge.
(MN250 modèles).
3. Voyez si les lames sont obstruées de
poils; si c’est le cas, nettoyez-les avec la
petite brosse de nettoyage.
4. Si la tondeuse ne fonctionne pas, présen-
tez-la au service après-vente Conair (voir
garantie et marche à suivre).
Si la tondeuse rechargeable ne semble pas se
recharger, vérifiez les points suivants avant
de la présenter au service après-vente :
1. Assurez-vous que la prise de courant est
sous tension.
2. Assurez-vous que la prise de courant
n’est pas commandée par un interrupteur.
3. Assurez-vous de bien placer la tondeuse
sur le chargeur. Voyez à ce que les contacts
soient établis et que la tondeuse est éteinte.
RÉSERVÉ À
L’USAGE MÉNAGER
DIRECTIVES D’UTILISATION
DE LA TONDEUSE
RECHARGEABLE MN251 MODÈLES
Vérifiez quel modèle
vous avez acheté.
1. Avant d’utiliser la tondeuse la première
fois, placez-la sur le chargeur et branchez ce
dernier dans une prise de courant. Chargez
la tondeuse 16 heures. La tondeuse doit
toujours être éteinte quand vous la placez
sur le chargeur.
2. Vérifiez toujours si le témon de charge est
allumé quand le cordon est branché et que
la tondeuse n’est pas utilisée.
3. Branchez-la dans une prise de courant
120 VCA 60 Hz.
4. La tondeuse peut être laissée branchée
sur le chargeur, sans risque pour la pile.
5. Pour utiliser la tondeuse, réglez l’inter-
rupteur en position de marche.
6. Après l’usage, réglez l’interrupteur en
position d’arrêt.
7. Si, en cours d’usage, la tondeuse semble
perdre sa charge, éteignez-la, placez-la sur
le chargeur et branchez ce dernier dans une
prise de courant. Laissez la pile recharger
quelques heures.
8. De temps à autre, pour maintenir la pleine
capacité de charge et prolonger la durée de
la pile, laissez la tondeuse fonctionner
jusqu’à ce qu’elle s’arrête puis rechargez-la.
9. Le chargeur peut devenir chaud pendant
la charge. Cela èst normal.
MN250 MODÈLES SEULEMENT :
CHANGEMENT DE LA PILE
C
ONTIENT UNE PILE NICKEL-
CADMIUM QUI DOIT ÊTRE REPRISE,
RECYCLÉE OU JETÉE DE FAÇON
APPROPRIÉE. NE PAS JETER AVEC
LES ORDURES MÉNAGÈRES.
Apportez la pile et le manche au centre de
collecte le plus près pour l'élimination
appropriée. NE jetez PAS la pile avec les
ordures ménagères.
DIRECTIVES D’UTILISATION
DE LA MN250 MODÈLES
Modèle à pile
Vérifiez quel modèle
vous avez acheté.
1. Enlevez le couvercle de la pile en tournant
le capuchon dans le sens antihoraire
comme indiqué sur les illustrations 1, 2 et 3
suivantes et en le soulevant.
2. Prenant soin de ne pas plier les contacts,
insérez la pile, bout positif dans le fond.
3. Remettez le couvercle en le poussant et le
tournant vers la droite jusqu’à ce que vous
entendiez un déclic.
4. Pour utiliser la tondeuse, réglez
l’interrupteur en position de marche.
5. Après l’usage, réglez l’interrupteur en
position d’arrêt.
6. Pour être plus pratique, la tondeuse est
fournie avec un socle qui accepte la ton-
deuse et les accessoires.
*La MN250 Modèles nécessite 1 pile AA (fournies).
Si
vous prévoyez ne pas utiliser la tondeuse pendant
un certain temps ou si la pile est morte, enlevez la
pile. La tondeuse durera ainsi plus longtemps.
TYPES DE MOUSTACHES/
BARBES
FAIRE POUSSER UNE BARBE
OU UNE MOUSTACHE
Il y a trois facteurs à considérer pour établir
quel type de barbe ou moustache convient
le mieux à votre visage :
1. La forme et la grandeur de votre visage.
2. La croissance naturelle des poils.
3. L’épaisseur de la barbe ou moustache.
Si vous n’êtes pas certain du type de barbe
ou moustache qui vous conviendrait le
mieux, parlez-en avec un coiffeur et voyez
quels conseils il pourrait vous donner. Une
fois que la barbe ou la moustache est taillée,
découpez-la de la forme voulue, en débutant
avec le contour de la mâchoire.
3. Posez la tête 3/4 po. Découpez la forme
en partant sous le menton et en travaillant
vers le haut, de part et d’autre du visage
jusqu’aux oreilles. Découpez ensuite le haut,
le long des joues, des favoris et vers la ligne
des cheveux.
VOUS ÊTES PRÊT À
TAILLER VOTRE BARBE
1. Pour utiliser le peigne
à 5 positions, glissez-le
sur les lames et
enclenchez-le. Au début,
si vous n’êtes pas
habitué avec la ton-
deuse, utilisez le peigne
le plus long et le réglage
le plus élevé (5/8 po).
(Vous pouvez toujours
faire un deuxième pas-
sage avec la tondeuse.)
2. Taillez votre barbe en
coups doux et uni-
formes débutant des
favoris vers le menton. (Ne taillez jamais à
contre-poil car les poils seront coupés trop
courts.)
3. Pour tailler de plus près, vous pouvez
alors ajuster le peigne à 5 positions à une
autre position et tailler votre barbe jusqu’à
ce que vous obteniez la longueur voulue.
Fig. 1 Fig. 2 Fig. 3
UNLOCKEDLOCKED
Fig. 1 Fig. 2 Fig. 3
UNLOCKEDLOCKED
Fig. 1 Fig. 2 Fig. 3
 Loading...