DATE:
CLIENT:
DESCRIPTION:
SCHAWK JOB#:
SKU#:
DIMENSIONS:
PRINTER SPEC:
RELEASE: V-9
LANGUAGE(S): ENGLISH
INTERNAL: R-X
18211 NE 68th Street, E120
Redmond, WA 98052
T: 425-881-5454
BAN#:81552932 Rev. 09/16
Contour Next LINK 2.4 QRG Canada
September 23, 2016
Ascensia Diabetes Care
Contour Next LINK 2.4 QRG Canada
English
920358
9755 Parent BAN# 81558914
16.5” (H) x 8” (W)
10000752618 REV -
FONTS:
Arial, Helvetica, Helvetica Neue, Zapf Dingbats, Skinny Mini, Mini Micra, Myriad Pro
COLORS:
Cyan Magenta Yellow Black 281 Process Build: 100C 79M 10Y 42K
NOTE: THIS COLOR PROOF INDICATES COLOR BREAK ONLY AND MAY NOT ACCURATELY REFLECT ACTUAL PRODUCTION COLOR.
Regional Master Template No: M-QRG-0347-R0002
Global / EU Master Template No: M-QRG-0304-R0003
Alt#1 - 04/15/14 Copy Changes
Alt#2 - 12/01/15 Copy Changes
Alt#3 - 12/10/15 Copy Changes
Alt#4 - 12/18/15 Copy Changes
Alt#5 - 07/08/16 Copy Changes
Alt#6 - 08/17/16 Copy Changes
Alt#7 - 09/08/16 Copy Changes
Alt#8 - 09/15/16 Copy Changes
Alt#9 - 09/23/16 Copy Changes
are in search mode.
Auto Connect
Before using Auto
Connect, be sure no other
nearby Medtronic devices
are in search mode.
Cancel
Continue
Use the arrow
buttons to
scroll to Continue.
Press the Select
button .
Menu
Insulin Settings
Sensor Settings
Event Markers
Reminders
Utilities
Utilities
Self Test
Carb Unit
Manage Settings
Sensor Demo
Device Options
Device Options
Manage Devices
Connect Device
Active Insulin 1.5 U
Bolus Basal
mmol/L
BG
Search
New Device
See User Guide to connect
new device. Select Search
below when ready.
Con rm Device SN
BGJ133333F found: SN:
BGJ133333F
Cancel
Con rm
Connect Device
Manual Connect
Auto Connect
5.2 mmol/L
Active Insulin 1.5 U
Bolus Basal
BG
12:0 0
PM
12: 00
PM
CONNECT TO PUMPCONNECT TO PUMP
?
OKOK
SkipSkip
?
OKOK
Go BackGo Back
Connect to a
MiniMed Pump?
Select “Connect
Device” on your Pump.
CONNECT TO PUMP CONNECT TO PUMP
CancelCancel
Searching...
Turn the page over to complete setup.
¬
®
QUICK REFERENCE GUIDE
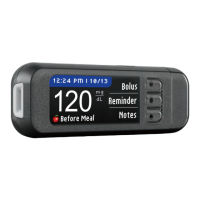
5.2
mmol
L
Before Meal Before Meal
12:00PM l 10/1312:00PM l 10/13
BolusBolus
ReminderReminder
NotesNotes
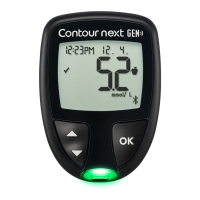
Uses only C
ONTOUR
®
N
EXT
Blood Glucose Test Strips
CONNECT TO PUMPCONNECT TO PUMP
5.2
mmol
L
Before Meal Before Meal
12:00PM l 10/1312:00PM l 10/13
BolusBolus
ReminderReminder
NotesNotes
Initial Setup of Meter and Connection
to MiniMed
®
630G Pump
1
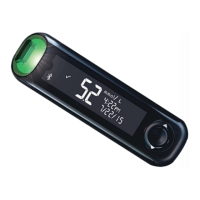
Remove the USB cap to reveal the USB
connector.
Charging Meter
2
To begin setup,
hold down the
topMenu button
for several
seconds until the
meter turns on.
Unplug Meter From Charging
Source Before Beginning Setup
Connect to Pump
3
Scroll down to select
your language.
Press OK.
5
Connect to a MiniMed Pump?
Press OK.
6
Press OK.
7
Put the meter down and pick
up your pump.
Press any button to turn the
screen on, then press the
Menu button .
Use the down arrow to
scroll toUtilities.
Press the Select button .
8
In the Utilities menu, use the
down arrow to scroll to
Device Options.
Press the Select button .
9
In the Device Options menu,
scroll to Connect Device.
Press the Select button .
10
Place the meter and pump next
to each other.
Select Auto Connect on your
pump.
11
Read the pump screen, using the down arrow to
scroll to the next page.
12
Place the meter and pump next
to each other.
Select Search on the pump.
SearchSearch
CancelCancel
CONNECT TO PUMPCONNECT TO PUMP
Select “Search” on
your Pump and meter.
The search may take up
to2minutes.
13
Check to see if Device SN
(serial number) on the pump
matches the Device SN on
the meter.
If they match, scroll to
Confirm on the pump.
Press the Select button .
CONNECT TO PUMP CONNECT TO PUMP
Use Pump to confirm Device
SN:
BGJ133333F
14
Turn the pump over.
Make sure that the SN on the
back of the pump matches
the pump serial number now
on the meter screen.
Press Next.
?
NextNext
DeleteDelete
MiniMed Pump
connected:
AA12345678
15
Select Always and press
OK on next screen.
AlwaysAlways
Ask MeAsk Me
NeverNever
Automatically send
results to the
Pump?
SEND OPTIONSSEND OPTIONS
16
Select the Date Format.
Month/Day/YearMonth/Day/Year
Day.Month.YearDay.Month.Year
SELECTSELECT
DATE FORMATDATE FORMAT
?
17
Press OK.
Note: If time and date
are incorrect, you must
change them on the
pump.
OKOK
Date / Time is
set by Pump.
DATE / TIMEDATE / TIME
?
18
Press Accept to select
AutoLog is Off.
AutoLog allows you to
mark a test result as
Fasting, Before Meal, or After Meal. See your user
guide to learn more.
AcceptAccept
Turn OnTurn On
AutoLog is Off.
AUTOLOGAUTOLOG
?
Wireless Blood Glucose
Monitoring System
?
Manual ConnectManual Connect
Auto ConnectAuto Connect
CONNECT TO PUMPCONNECT TO PUMP
4
Press OK if the correct language is displayed.
Press NO if the incorrect language is displayed.
*
Wall charger may not be included in all meter kits. Contact Customer
Service for information on obtaining a wall charger.
If pump screen goes blank, press
any button to turn it back on.
When the pump links to the meter, the SN on
the meter screen will change to a different serial
number. This number is the pump SN.
PUMP CONNECTEDPUMP CONNECTED