4-Zone Amplifier
Installation and Setup Guide
Supported Models
• C4-8AMP1-B 4-Zone Amplier
Important Safety Instructions
Box Contents
• Control4® 4-Zone Amplier
• IEC Power Cable
• 4-ZoneAmplierInstallationandSetupGuide (this document)
1. Read and keep these instructions.
2. Heed all warnings and follow all instructions for this product in this and other Con-
trol4® documents included with or related to this product.
3. Improper use of this product may result in potential electric shock.
4. Do not use this product near water.
5. Never spill liquid of any kind on this product.
6. Clean this product only with a damp or dry cloth. Do not use liquid cleaners or aerosol
cleaners to clean the product.
7. Install this product according to the manufacturer’s instructions.
8. Install this product according to the National Electrical Code ANSI/NFPA 70 and the
prevailing local codes and requirements.
9. This product is designed for IT power systems with phase-to-phase voltage 120V,
240V, or 277V.
10. This product should be operated with the type of power indicated on the marked label.
If you are not sure of the type of power available, consult your Control4 dealer or local
power company.
11. Slots and openings on a cabinet rack, and components used with this product are pro-
vided for ventilation, reliable operation, and protection from overheating of the product.
These slots and openings must not be blocked or covered.
12. This product should never be placed near or over a radiator or heat register, or in a
built-in installation unless proper ventilation is provided.
13. Never push objects of any kind into this product through cabinet slots because they
may touch dangerous voltage points or short out parts that could result in a re or
electric shock.
14. Only use the attachments and accessories included with this product or recommended
by Control4.
15. Do not allow anything to rest on the power cord. Do not install or place this product
where people will walk on the cord.
16. Do not use extension cords with any products in a Control4 system.
17. If applicable, unplug this product during lightning storms or when unused for long
periods of time.
18. This product must be installed by qualied professionals only.
19. Do not attempt to service this product yourself except as noted in this guide. Opening
or removing covers of internal components may expose you to dangerous voltage
points or other risks.
20. Refer all servicing to qualied service personnel. Servicing is required when the ap-
paratus has been damaged or frayed in any way; for example, a power-supply cord or
plug is damaged, liquid has been spilled or objects have fallen into this product, this
product has been exposed to rain or moisture, this product does not operate normally,
or this product has been dropped.
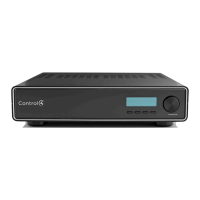
Front Display (LCD)— LCD for displaying or setting 4-Zone Amplier settings and navi-
gating system menus. Used to view or modify audio source routing and zone settings for
gain, bass, and treble. The display also shows zone activity.
Select Dial— Rotate to scroll through list items and options displayed on the LCD.
Press to make selections.
Buttons—Provides access to menu options displayed on the LCD.
1
2
3
Feature Description
C4-4AMP1-B 4-Zone Amplier
Communications: Ethernet 10/100 networking
Connections: 4 stereo inputs, two of which can be digital; 4 sets of
amplier outputs
Dimensions: 4” x 17” x 16”
Display: LCD screen
Power requirements: 100-240 VAC, 50-60 Hz
Shipping weight: Approximately 16 lbs.
ProductSpecications
WARNING! Do not expose the apparatus to dripping or splashing. Do not place
objects lled with liquids near the apparatus.
AVERTISSEMENT ! N’exposez pas l’appareil à l’égoutture ou à l’éclaboussement. Ne
placez pas les objets remplis de liquides près de l’appareil.
WARNING! Setzen Sie den Apparat nicht Bratenfett oder dem Spritzen aus. Setzen
Sie nicht die Gegenstände, die mit Flüssigkeiten nahe dem Apparat gefüllt werden.
WARNING! To reduce the risk of re or electrical shock, do not expose this apparatus
to rain or moisture.
AVERTISSEMENT ! Pour réduire le risque du feu ou de choc électrique, n’exposez
pas cet appareil à la pluie ou à l’humidité.
WARNING! Um die Gefahr des Feuers oder des elektrischen Schlages zu verringern,
setzen Sie diesen Apparat nicht Regen oder Feuchtigkeit aus.
IMPORTANT! Using this product in a manner other than outlined in this document
voids your warranty. Further, Control4 is NOT liable for any damage incurred with the
misuse of this product. See “Limited 2 Year Warranty.”
IMPORTANT ! Employer ce produit en quelque sorte autre que décrit dans ce docu-
ment vide votre garantie. De plus, Control4 n’est pas responsable d’aucun dommage
encouru avec l’abus de ce produit. Voyez que « a limité la garantie de 2 ans. »
WICHTIG! Das Verwenden dieses Produktes in gewissem Sinne anders als umrissen
in diesem Dokument hebt Ihre Garantie auf. Weiter ist Control4 NICHT für irgendeine
Beschädigung verantwortlich, die mit der Fehlanwendung dieses Produktes genom-
men wird. Sehen Sie, daß „begrenzte eine 2 Jahr-Garantie.“
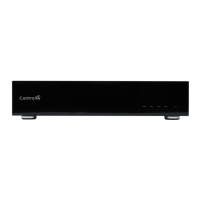
Front and Rear Panel Descriptions
Front Panel
Back Panel
Ethernet Port— RJ-45 for a 10/100 BaseT Ethernet connection.
Audio Inputs 1-4—RCA jacks for four (4) audio sources. Inputs 1 and 3 can be set up
for analog or digital sources. Inputs 2 and 4 are for analog sources only.
AmplierOutputs1-4—5-way binding post pair up to four (4) stereo class-D-amplied
zones.
Power Plug Port—For use with a standard IEC equipment power cord. Use the sup-
plied power cord or ensure the power cord you are using is at least 18 AWG or larger.
4
5
6
7
Installthe4-ZoneAmplier
This device operates as part of the Control4 home system which requires physical and
logical connections to function as designed.
This section describes how to set up the physical connections required for the Multi Channel
Amplier and all of the devices associated with it. To set up the logical connections required,
refer to Control4 ComposerProUserGuide.
Requirements and Specifications
• Ensure that your home network wiring is in place before starting your system
setup. The 4-Zone Amplier is controlled through 10/100 Ethernet networking.
Features and Benefits
• Receives up to four (4) stereo inputs with full audio switching on inputs.
• Outputs four (4) stereo class D amplied channels at 60 W per channel at 8 ohms or
at 120 W per channel at 4 ohms (not all channels driven simultaneously).
• Adjustable gain, treble, and bass for each zone.
• Master Volume Control for all outputs.
• Device chassis is two (2) standard rack spaces and rack mountable using three (3)
standard rack spaces conguring to EIA 19” rack standards. The optional Control4
Rack Mount Kit (C4-4URMK-B) provides ½ U spacing above and below the chassis.
If the Control4 Rack Mount Kit is not used, allow ½ rack space above and below the
chassis for ventilation.
• Communicates via Ethernet 10/100 networking.
2
6 7
WARNING! To reduce the risk of re, do not install this device in a cabinet that is
smaller than 20” wide x 20” deep x 12” high. If you do, the device may overheat.
4
5
You must congure the 4-Zone Amplier in the Composer project in order to control, navi-
gate, and use the amplier as designed.
Create logical connections in Composer. For instructions, refer to the Control4 Composer
ProUserGuide.
Set Up Logical Connections
Press Cong.
Using the Select Dial, scroll down to Network and press the Select Dial to view the
Network menu.
Press the Select Dial to edit your setting. Rotate the dial to choose Static IP.
Press OK (or press the Select Dial).
Edit the IP, GW, and MK elds for the Static IP network. Use the Select Dial to select a
line, then press the dial. (Scroll down to see GW and MK.)
Use the Select Dial to scroll the number up or down and edit as needed, then press the
Select Dial to move to the next eld within the number.
1
2
3
4
5
CongureNetworkSettings
1 3
WARNING! Connecting speaker wires or input cables while the 4-Zone Amplier is
powered, may cause shock and could damage the amplier. Unplug the power cord
before making connections.
AVERTISSEMENT! Les ls se reliants de haut-parleur ou les câbles entrés tandis
que l’amplicateur 4-Zone est actionné, peuvent causer le choc et pourraient endom-
mager l’amplicateur. Débranchez le cordon de secteur avant d’établir des rapports.
WARNUNG! Anschließenlautsprecherdrähte oder eingegebene Kabel, während der
Verstärker 4-Zone angetrieben wird, können Schlag verursachen und konnten den
Verstärker beschädigen. Trennen Sie das Netzanschlusskabel, bevor Sie Beziehun-
gen herstellen.
WARNING! Do not bridge outputs. The outputs on the C4-8AMP1-B cannot be
bridged. Do not connect black terminals together or to ground. The black terminals
are not at ground potential; connecting them together or to ground can damage the
amplier.
AVERTISSEMENT! Ne jetez pas un pont sur les sorties. Les sorties sur le C4-
8AMP1-B ne peuvent pas pont. Ne mettez pas les bornes noires ensemble ou à la
terre. Les bornes noires ne sont pas au potentiel au sol ; les mettre ensemble ou à la
terre peuvent endommager l’amplicateur.
WARNUNG! Überbrücken Sie nicht Ausgänge. Die Ausgänge auf dem C4-8AMP1-B
können nicht überbrückt werden. Schließen Sie schwarze Anschlüß nicht zusammen
oder an Boden an. Die schwarzen Anschlüß sind nicht am Grundpotential; sie Boden
zusammen oder an anschließen kann den Verstärker beschädigen.
1. Connect up to four (4) audio source devices (such as a controller, tuners, or CD
or tape players) to the audio input jacks.
Note: Inputs 1 and 3 can be set up for analog or digital sources.
2. Connect speakers to the audio output jacks. Tighten the binding posts to ensure
a good electrical connection to the speaker wires (even if you are using banana
plugs).
3. Use a standard 10/100 Base T Ethernet cable to connect the Ethernet port on
the amplier to your network.
4. Connect the power cord provided to the back of the amplier and to the power
outlet. Once the power cord is connected, the amplier should power up.
The 4-Zone Amplier, by default, uses DHCP to obtain a network IP address.
If the local area network does not support DHCP, you can congure the switch to use a
Static IP address instead:
View Output Assignments
When you complete the physical connections and logical connections (in Composer), you
can view or change your setup in the 4-Zone Amplier front display.
When you rst power up the 4-zone amplier, a System Status screen similar to the following
one appears momentarily.
The System Status screen is then replaced by the In to Out Assignments screen. The screen
shows 4 output zones and any assigned input sources (such as Input 1 as shown in the
following screen).
The menu buttons on the front panel provide access to the following screens:
• Audio: Displays audio settings and allows some control of inputs, outputs,
and tone controls.
• Cong: Displays current settings and allows for some conguration of the LCD
and Network settings and reset to factory defaults.
Note: After leaving the Audio or Cong menu and returning to the In to Out Assignments
screen, you may need to wait for the screen to load before selecting another menu.