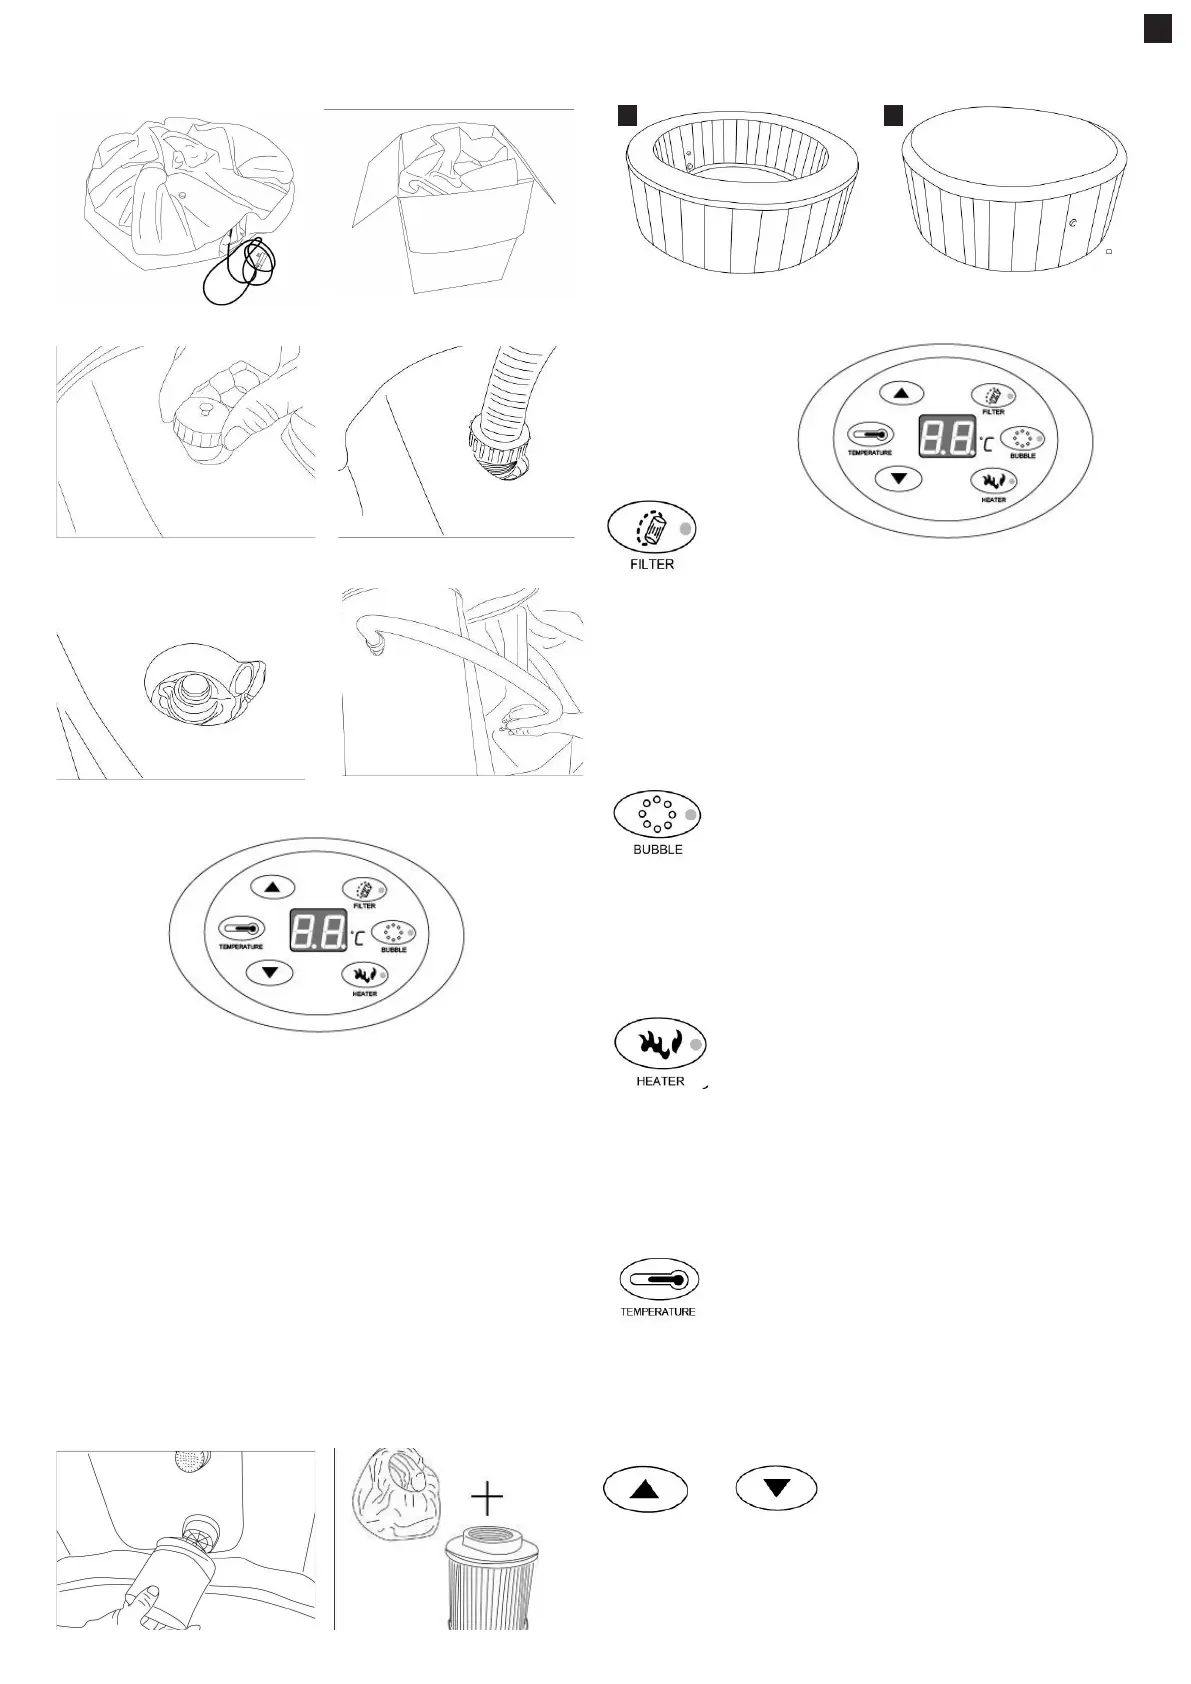
ASSEMBLY
1. Unfold the spa from the packaging. Spread the spa and cover. Make sure both are
placed with the right side up.
2. Open the air outlet on the spa. Screw one end of the ination hose onto it.
3. Open the air valve on the spa. Connect the other end of ination hose into the valve.
4. Inate th e sp a by press ing the “bubble” button.
Important: Do not over inate!
Insert the measuring end of pressure gauge inside the air valve of your spa.
The pressure gauge pointer will indicates the ination pressure of the spa.
Please always check the air pressure to keep it in GREEN RANGE.
[YELLOW RANGE] -Too low pressure
[GREEN RANGE] - Normal pressure
[RED RANGE]- Too much pressure
When the spa is properly inated, press the “bubble” button to shut off the bubbles.
Useful tip: If you want ination when the spa has lled water, you must put on the Jets for 2-3
minutes by pressing
the “bubble” button rst, and then operate according to step 2-4 above.
Important: Prevent blocked pipes
Make sure the bottom spray pipe is at before you use bubble function, as the air bubble
cannot come out from the bottom
pipe if the pipe is bent or stuck together.
5. Remove the ination hose and screw the valve tight.
6. Remove the ination hose from the air outlet and screw the nut tight.
7. Screw the lter cartridge onto the water inlet on the spa wall by turning it clockwise.
Important: Prevent blockage by using the lter
To prevent blockage caused by small parts entering the control box, please always install
the lter cartridge when using spa.
8. Fill the spa using a garden hose to ll to the water level printed on the spa wall.
9. Place the cover onto the spa, fasten the zipper.
OPERATION
Control panel
8 9
FILTER Key - On-off key for the ltration system. Press this key, and the lter pump will start
working and the red indicator lamp will be on. Press again the pump will stop working and the
lamp will be off.
When the FILTER PUMP has worked for 168 hours, the letters ‘FC’ will appear on the display
screen, accompanied by a warning tone. At that time, the indicator lamp for the key of ltra-
tion system will be on but the lter pump will actually not work. The indicator lamp for the key
of heating system will be off and the heating system will not work. Only by pressing the key
‘FILTER’ again can the indicator lamp for the key of ltration system be turned off. At that time,
the letters ‘FC’ on the display screen will disappear and so will the warning tone. Actual water
temperature will be displayed. All keys return to normal working status. ‘FC’ and the warning
tone are to remind the user to clean or replace the lter element.
BUBBLE/JET Key - On-off key for the jet system. Press this key and the air pump will start
working and the red indicator lamp will be on. Press again and the jet system will stop working
and the lamp will turn off. The jet system will stop automatically after working for 20 minutes.
To use it again, you’ll have to wait for 10 minutes and then press the “Bubble” key again. During
the time period which the bubbling function has been turned on for less than 15 minutes, bub-
bling can be stopped or once again started. If the jets are stopped after working for more than
15 minutes, bubbling can be stopped but not be started.
The re-starting of jets should wait for 10 minutes.
HEATER Key - On-off key for the heating system. Press this key to start the heating system, a
red indicator lamp will be on. Press the button again and the heating system will stop working
and the lamp will turn off. When heating is turned on, this will activate the lter pump to start
working. When the preset temperature has been reached, the heating system will stop working
while the heating indicator lamp will
not turn off. The lter pump will stop working and the ltration indicator lamp will be off. When
the water temperature falls to 2 degrees below the preset temperature, the heating system will
start working automatically and so will the lter pump.
TEMPERATURE Key – Key for setting temperature. Press this key and the numbers on the
display screen will start ashing, and the keys for increasing or decreasing temperatures can
be pressed to set the temperature. When settings are nished, press the TEMPERATURE
Key again to conrm. Default temperature is 40°C, and temperature can be set in the range
of 20-42°C.
Keys for increasing and decreasing water temperature
EN
 Loading...