2
OPERATING YOUR FIXTURE
1. Turn on power to the fixture. The fixture will turn
on for approximately 1 minute to warm up and
then will turn off.
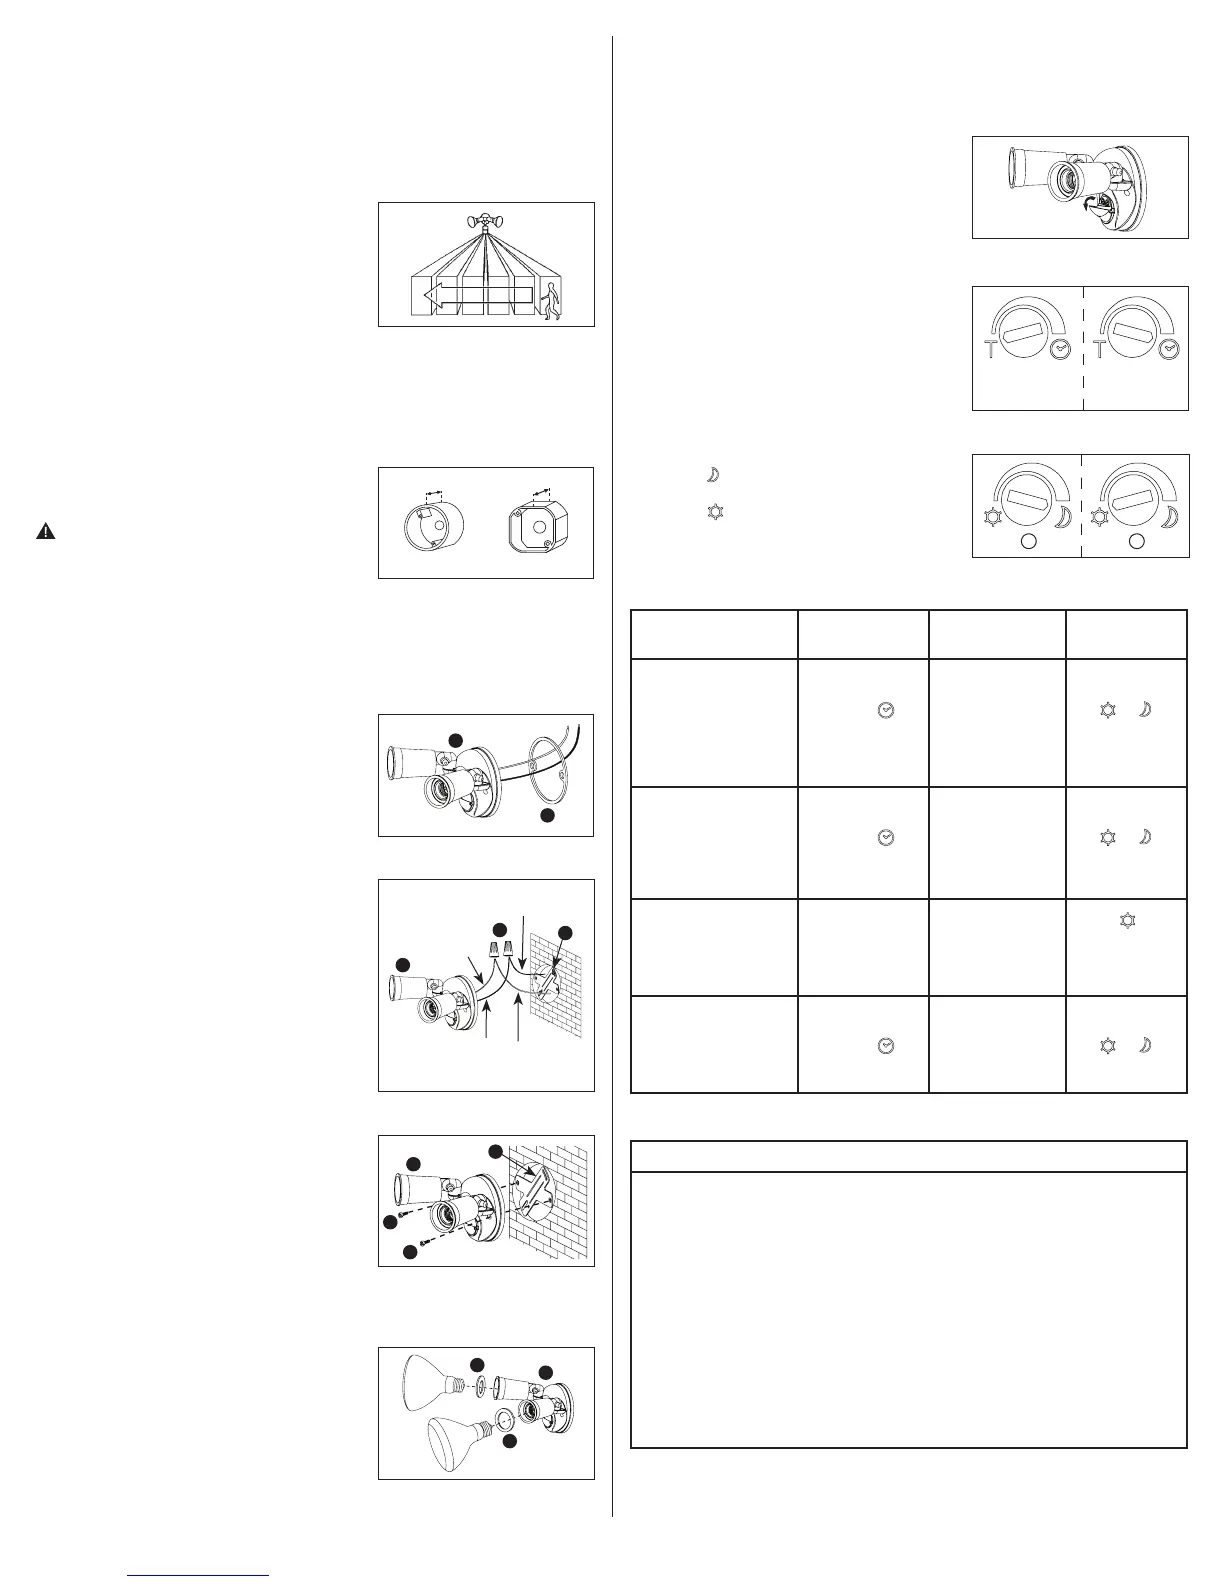
2. Open the motion sensor cover downward to expose
the sensor control knobs (Fig. 8).
3. Turn the LUX control knob counterclockwise to the
edge to “T” (test).
4. Walk through the detection area. The fixture turns
on when you move and turns off when you stop.
Wait for the fixture to turn off before moving to test
the fixture again.
5. The time adjustment knob controls how long
the light will stay on after the motion has been
detected. While the light fixture is off, turn the time
adjustment knob to the desired length of time. The
floodlight will remain on after the last motion is
detected (5 seconds to 12 minutes) (Fig. 9).
6. The LUX adjustment knob determines the light level
at which the lighting system will start operating
when you set the sensor to automatic operation.
In this setting, the floodlight will remain in the
OFF position during daylight hours. Turn the knob
closer to (moon symbol) for the light to turn on
(with motion) at night (Fig. 10A) or turn the knob
closer to (sun symbol) for the light to start
detecting motion at dusk (Fig. 10B).
WARNING: FCC Regulations state that any unauthorized changes or
modifications to this equipment not expressly approved by the manufacturer
could void the user’s authorization to operate this equipment.
SAVE THESE INSTRUCTIONS AND WARNINGS.
FOR BEST RESULTS
• Install the motion sensor/transmitter 8-12 feet above the ground. (Motion sensor is less
sensitive above 12 feet.)
• Locate motion sensor so motion moves across
detection zone (Fig. 2).
• Locate sensor away from heat producing sources to
prevent false triggering. Also be very careful not to
include objects such as windows, white walls and
water in the detection zone.
• Locate sensor away from moving objects such as
trees, large shrubs and street traffic.
• Do not install more than one motion activated floodlight on one wall switch.
• For outdoor installation, a location under eaves is preferable.
MOUNTING AND WIRING YOUR FIXTURE
NOTE: Fixture can be wall mounted only. NOT suitable
for eave or ground mount installation.
N
OTE: Coverplate mounts to recessed mounted
standard junction boxes (Fig. 3). Junction box must be
at least 1-1/2 inch in depth for proper installation for
recessed mount application.
WARNING: Risk of electric shock. Disconnect
power at fuse or circuit breaker before installing
or servicing.
1. Turn off the power at the main fuse/breaker box.
2. Attach mounting bracket (C) to recessed junction
box with two of the screws (D) provided. Either (2)
#6 or (2) #8 screws will work with most standard
junction boxes. Junction box must be at least
1-1/2 inches in depth for proper installation.
3. Thread fixture wires through coverplate
gasket (B) (Fig. 4).
4. Connect black wire to house black wire and connect
white wire to house white wire using the wire nuts
(E) provided (Fig. 5).
5. Attach fixture to mounting bracket (C) using the
(2) fixture mounting screws (F) provided (Fig. 6)
6. Apply silicone caulk around the edges of coverplate
and any open screw holes for a watertight seal.
7. Insert lampholder gaskets (G) into lampholders and
screw bulbs into each lampholder (Fig. 7). (Do not
overtighten bulbs.)
8. Turn on power at main fuse/breaker box.
Fig. 3
Octagonal
Round
1-1/2 inch 1-1/2 inch
Fig. 2
Fig. 4
A
B
Black
fixture
wire
White house
power wire
Black house
power wire
Fig. 5
White
fixture
wire
A
E
C
Fig. 6
A
F
F
C
Fig. 7
A
G
G
Fig. 8
Fig. 9
Approximately
5 seconds
Approximately
12 minutes
Fig. 10
A
B
SELECTING YOUR DESIRED FEATURE
LUX Control
Knob Setting
Auto setting
between
and
Auto setting
between
and
Auto setting
between
and
Desired
Operation
“Auto” Setting
(motion activated)
Lights should turn ON
with motion only at night
and turn OFF after
5 seconds-12 minutes
of no motion.
Standard Floodlight
Setting (Manual Override)
Lights should stay ON
continuously both
day and night.
(Must be reset manually.)
Test Setting
Lights should turn ON with
motion both day and night.
Light should turn off
after 5 seconds.
Reset fixture to
the “Auto”
(motion activated)
setting.
Time Adjust
Knob Setting
Auto setting
between
Auto setting
between
“T”
(test)
Auto setting
between
Wall ON/OFF
Switch Setting
Keep the power to
the fixture ON.
Turn the power
OFF-ON-OFF-ON
within 2 seconds.
Keep the power to
the fixture ON.
Turn the power OFF
for at least 10 seconds,
then back ON
or turn the power
OFF-ON-OFF-ON.
“T” and
“T” and
“T” and
TROUBLESHOOTING
Problem Cause / Solution
Light does not
come on with
motion at night.
No power to the fixture.
• Check if circuit breaker tripped.
• Confirm wall switch is ON.
Bulb is faulty.
• Replace bulb.
Surrounding external ambient light is too bright. (If so, the unit may
think it is daytime.)
• Re-aim the head.
• Relocate or reposition the unit away from the light.
TURN OFF POWER BEFORE CONTINUING
Wiring to the unit is loose.
• Check wiring, and reconnect if necessary using wire
connectors (E) provided.
 Loading...