EasyManua.ls Logo

Cosmopolitan COSMOLiving Westerleigh 3642013COM User Manual

Cosmopolitan COSMOLiving Westerleigh 3642013COM
30 pages
To Next Page IconTo Next Page
Page #1 background imageLoading...
Page #1 background image
B343642013COM00
Do Not Return This Product!
Contact our customer service team for help rst
Call: 1-800-489-3351 (toll free)
Monday-Friday 9am - 5pm CST
Visit: www.ameriwoodhome.com
Unit can p over causing severe injury or death.
–Anchor unit to stud in wall (if instructed to)
–Do not allow children climb on unit
–Put heavy items on lower shelves or drawers
Westerleigh 6 Drawer Dresser White
3642013COM
Date of Purchase: ____/____/_____
Lot Number:
THIS INSTRUCTION BOOKLET CONTAINS IMPORTANT SAFETY INFORMATION. PLEASE READ AND KEEP FOR FUTURE REFERENCE.
WARNING
Follow Ameriwood Home
Easy Tough
Assembly Diculty Meter
Question and Answer IconNeed help?

Do you have a question about the Cosmopolitan COSMOLiving Westerleigh 3642013COM and is the answer not in the manual?

Cosmopolitan COSMOLiving Westerleigh 3642013COM Specifications

General IconGeneral
Product NameCOSMOLiving Westerleigh 3642013COM
CategoryIndoor Furnishing
MaterialWood
ColorBrown
StyleModern
Weight Capacity250 lbs

Summary

Safety and Assembly Preparation

Customer Support Contact

Contact details for product assistance and troubleshooting.

General Safety Warnings

Essential precautions to prevent serious injury or death from furniture tip-over.

Helpful Assembly Hints

Tips and advice to ensure a smoother and easier assembly process.

Before You Start Checklist

Key steps and preparations required before beginning the assembly.

Cam Lock Fastening System Explained

Detailed explanation of the cam lock mechanism used throughout assembly.

Component Identification

Board Identification Guide

Visual reference for identifying all wooden parts and their labels.

Hardware and Tool Identification

List and visual guide for all fasteners, hardware, and tools included.

Step-by-Step Assembly Instructions

Step 1: Base Assembly

Initial construction of the dresser base and leg attachments.

Step 2: Drawer Slide Installation

Attaching the drawer slides to the main frame components.

Step 3: Side Panel Assembly

Connecting the main vertical side panels to the base.

Step 4: Top Molding Attachment

Affixing the decorative top molding pieces to the frame.

Step 5: Main Body Assembly

Connecting larger structural panels to form the main body.

Step 6: Top Panel Installation

Securing the main top surface panel to the dresser frame.

Step 7: Back Panel Attachment

Installing the structural back panel for unit stability.

Step 8: Drawer Side Construction

Assembling the side panels of the individual drawers.

Step 9: Drawer Back Panel Attachment

Completing the drawer box structure by attaching the back panel.

Step 10: Drawer Slide to Drawer Connection

Connecting the drawer slides to the assembled drawer boxes.

Step 11: Drawer Bottom Installation

Inserting the drawer bottom panels into the drawer boxes.

Step 12: Drawer Front Panel Attachment

Securing the drawer faces to the front of the drawer boxes.

Step 13: Drawer Handle Installation

Attaching the drawer handles to the front panels.

Final Safety and Product Information

Anti-Tipping Safety Bracket Installation

Crucial step to secure the unit to the wall and prevent tip-overs.

Maximum Load Capacity Guidelines

Recommended weight limits for safe use of the dresser and drawers.

Product Registration and Feedback

Instructions for registering your product and providing feedback.
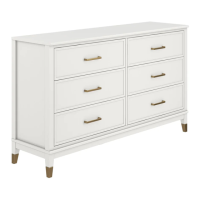
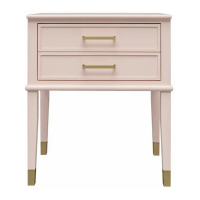
Related product manuals