This document provides assembly instructions and important information for the RUS4265-WM swing, a product from Courtyard Creations Inc. It is designed for residential use only and is not intended for commercial purposes.
Function Description
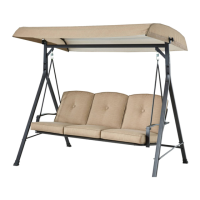
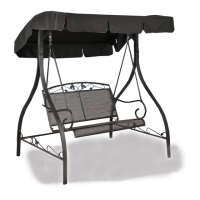
The RUS4265-WM is a three-person outdoor swing designed for relaxation and comfort. It features a sturdy frame, a cushioned seat, and a canopy for shade. The swing's design allows for conversion of the seat assembly into a bed, offering versatility for different relaxation needs. The assembly process involves constructing the main frame, attaching the seat assembly, and installing the canopy.
Important Technical Specifications
- Model Number: RUS4265-WM
- Weight Limit: 750 lbs.
- Tools Required (Not Included): Phillips Screwdriver
- Tools Provided: Nut Wrench (Part #31), Hex. Key Wrench (Part #30)
- Main Frame Components:
- Top Cross Beam w/Adjustable Teeth (Part #1)
- Rear Upright Support (Part #2)
- Front Upright Support (Part #3)
- Lateral Cross Brace (Part #4)
- Rear Cross Brace (Part #5)
- Swing Arm Tube (Part #11)
- Leg Cap (Part #14)
- Seat Assembly Components:
- Right Seat Arm (Part #6)
- Left Seat Arm (Part #7)
- Seat Front Support (Part #8)
- Seat Rear Support (Part #9)
- Seat Assembly (Part #10)
- Suspension Spring (Part #16)
- Cushion (Part #33)
- Canopy Components:
- Front/Rear Canopy Brace (Part #12)
- Side Canopy Brace (Part #13)
- Canopy (Part #32)
- Canopy/Frame Connector (Part #28)
- Plastic Screw (Part #29)
- Fasteners:
- Bolt M6*60 (Part #17)
- Bolt M6*45 (Part #18)
- Bolt M6*40 (Part #19)
- Bolt M8*80 (Part #20)
- Bolt M6*35 (Part #21)
- Screw ST4.2*16 (Part #22)
- Washer d6.5D161.2 (Part #23)
- Washer d8.5D171.6 (Part #24)
- Plastic Nut M6*P1.0 (Part #25)
- Jam Nut M8*1.25 (Part #26)
- Plastic Washer (Part #27)
Usage Features
Assembly Process:
The assembly is divided into several steps (A through H) to ensure proper construction.
- Step A (Frame Assembly): Involves connecting the top cross beam, upright supports, lateral cross braces, and rear cross brace using bolts, washers, and plastic nuts. It is crucial not to tighten bolts and nuts until all components for a specific step are loosely fastened. The rear cross brace (Part #5) has a label arrow mark that should face upwards. Leg caps are inserted into the base feet.
- Step B (Seat Assembly): This step focuses on assembling the seat. The seat arms (Parts #6 and #7) are inserted into the seat supports (Parts #8 and #9) and secured with plastic joint covers, bolts, washers, and plastic nuts. A key detail is ensuring the "back" labels on the left seat arm and seat rear support align, and the clip holders on the seat rear support are positioned inside the swing with the open side facing upwards. The seat assembly (Part #10) is then attached to the seat arms using bolts, washers, plastic washers, and jam nuts. The support brace on the back of the seat assembly must be fully inserted into the clip holders. Finally, the swing arm tubes (Part #11) are attached to the seat arms, and suspension springs (Part #16) are hooked into the top of the swing arm tubes.
- Step C (Suspension): The opposite ends of the suspension springs (Part #16) are hooked into the holes on the top cross beam w/adjustable teeth (Part #1). A warning emphasizes ensuring the suspension springs go completely through the holes on both the top cross beam and swing arm tubes for safety.
- Step D (Canopy Frame Assembly): This involves sliding canopy/frame connectors (Part #28) into the side canopy braces (Part #13) and fastening them with screws (Part #22). The teeth on the connectors should face toward the inside of the frame. Front/rear canopy braces (Part #12) are inserted into the sleeves of the canopy (Part #32). The side canopy braces are then fastened to the front/rear canopy braces using bolts (Part #21). Finally, the canopy is secured to the side canopy braces with Velcro.
- Step E (Canopy Attachment): The canopy/frame connectors (Part #28) are fastened to the adjustable teeth on the top cross beam w/adjustable teeth (Part #1) using plastic screws (Part #29).
- Step F (Cushion Placement and Final Check): Cushions (Part #33) are placed onto the seat assembly (Part #10). A crucial step is to double-check and ensure all bolts have been completely tightened to assure stability.
- Step G (Seat-to-Bed Conversion): The swing features a safety lock mechanism that allows conversion of the seat assembly into a bed. When in the swinging (seat) position, safety locks on the seat rear support (Part #9) should be fully locked. To flatten the seat into a bed, the safety lock is lifted, the support brace is removed, and then re-inserted into the rear cross brace (Part #5) to secure the assembly in the bed position.
- Step H (Locking Mechanism): This step further illustrates the locking mechanism for converting the seat assembly into a bed.
Safety Warnings:
- Residential Use Only: This product is strictly for residential use, not commercial.
- Child Safety: Keep children away during assembly due to small parts. Children should always be under direct adult supervision when using the product.
- Packaging: Do not discard packaging until all parts and fittings are checked.
- Placement: The swing must be placed on level ground, at least 6 feet away from any obstructions (fences, garages, houses, overhanging branches, laundry lines, electrical wires).
- Canopy in Wind: Always remove the canopy in heavy wind conditions to prevent tipping and damage.
- Suffocation Hazard: Keep plastic bags and small parts away from babies and children.
Maintenance Features
- Cleaning:
- Wash frame parts and fabric with mild soap and water.
- Rinse thoroughly and allow the frame to dry completely.
- Allow the fabric to drip dry.
- Do NOT use bleach, acid, or other solvents on the fabric or frame parts.
- Storage: To prolong the life and beauty of the swing, it is recommended to store it in a dry area when not in use (e.g., overnight or on rainy days).
- Regular Inspection:
- Inspect and tighten all bolts or fasteners on a regular basis to ensure proper performance and safety.
- Check all bolts and nuts for tightness regularly.
- Ensure suspension springs are always properly hooked before each use.
- Oil all metallic moving parts during usage season.
- Unauthorized Repairs: The manufacturer will not accept responsibility for unauthorized repair or modifications to the swing.
Customer Service:
For missing or damaged parts, or assembly difficulties, customers are advised to contact the service center directly instead of returning the product to the store.
- Toll-Free Tel: 1-877-539-7436
- Fax: 1-877-539-7439
- Hours: Monday through Friday, 9:00 AM to 4:30 PM Eastern Time.
- When contacting, provide the model number of the product and the part number/material code from the parts list.