CPR Aquatic, INC•P.O. Box 1111•3749 West End Road, Arcata, CA 95521
CPR Technical Support (707) 826-9636 • FAX (707) 826-9623
www.cprusa.com • cpr@cprusa.com
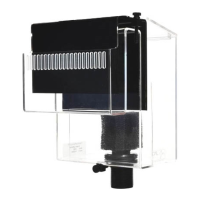
CS100
Continuous Siphon Overflow
CPR’s Continuous Siphon Overflows provide the most efficient means of getting water to an external
filter without expensive modifications to the tank. These precision-engineered overflows skim water from
the surface of your aquarium at flow rates up to six times greater than units with tubes. Advantages
such as water level adjustment, quiet operation, fish screen, and a black top to reduce algae growth all
make the CPR Continuous Siphon Overflow the best on the market. Please read through the set up
directions before and during the actual set up to ensure it is done correctly.
To place your overflow into operation:
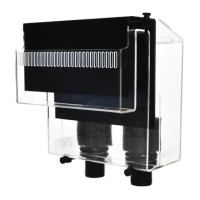
1. Open the packaging carefully and inspect the unit for damaged or missing parts. You should have:
(1) Overflow body
(1) Fish screen
(1) Pre filter screen and sponge
(1) Vent tube with small “O” ring
(1) Bulkhead assembly
(4) Adjustment screws
(1) Airline
(1) Aqua Lifter pump and Acrylic Lid (included in Deluxe models)
If any items are damaged or missing, please contact your dealer immediately.
2. Before using the overflow for the first time it is important to decide where to position the unit. It is
best to have the overflow as far away from the inflow as possible to reduce turbulence. It is also
important to check the capacity of your sump as well as the flow rate of your return pump on your
filtration system to prevent possible overflow. It will be necessary to add water to the system after
it begins running. The amount of water that you will need to add will depend on the sump size and
design.
3. Assemble the bulkhead fitting as shown in diagram A. Insert the pre-filter screen into the bulkhead
and place the pre-filter sponge over the screen. Insert the vent tube into the hole at the top of the
pre-filter screen. The “O” ring can slide up or down to adjust the height of the vent tube once the
unit is operational.
4. Connect the bulkhead fitting to the hose going into your filtration system. You should use 1”
Schedule 40 PVC inserted into the slip fitting of the bulkhead. The PVC can be run directly into the
filter or can be attached to 1 1/4” flexible line (using the optional PVC adapter available at Ameka
Aquatics.com). The fewest bends in the line will ensure the quietest operation. To prevent leaking
from where the PVC inserts into the bulkhead, you should use PVC cement to secure it into place. If
using adapters other than PVC, All-Purpose Cement should be used to secure the plumbing in place.
5. Place the unit on the edge of your tank and allow the water to fill the front chamber. Adjust the
lower adjustment screws so that the unit is parallel to the back of the tank.