Do you have a question about the Craftsman 320.19730 and is the answer not in the manual?
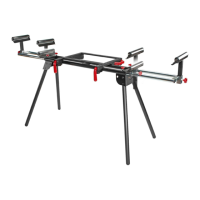
Identifies the product title and model number for the universal bench top tool work stand.
Caution to read the manual and follow safety rules before using the product.
Lists the main sections included in the operator's manual.
Details the one-year full warranty coverage for Craftsman products.
Encourages users to save and read all instructions for future reference.
Explains the importance of safety symbols for attracting attention to potential dangers.
Defines the meanings of DANGER, WARNING, and CAUTION safety alerts.
Explains messages related to preventing equipment or property damage.
Specific warning regarding the necessity of wearing safety goggles or glasses.
Guidelines for maintaining a clean, well-lit, and hazard-free work environment.
Advice on operator alertness, proper attire, and avoiding distractions.
Ensuring the work stand and attached power tool are properly set up before use.
Methods for securing workpieces and safe practices for tool operation and care.
Warnings and advice concerning electrical hazards, including grounding and wet conditions.
Explanation of double insulation and importance of matching tool voltage.
Recommendations for selecting and using appropriate extension cords for safety.
Guidelines for stable setup, secure tool mounting, and following power tool manuals.
Interpretation of various symbols found on the tool's label.
Warnings regarding material feeding direction and keeping hands clear of cutting areas.
Prohibits climbing or sitting on the stand; ensures bystanders wear safety gear.
Checking the tool stand for damage or misalignment before assembly or use.
Instructions for unpacking the tool stand and inspecting its components.
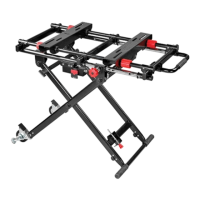
The first steps in unfolding the tool stand and preparing it for use.
Procedures for unlocking the carrying handle and lifting the table top assembly.
Steps to extend the stand's legs and secure the base for stability.
How to extend the chrome extension bars for the support bar.
Connecting and locking the support bar into the table top groove.
How to change the width of the table top assembly's working area.
Securing the table top in the desired position after adjustment.
Instructions for locking and unlocking the caster wheels.
Diagram showing labeled parts of the tool stand assembly.
Specific instructions for mounting a miter saw or similar tool.
Aligning mounting holes and using bolts to connect the tool securely.
Alternative mounting procedure using a plywood board for specific tools.
Warning for saws regarding sawdust, fire risk, and following tool manual instructions.
Instructions on how to fold and collapse the tool stand for compact storage.
Overview of the stand's lightweight, compact design, 'X' frame, and stability features.
Details on plywood compatibility, carrying handle, and product specifications (weight, height, capacity).
Guidelines for handling, cleaning, and storing the tool stand to maintain performance.
Specifies the model number (320.19730) for the universal bench top tool work stand.
A visual diagram showing all the parts of the tool work stand.
A comprehensive list of all parts with their corresponding numbers, descriptions, and quantities.
| Brand | Craftsman |
|---|---|
| Model | 320.19730 |
| Category | Racks & Stands |
| Language | English |