EasyManua.ls Logo

Craftsman 98020 - User Manual

Craftsman 98020
32 pages
Print Icon
To Next Page IconTo Next Page
Loading...
Operator's Manual
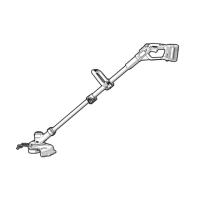
40v MAX* Lithium Trimmer / Edger
Model- 98020
KEY iNFORMATiON YOU SHOULD KNOW:
The guard must be installed before trimming or edging - if not, the motor will
overheat (page 8).
When replacing the line, use only .065 inch diameter ROUND line (Craftsman_ Model
#98030 is recommended) - otherwise the tool will not function properly (page 11).
Do not bump the feed head against the ground - it will disrupt the feed mechanism.
For use only with Craftsman_'40v Max* batteries.
zLCAUTION: Read, understand and follow
all Safety Rules and Operating Instructions
in this manual before using this product.
Sears Brands Management Corporation,
Hoffman Estates, IL 60179 U.S.A.
See the full line of Craftsman ®products
at craftsman.corn
Part No. 90616328 REV01
SAFETY
OPERATION
MAINTENANCE
TROUBLESHOOTING
ESPANOL PG. 15
*Maximum initial battery pack voltage (measured
without a workload) is 40 volts. Measured under a
workload, nominal voltage is 36.
*El maximo voltaje inicial del paquete de baterias
(medido sin una carga de trabajo) es 40 voltios. Si se
mide con una carga de trabajo, el voltaje nominal es 36.
March 2015

Questions and Answers

  • B
    Brian SanchezAug 2, 2025
    What to do if my Craftsman Trimmer unit will not start?
    • D
      David BlackburnAug 2, 2025
      If your Craftsman Trimmer unit won't start, there are a couple of things you can check. Make sure the battery is installed properly. Also, ensure the battery is adequately charged.
  • P
    pagejenniferAug 7, 2025
    What to do if automatic line feed does not feed more line in Craftsman 98020?
    • M
      Melissa TaylorAug 7, 2025
      If the automatic line feed on your Craftsman Trimmer isn't feeding more line, consider the following: First, check the spool to see if the line is wound correctly; it should not be crisscrossed. If it is, unwind and rewind it neatly. Inspect the spool for any damage and replace it if necessary. Ensure enough line remains on the spool. The cutting line should protrude approximately 4-13/16 inches (122mm) from the spool. Finally, if the cutting line is too long, trim it, so it just reaches the trimming blade.
  • A
    Anna MartinezAug 13, 2025
    Why Craftsman Trimmer battery won't charge?
    • K
      Kevin WatsonAug 13, 2025
      There are several reasons why your Craftsman Trimmer battery might not be charging. First, ensure the battery is correctly inserted into the charger until the green LED appears. If the battery is totally drained, allow it to charge for up to 8 hours. Also, verify that the charger is plugged into a working outlet. Finally, the surrounding air temperature could be too hot or too cold; move the charger and tool to a location where the air temperature is between 40°F (4.5°C) and 105°F (40.5°C).
  • B
    barnesmatthewAug 20, 2025
    Why is my Craftsman Trimmer overfeeding line?
    • J
      jennifer78Aug 20, 2025
      If your Craftsman Trimmer is overfeeding, it might be because you're holding it at too sharp of an angle. Make sure you are not exceeding a 10° angle.
  • Z
    Zachary SnyderAug 26, 2025
    What to do if line unravels when I remove the cap or spool on my Craftsman 98020 Trimmer?
    • G
      gluceroAug 27, 2025
      If the line unravels when you remove the cap or spool on your Craftsman Trimmer, make sure to park the lines in the holding slots before removing the cap or spool.

Summary

Safety Information

Operation Information

Maintenance Information

Troubleshooting Guide

Craftsman Limited Warranty

Symbol Signal Meaning

Important Safety Warnings and Instructions

Symbols Explained

Battery Charger Safety Instructions

Battery Pack Safety Instructions

Storage Recommendations

Parts and Features

Charging Procedure

Charger Diagnostics

Bad Battery Detection

Identifies a weak or damaged battery with a red LED flash pattern.

Hot;Cold Pack Delay

Suspends charging for batteries too hot or cold until normalized.

Leaving Battery in Charger

Important Charging Notes

Installing and Removing Battery Pack

State of Charge Indicator

Checking Charge During Use

Displays battery charge level using LEDs, indicating percentage of charge.

Assembly and Adjustment

Attaching the Guard

Instructions for securely attaching the protective guard to the trimmer head.

Attaching the Auxiliary Handle

Steps for attaching the auxiliary handle for better control and comfort.

Adjusting Auxiliary Handle Position

Guidance on adjusting the auxiliary handle for optimal balance and comfort.

Adjusting Tool Height

Releasing the Cutting Line

Operation

Setting Trimming or Edging Mode

Instructions on how to set the tool for trimming or edging functions.

Switching On and Off

Procedure for turning the trimmer on and off safely.

Power Command (Max Power;Runtime)

Using the dial to optimize performance or battery runtime.

Operating the Trimmer

Guidance on the proper technique for using the trimmer.

Edging Techniques

Tips and best practices for edging with the trimmer.

Helpful Cutting Tips

Advice for effective cutting and line usage.

Cutting Line and Line Feeding

Information on the correct cutting line and how the auto-feed system works.

Replacement Accessories

Details on approved replacement parts, including cutting line and spools.

Rewinding Spool

Maintenance

Troubleshooting

Craftsman 98020 Specifications

General IconGeneral
Power SourceGasoline
Adjustable HandleYes
Warranty2-year limited
Shaft TypeStraight
TypeString Trimmer
Cutting Width/Swath17 inches
Line Diameter0.095 inch

Related product manuals