7
ENGLISH
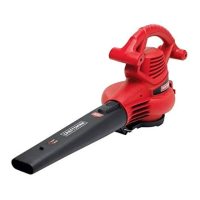
Proper Hand Position (Fig. A, D)
WARNING: To reduce the risk of serious
personal injury, ALWAYS use proper hand position
as shown.
WARNING: To reduce the risk of serious
personal injury, ALWAYS hold securely in anticipation
of a sudden reaction.
Hold the blower with one hand on the main handle
3
Fig.D
3
Switching On (Fig. A, D, E)
CAUTION: Do not point unit discharge at
self or bystanders.
CAUTION: Always wear safety glasses and
hearing protection. Wear a filter mask if the operation
is dusty. Use of gloves, long pants and substantial
footwear is recommended. Keep long hair and loose
clothing away from openings and moving parts.
To turn the blower on, depress the variable speed trigger
1
.
To turn the blower off, release the variable speed trigger.
To lock the blower on, pull back on the cruise control
lever
(
2
, as shown in FigureE. The blower runs at higher
speeds as the lever is moved further. The cruise control lever
can also be pulled back to start the blower without needing
to first depress the variable speed trigger.
To turn the blower off when using the speed lock lever,
push the lever toward the front of the blower.
• Hold the blower with one hand as shown in FigureD
and sweep from side to side with the tube
4
several
inches above the hard surface. Slowly advance keeping
the accumulated pile of debris in front of you.
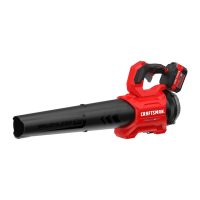
until the lock engages the tube and an audible click
isheard.
• Pull on the tube to ensure it is securely in place.
• To remove the tube, insert a screwdriver into the
unlocking hole
9
on both sides of the housing and pull
tube out.
Fig.B
7
8
9
OPERATION
WARNING: Do not operate blower
without tube securely in place. Never reach down into
housing through tube hole.
WARNING: Always remove the battery
when you leave blower unattended or when storing,
checking, adjusting, cleaning, or working onblower.
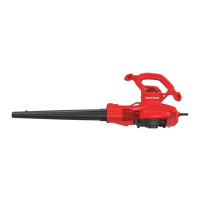
Installing and Removing the Battery Pack
(Fig. C)
NOTE: For best results, make sure your battery pack is
fullycharged.
To install the battery pack
5
into the tool handle, align the
battery pack with the rails inside the tool’s handle and slide
it into the handle until the battery pack is firmly seated in
the tool and ensure that it does notdisengage.
To remove the battery pack from the tool, press the release
button
6
and firmly pull the battery pack out of the tool
handle. Insert it into the charger as described in the charger
section of thismanual.
Fig.C
5
6