REPLACEMENT PARTS:
LIMITED WARRANTY
INSTRUCTION
MANUAL
FOR
No. 575 MULTI-UNDERCUT SAW
Printed by: HF FORM F0575 01/2015
Milpitas, CA 95035 TEL: (408) 946-6100
CRAIN CUTTER CO., INC.
Crain warrants this saw to be free of defects in work-
manship and quality of materials under normal use for
a period of six months from the date of purchase. Not
covered is the motor or motor brushes. Burnt motors
or worn-out brushes will be repaired at a charge.
Any parts of this saw found defective subject to the
guarantee will be replaced at no charge. Credit in full
or part can not be extended by the distributor, nor will
a new saw be given as a replacement or loaner.
Saws subject to this warranty must be accompanied
by the same, and returned freight PREPAID to Milpitas,
CA, and must be in assembled condition.
DATE OF MFG.
Plunge to appropriate depth. Always move the saw from
left to right only.
Do not force the saw; let blade cut at highest RPM possible.
Remove the saw from the cut, and release the switch to stop.
When the switch is released, the motor and the blade
coast to a stop. KEEP HANDS AWAY FROM THE BLADE.
THE BLADE CAN CUT YOU AS LONG AS IT IS TURNING.
Do not remove a hand from the handles to clear debris
until the saw is moved away and the blade is stopped.
If the saw is dropped, the blade guard may be bent or
otherwise damaged, restricting full return. Sawdust that ac-
cumulates behind the blade guard will cause it to become
clogged, especially drywall dust. Check operation of the
blade guard before each use. Do not use saw if the blade
guard does not operate properly. When not in use, store saw
in the custom carrying case. If the switch malfunctions, the
saw motor may continue running even after being switched
off. Turn off by unplugging. Repair the switch immediately!
Do not use the saw with a faulty switch.
MAINTENANCE:
Figure 9
SPECIFICATIONS:
POWER UNIT Model No. 575
Voltage: 120VAC, 60 HZ.
Amperes: 8.0 Amps
No Load Speed: 10,000 RPM
Max. Depth Adj: 1-1/4"
Max. Height Adj: 1"
Toe Space Specifications
Minimum Height: 3-1/2"
Maximum Depth: 3-1/2"
Gross Weight: 11.6 LBS.
Replacement Blade: #556 Carbide-Tipped Blade
Order No. Description Order No. Description
Figure 10 Figure 11
Cut towards the corner at 45˚ angle until the depth gauge
meets the right wall (see Figure 9). Switch off and unplug
saw. Wait for blade to stop. Remove depth gauge and con-
tinue the cut (see Figure 10). Push the saw into the corner
as shown until the housing meets both walls (see Figure 11).
WARNING: Depth gauge covers the blade and makes the
saw safer to use. Always unplug saw and re-install depth
gauge when you are done with the inside corner cutting.
INSIDE CORNER CUTTING:
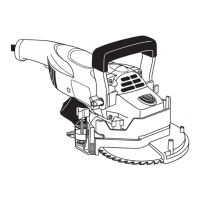
1575-A Housing
1575-C Power Unit, 120 volts
1575-K Brush Set (2 - not shown)
1575-S Brush Holder Assembly (2)
(not shown)
1575-W Power Cord Strain Relief
(not shown)
1555-B Height Adjuster
1555-D Plastic Handle
1555-E Depth Gauge
1555-F Blade Guard
1555-G Three-Arm Knob
1555-L Handle Fastener Set (4)
1555-M1 Guide Washer &
Fastener Set (8)
1555-N Housing Fastener Set (4)
1555-O Set Screw
1555-P Snap Ring
1555-R Carrying Case (not shown)
1555-V1 Marquardt Switch (not shown)
1555-X Return Spring Screw Only
1555-Z Power Cord (not shown)
1810-J Blade Guard Spring
1812-O Blade Spacer
1812-P Blade Clamp
1812-Q Blade Screw
1812-R Hex Wrench
KICKBACK HAZARDS:
t
THIS SAW PLUNGE-STARTS. PLUNGE SLOWLY
BEFORE PUSHING FORWARD!
t
KEEP RPMs HIGH. DON’T FORCE THE SAW,
ESPECIALLY WHEN NAILS MAY BE PRESENT.
DO NOT OVERHEAT.
t
HEIGHT ADJUSTMENT: KEEP THE BLADE
HOUSING FLAT ON LEVEL FLOORS, AND
KEEP BLADE PARALLEL TO THE FLOOR AT
ALL TIMES.
t
ALWAYS PUSH SAW AGAINST BLADE ROTATION.
NEVER PULL TOWARDS YOU OR RUN IN REVERSE.
WARNINGS:
KEEP KNEES AND OTHER
BODY PARTS OUT OF KICK
BACK ARC.
KNEEL TO THE SIDE!
DO NOT USE STANDING UP!
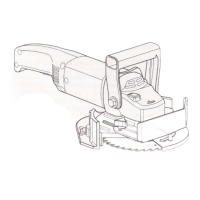
SAFE OPERATING POSITION:
A
R
C
CUTTING DIRECTION
D
L
O
G
1575-C
M1
1575-A
B
E
N
F
X
P
1812-O
1812-P
1810-J
1812-Q
1812-R