Do you have a question about the Create Room Cubby and is the answer not in the manual?
Lists all required hardware components including posts, dowels, screws, and cams.
Details the necessary tools for assembly, such as drills and screwdrivers.
Step-by-step guide on using the cam and post locking system for secure connections.
Locate and insert posts and dowels into the Base, Side 1, and Side 2 panels.
Insert cams into the underside of the Base panel.
Connect Side 1 and Side 2 panels to the Base, then lock cams.
Insert the back panels into the channels of the assembled unit.
Prepare and attach the Lid to the top of the unit, locking cams.
Slide the divider into the Cubby and secure connector bolts.
Use 25mm euro screws to secure the back panels.
Secure the Cubby to the wall using anchors and wire.
Insert tracks and shelves into the Cubby.
Optional step to connect multiple Cubbies using a connecting plate.
The Create Room Cubby is a modular storage unit designed to help users organize their homes efficiently. It utilizes a cam and post locking system for assembly, ensuring a secure and stable structure. The cubby is designed to be built by two people, emphasizing the need for assistance during the assembly process to ensure safety and ease of construction.
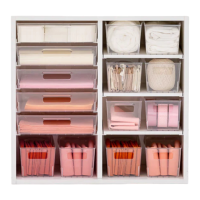
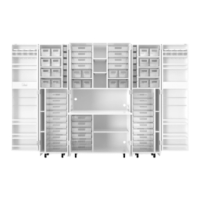
The Create Room Cubby serves as a versatile storage solution for home organization. Its primary function is to provide structured storage space, which can be customized with tracks and shelves, as well as DiviDrawers (sold separately) for a personalized organizational planogram. The cubby is designed to be anchored to a wall for stability and safety, preventing accidental tipping. Additionally, multiple cubbies can be stacked on top of each other using a connecting plate, allowing for vertical expansion of storage space to accommodate growing organizational needs. The product aims to simplify home organization by offering a robust and adaptable storage system.
While specific dimensions and material details are not explicitly listed in the provided manual pages, the hardware list gives an indication of the construction components:
The locking system involves cams and posts, where posts are inserted into panels until a plastic sleeve touches the wood, and cams are then inserted with an arrow facing the post. The cams are gently turned 220 degrees clockwise to lock into position. This cam and post system is a common method for flat-pack furniture assembly, known for its ease of use and secure connections.
The manual does not explicitly detail maintenance features or instructions for cleaning and upkeep. However, as a piece of furniture, general maintenance would likely involve:
The Create Room Cubby is presented as a user-friendly and adaptable storage solution, emphasizing ease of assembly with assistance, safety through wall anchoring, and expandability for diverse organizational needs.
| Brand | Create Room |
|---|---|
| Model | Cubby |
| Category | Indoor Furnishing |
| Language | English |