Do you have a question about the Creek Audio EVOLUTION 100A and is the answer not in the manual?
Read and retain the manual for future reference and follow all warnings.
Do not use near water to avoid electric shock or fire hazards.
Ensure adequate ventilation around the unit to prevent overheating.
Keep away from heat sources; designed for normal room temperature.
Disconnect power before cleaning; avoid solvents and chemical cleaners.
Power switch is single-pole; always disconnect power cord for safety.
Do not disable the unit's grounding.
Locate outdoor antennas away from power lines.
Unplug the power cord when not in use for extended periods.
Immediately turn off and unplug if an abnormal smell occurs.
Refer to a professional for repairs if water damage, malfunction, or damage occurs.
Keep packing material for future use; it contains cables, remote, and batteries.
Place on suitable furniture; ensure good ventilation around heat sinks.
Check voltage setting; plug into a suitable outlet, avoid overloading.
Replace fuse with identical rating (T8AL 250V) to prevent fire risk.
5 standard Line level inputs; some configurable for different requirements.
Suitable for CD, Tuner; can be MM/MC Phono with optional module.
Suitable for any line level source.
Can be Line Level or AV Direct input (bypasses pre-amp).
Connect to Pre-out for bi-amping or slave another unit.
Duplicates Line 3; also has balanced connection option.
Use either RCA or XLR balanced input, not both.
Bypasses pre-amp for sources with volume control.
Provides pre-amp output for driving other amps or subwoofer.
Hold MENU, turn on power, release when "Setup Menu" appears.
Configure Line 3 as Line Level or Power Amp Input (AV Direct).
Configure Line 4 as Line Level, Power Amp Input, or Factory Defaults.
Use rotary control to select and press to confirm options.
Can be used alone or with speakers; select via MENU.
Install optional Creek plug-in 'Sequel Phono' board for vinyl playback.
Connect turntable's ground wire to the rear panel's ground terminal.
Connect with amplifier power off; use suitable cables and tighten terminals.
Ensure correct polarity (+ to +, - to -) for proper bass and stereo image.
Never short speaker cables; turn off amp before connecting/disconnecting.
Controls amp, CDP, tuner; cannot switch mains power.
Connect IN to OUT using 3-pin 3.5mm stereo cable; never IN to IN.
Hold INFO, power on to see firmware version and phono/tuner card status.
Avoid placing near mobile phones or radio transmitters to prevent performance issues.
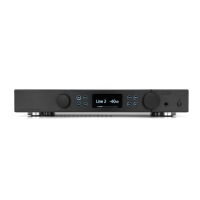
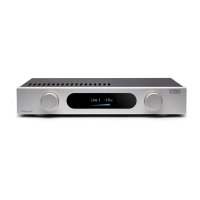
Overview of rotary selector, buttons, display, volume, headphone socket.
Press power button; display shows Creek logo, then input and volume.
Select input using the left-hand rotary knob or remote control.
Adjust volume with right-hand knob or remote; press knob for mute.
Output depends on volume and input signal level; volume can be low.
Last volume is remembered; startup volume limited to -20dB.
Press MENU to reveal 3 options; use rotary control to select and confirm.
Configure display to be Always On or Auto Off.
Adjust screen brightness to Full, Medium, or Low.
Adjust left/right channel balance using balance button and rotary control.
Adjust Bass and Treble; tone controls can be bypassed or reset to zero.
Features short circuit, over-temperature, and DC offset protection.
Isolates output on short circuit; check speaker wiring.
Check ventilation and speaker wiring if over-temperature occurs.
Indicates internal fault or severe clipping; reduce volume or check for distortion.
Turn off when not in use to save energy and prolong product life.
Controls amp, CDP, tuner; cannot switch mains power.
Contact dealer for assistance; return in original packaging for service.
UK warranty details; international service via dealer/importer.
| Type | Integrated Amplifier |
|---|---|
| Signal-to-Noise Ratio | > 100 dB |
| Weight | 10 kg |
| Damping Factor | > 100 |
| Pre-amp Output | Yes (RCA) |
| Power Output | 100 W per channel into 8 ohms |
| Inputs | 4 x RCA |
| Input Impedance | 47 kΩ |
| Headphone Output | Yes |
| Frequency Response | 10Hz - 100kHz (±1dB) |