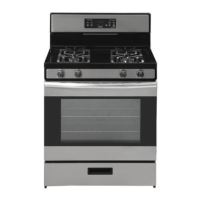
The Criterion 30" Standard Gas Range is a kitchen appliance designed for cooking with both surface burners and an oven. This user manual covers models 455-4603, 455-4604, and 455-4605.
Function Description:
The gas range features four sealed surface burners on the cooktop and a gas oven with bake and broil functions. The cooktop burners are controlled by individual knobs, allowing for adjustment of flame intensity from HI to LO. The oven functions, including Bake, Broil, Timer, and Clock, are managed through an electronic control panel. The range is equipped with an anti-tip bracket for safety, preventing it from tipping over during normal use. It also includes an oven light for visibility inside the oven cavity. The appliance is designed for use with either Propane (LP) Gas or Natural (NG) Gas, with specific burner output ratings provided for each.
Important Technical Specifications:
- Size: 30" Standard Gas Range
- Fuel Type: Propane (LP) Gas or Natural (NG) Gas
- Burner Output Ratings (BTU/HR):
- Propane (LP) Gas 10" W.C.P.:
- Front Left (LF): 9500 BTU, Orifice Size 0.90 (0.035"), Valve Color Green
- Rear Left (LR): 9500 BTU, Orifice Size 0.90 (0.035"), Valve Color Green
- Front Right (RF): 11500 BTU, Orifice Size 1.02 (0.04"), Valve Color Blue
- Rear Right (RR): 5000 BTU, Orifice Size 0.66 (0.026"), Valve Color Red
- Oven: 18000 BTU, Orifice Size 1.24 (0.049"), Valve Color N/A
- Natural (NG) Gas 5" W.C.P.:
- Front Left (LF): 9500 BTU, Orifice Size 1.40 (0.055"), Valve Color Green
- Rear Left (LR): 9500 BTU, Orifice Size 1.40 (0.055"), Valve Color Green
- Front Right (RF): 11500 BTU, Orifice Size 1.62 (0.064"), Valve Color Blue
- Rear Right (RR): 5000 BTU, Orifice Size 1.01 (0.04"), Valve Color Red
- Oven: 18000 BTU, Orifice Size 1.95 (0.077"), Valve Color N/A
- Oven Temperature Range: 170°F (77°C) to 550°F (290°C) for Bake function.
- Broil Temperature Settings: High (550°F) and Low (450°F).
- Timer: Up to 11 hours and 59 minutes (12-hour mode) or 23 hours and 59 minutes (24-hour mode).
- Oven Light: Standard 25-watt (G9 Halogen) appliance bulb.
Usage Features:
- Surface Burner Operation: To start a burner, push in and turn the knob counterclockwise to "IGNITE" and hold. All surface burners will click, but only the selected burner will produce a flame. Flame level can be adjusted between HI and LO. Cookware should be placed on the grate before turning on a burner, and the flame should not extend beyond the edge of the pan.
- Oven Bake Function: Press the "Bake" pad, enter the desired temperature (350°F is default), and press "Start." The oven preheats, indicated by "PrE" on the display, and sounds three reminder tones when preheating is complete.
- Oven Broil Function: Press the "Broil" pad (once for High, twice for Low), then "Start." The display will show "HI" or "LO." The broiler is located at the bottom of the range. Food should be placed on a broiler-safe pan on the broiler rack.
- Cook Time: Available in Bake or Broil modes. Press the "Cook Time" pad, enter the desired cooking time, and press "Cook Time" again to start. The oven will automatically turn off at the end of the set time.
- Delay Time: Available in Bake or Broil modes. Press "Delay Time," set the desired start time, then select Bake or Broil settings.
- Clock/Display: Displays time (12-hour or 24-hour format). To set, press "Set Clock," adjust hours and minutes with "+ or -" pads, and press "Set Clock" again to lock.
- Control Lock: Locks the control panel to prevent unintended use. To activate/deactivate, press and hold "Lock Controls" for three seconds. "LOC" or "OPN" will appear on the display.
- Oven Racks: Position racks before turning on the oven. Different rack positions are recommended for various cooking tasks (e.g., Rack 1 for large roasts, Rack 3 for cakes/cookies, Racks 2 and 5 for batch baking).
- Power Failure: Surface burners can be lit manually with a match during a power outage.
- Oven Temperature Format: Default is Fahrenheit (F), but can be switched to Celsius (C) by pressing and holding the "Bake" pad for three seconds.
- Display Sleep Mode: Turns off the display. To enter/exit, press and hold the "Timer" pad for three seconds.
Maintenance Features:
- General Cleaning:
- Ensure all controls are off and the range is cool before cleaning.
- Use soap and water with a soft cloth or sponge for surface areas.
- Grates and burner caps can be washed with hot soapy water, rinsed, and dried immediately.
- Control panel and knobs should be wiped with a soapy soft cloth, then rinsed and dried.
- Burner Cleaning:
- Remove burner caps from the burner base.
- Clean burner caps according to the "General Cleaning" section.
- Clean the gas tube opening with a damp cloth.
- Clogged burner ports can be cleaned with a straight metal pin (do not enlarge or distort the port).
- Ensure burner caps are properly aligned when replaced.
- Oven Door Removal/Reinstallation:
- Open the oven door fully (90 degrees).
- Locate and flip up the hinge latches in both corners to the unlocked position.
- Gently close the door as far as it will shut, then lift and pull it towards you to remove.
- To reinstall, insert hanger arms into the range with latches in the unlocked position, open the door fully, then move latches back to the locked position.
- Oven Light Replacement:
- Disconnect power supply.
- Turn the glass cover counter-clockwise to remove.
- Pull out the bulb straight from the socket.
- Push in the new bulb, then reinsert glass cover clockwise.
- Reconnect power.
- Oven Cavity Cleaning:
- Clean food spills when the oven cools.
- Use a mild soap and water solution with a non-scratch sponge or damp cloth.
- Do not use strong oven cleaners, steel-wool pads, or abrasive materials, as they may damage the interior coating.
- Anti-Tip Bracket Verification: Slide the range forward, check for the bracket attached to the floor or wall, then slide the range back so the rear foot is under the bracket. If the range can be tipped, the bracket is not properly secured.