Do you have a question about the Crosley Bates CO1024 and is the answer not in the manual?
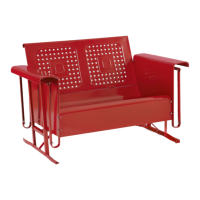
Lists all physical components included in the loveseat glider kit.
Details all fasteners, tools, and accessories required for assembly.
Screw adjustable levelers into the pre-drilled holes on the bottom of the legs.
Attach the leg support to the legs using specified hardware and tools.
Connect supports to legs and leg support using bolts, washers, and nuts.
Join the back panel and seat panel using medium bolts, short bolts, washers, and nuts.
Attach connecting screws to back panel and connect arms using various hardware.
Lift assembled unit and attach arms to swing arms on legs using bolts and washers.
Connect the connecting wire to the arms using washers, nuts, and wrench.
Attach the connecting wire to the arms on the opposite side using specified hardware.
Important note on using two people to move the completed loveseat glider safely.
The Crosley Loveseat Glider (model CO1024) is a two-person outdoor seating unit designed for comfort and gentle motion. It features a sturdy metal frame with a classic design, incorporating perforated back and seat panels for breathability and a distinctive aesthetic. The glider's primary function is to provide a relaxing seating experience with a smooth, back-and-forth gliding motion, making it suitable for patios, decks, or garden areas.
The glider is constructed from several key components, as detailed in the parts list:
Frame Components:
Hardware Components: The assembly relies on a variety of fasteners and tools to ensure a secure and stable structure:
In summary, the Crosley Loveseat Glider CO1024 is a well-designed, two-person outdoor seating solution that prioritizes comfort through its gliding motion and durability through its metal construction. Its assembly process is designed to be straightforward with clear instructions, and its features cater to practical outdoor use and basic maintenance.
| Brand | Crosley |
|---|---|
| Model | Bates CO1024 |
| Category | Outdoor Furnishing |
| Language | English |