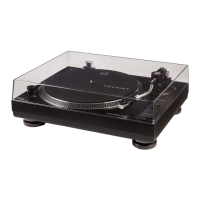
INSTALLATION OF NEW CARTRIDGE
Your unit comes pre-installed with cartridge mounted to the headshell. When installing a new or different
cartridge, refer to the installation instructions of that cartridge. During installation attach the stylus protector to
guard the stylus tip from damage.
a. Connect the lead wires to the cartridge terminals. The terminals of most cartridges are color
coded.
Connect each lead wire to the terminal of the same color.
White (L+) .................... Left channel +
Blue (L-) ..................... Left channel -
Red (R+) ................... Right channel +
Green (R-) .....................Right channel -
b. Install the cartridge to the headshell and lightly tighten screws provided with the cartridge.
c. Use a cartridge alignment tool (not included) to ensure the new cartridge is properly aligned. If
adjustments need to be made, loosen the cartridge screws and gently rotate the cartridge and recheck
until correct according to your cartridge alignment tool. Once correct, fully tighten the cartridge screws.
NOTE: See instructions included with cartridge alignment tool on how to correctly align your cartridge.
 Loading...