27
English
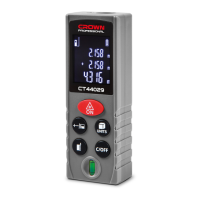
Switching on / off
Switching on:
Press and hold button 5� Display 1 will
show some signs (see g. 3, 14).
Switching on:
Press and hold button 9� Signs on
display 1 will disappear� Addition-
ally, the appliance automatically turns
off after 3 minutes of inactivity� Short
pressing of button 9 deletes the mea-
surement result�
Working advice
Presetting the appliance before
measurements (see g. 5-12, 16-25)
[CT44028, CT44029, CT44030,
CT44031]
• To select the reference point, press
and release button 8 (see g. 5).
Sign 18 will display the selected refer-
ence point�
• To select the measurement
units, press and hold button 27 (see
g. 6). The measurement units will
be alternately displayed on display 1
(sign 17)�
• To select the measurement type,
press and release button 27 (see
g. 7-9). The selected measurement
type is displayed with sign 14 (area or
volume measurement) or sign 15 (indi-
rect measurements)�
• In the single measurement mode,
the obtained results can be added, sub-
tracted, stored in the appliance memory
using button 25 (see g. 10-12).
[CT44032, CT44033, CT44034,
CT44035]
• To select the reference point, press
and release button 8 (see g. 16).
Sign 18 will display the selected refer-
ence point�
• To select the measurement
units, press and hold button 11 (see
g. 17). The measurement units will
be alternately displayed on a display 1
(sign 17)�
• To select the measurement type,
press and release button 6 (see
g. 18-22). The selected measurement
type is displayed by sign 14 (area or
volume measurement) or sign 15 (indi-
rect measurements)�
• In the single measurement mode,
the obtained results can be added,
subtracted, stored in the appliance
memory using buttons 7, 10 and 11
(see g. 23-25).
Single measurement (see g. 3, 14)
• Turn on the appliance�
• Set the appliance in the measure-
ment starting point�
• Press and release button 5� Dis-
play 1 will show the measurement re-
sult (see g. 3, 14).
Continuous measurement and
maximum / minimum values
measurement (see g. 4, 15)
• Turn on the appliance�
• Press and hold button 5, display 1
will show sign 13 (see g. 4, 15).
• Take measurements�
• Display 1 will show measure-
ment results� The maximum and
minimum values will be indicated with
signs 19, 20�
Area measurement (see g. 7, 18)
• Turn on the appliance�
• Press and release button 28 or 6
(depending on the model) to enter the
area measurement mode� Display 1 will
show sign 14 (see g. 7, 18). There are
ickering symbols around sign 14; they
show which of the two distances should
be further measured�
• Press and release button 5 to meas-
ure the length�
 Loading...