EasyManua.ls Logo

Cub Cadet 19A70019100 - User Manual

Cub Cadet 19A70019100
2 pages
Print Icon
To Next Page IconTo Next Page
Loading...
Bracket Installation (48-inch decks)
Note: Removing the cutting deck from beneath the tractor
as instructed in your tractor’s Operator’s Manual will ease
installation of this kit.
1. Locate and discard the three identical roller brackets used
for 54- and 60-inch decks.
2. Secure the two identical roller brackets for 48-inch decks
to the rear left and rear center of the cutting deck with self-
tapping screws. See Figure 1-2.
3. Secure the remaining roller bracket for 48-inch decks to the
rear right and of the cutting deck with self-tapping screws.
See Figure 1-2.
Figure 1-2
19A70019100 lawn striping kit is designed for use with three-
blade fabricated cutting decks found on select Cub Cadet
models. Refer to your machine’s Operator’s Manual or consult
your Cub Cadet dealer to assure compatibility.
Carton Contents
Before beginning installation, remove all parts from the carton to
make sure everything is present. Carton contents are listed below
and shown in Figure 1-1. Part numbers are shown in parentheses.
• One 25.75” Pin (711-05664)
• One Hex Lock Nut (712-3083)
• Six ⁄-inch Screws (710-0623)
• Four Rollers (731-3005)
• Three Roller Brackets (703-08454)
• Two Roller Brackets (703-09618)
• One Roller Bracket (703-08076)
48-inch decks
54- and 60-inch decks
Figure 1-1
WARNING: Before beginning installation, place
the tractor on a firm and level surface, set the
parking brake, place the PTO in the disengaged
(OFF) position, stop the tractors engine and remove
the ignition key to prevent unintended starting.
InstallatIon Manual
Lawn Striping Kit — 19A70019100
Form No. 769-06205
October 11, 2013
CUB CADET LLC, P.O. BOX 361131 CLEVELAND, OHIO 44136-0019
Printed In USA
Question and Answer IconNeed help?

Do you have a question about the Cub Cadet 19A70019100 and is the answer not in the manual?

Summary

Bracket Installation (48-inch decks)

Bracket Installation (54- and 60-inch decks)

Roller Installation (all decks)

Overview

This document is an installation manual for a Cub Cadet Lawn Striping Kit, model number 19A70019100. The kit is designed to be used with three-blade fabricated cutting decks found on select Cub Cadet models, and users are advised to consult their machine's Operator's Manual or a Cub Cadet dealer to ensure compatibility.

Function Description:

The Cub Cadet Lawn Striping Kit is an accessory designed to create a striped pattern on a lawn by bending grass blades in different directions as the mower passes over them. This effect is achieved through a series of rollers that are attached to the rear of the cutting deck. When installed, these rollers apply pressure to the grass, causing it to lie down in a uniform direction, which, when viewed from different angles, creates the appearance of alternating light and dark stripes. This kit enhances the aesthetic appeal of a mowed lawn, giving it a professional, manicured look. The installation process involves attaching brackets to the cutting deck and then inserting rollers into these brackets, secured by a pin and a hex lock nut.

Important Technical Specifications and Components:

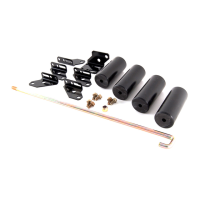
The kit includes several components necessary for its installation and function, as detailed in the "Carton Contents" section and illustrated in Figure 1-1. These components are:

  • One 25.75" Pin (711-05664): This pin is crucial for securing the rollers within the brackets, allowing them to rotate freely while remaining attached to the mower deck.
  • One Hex Lock Nut (712-3083): This nut is used to fasten the pin securely, preventing it from dislodging during operation.
  • Six 3/4-inch Screws (710-0623): These screws are likely used for attaching the roller brackets to the cutting deck.
  • Four Rollers (731-3005): These are the primary functional components responsible for pressing down the grass blades to create the striping effect.
  • Three Roller Brackets (703-08454): These brackets are specifically designed for 54- and 60-inch decks.
  • Two Roller Brackets (703-09618): These brackets are specifically designed for 48-inch decks.
  • One Roller Bracket (703-08076): This bracket is also specifically designed for 48-inch decks.

The distinction in bracket types (703-08454, 703-09618, 703-08076) highlights the kit's adaptability to different cutting deck sizes, specifically 48-inch, 54-inch, and 60-inch decks. The manual provides separate instructions for installing brackets on 48-inch decks versus 54- and 60-inch decks, indicating a tailored fit for optimal performance across various mower models.

Usage Features:

The primary usage feature of this kit is to enhance the visual appeal of a lawn by creating distinct stripes. This is a purely aesthetic feature that does not impact the cutting performance of the mower itself, but rather the presentation of the mowed area. The kit is designed for straightforward installation, though it is noted that removing the cutting deck from the tractor can ease the process. Once installed, the striping kit operates passively as the mower is used, requiring no additional user input during mowing. The rollers are positioned at the rear of the deck, ensuring that they follow the mower's path and press down the grass after it has been cut.

Maintenance Features:

While the manual does not explicitly detail maintenance features for the striping kit itself, general maintenance practices for lawn care equipment would apply. The rollers, being exposed to grass and potentially soil, would likely benefit from periodic cleaning to prevent buildup that could hinder their rotation or effectiveness. The pin and hex lock nut should be checked for tightness to ensure the rollers remain securely attached. Given that the components are subject to wear and tear from contact with the ground and environmental elements, regular inspection for damage or excessive wear on the rollers and brackets would be prudent. The manual provides contact information for ordering replacement parts, indicating that individual components of the kit are replaceable, which is a key maintenance feature. Users can call the Customer Dealer Referral Line at 1-877-282-8684 or visit www.cubcadet.com to find a dealer for parts.

Installation Process Overview:

The installation process is divided into two main sections: "Bracket Installation" and "Roller Installation."

  • Bracket Installation (48-inch decks):
    1. Discard the three identical roller brackets intended for 54- and 60-inch decks.
    2. Secure the two identical roller brackets (for 48-inch decks) to the rear left and rear center of the cutting deck using self-tapping screws.
    3. Secure the remaining roller bracket (for 48-inch decks) to the rear right of the cutting deck using self-tapping screws.
  • Bracket Installation (54- and 60-inch decks):
    1. Discard the roller brackets intended for 48-inch decks.
    2. Secure the three identical roller brackets (for 54- and 60-inch decks) to the rear left, rear center, and rear right of the cutting deck using self-tapping screws.
  • Roller Installation (all decks):
    1. Position the four rollers between the installed brackets.
    2. Insert the 25.75" pin through the brackets and rollers.
    3. Secure the pin in place with the hex lock nut.

Safety Precautions:

A critical safety warning is prominently displayed, advising users to:

  • Place the tractor on a firm and level surface.
  • Set the parking brake.
  • Place the PTO (Power Take-Off) in the disengaged (OFF) position.
  • Stop the tractor's engine.
  • Remove the ignition key to prevent unintended starting before beginning installation.

This ensures a safe working environment and prevents accidental operation of the mower during the installation process. The manual emphasizes the importance of these steps to avoid injury.

Cub Cadet 19A70019100 Specifications

General IconGeneral
BrandCub Cadet
Model19A70019100
CategoryLawn and Garden Equipment
LanguageEnglish

Related product manuals