2
1
Installing
the Electric
Bed Lift
IMPORTANT: Refer to your Cub Cadet Owner’s Manual
for any information relating to the use of your 4x4 unit.
These instructions are for assembly of your new acces-
sory to further enhance your 4x4 experience.
NOTE: Specifications subject to change without notice
or obligation.
Installing the Electric Bed Lift
The hardware needed for this installation is included
with the electric bed lift kit.
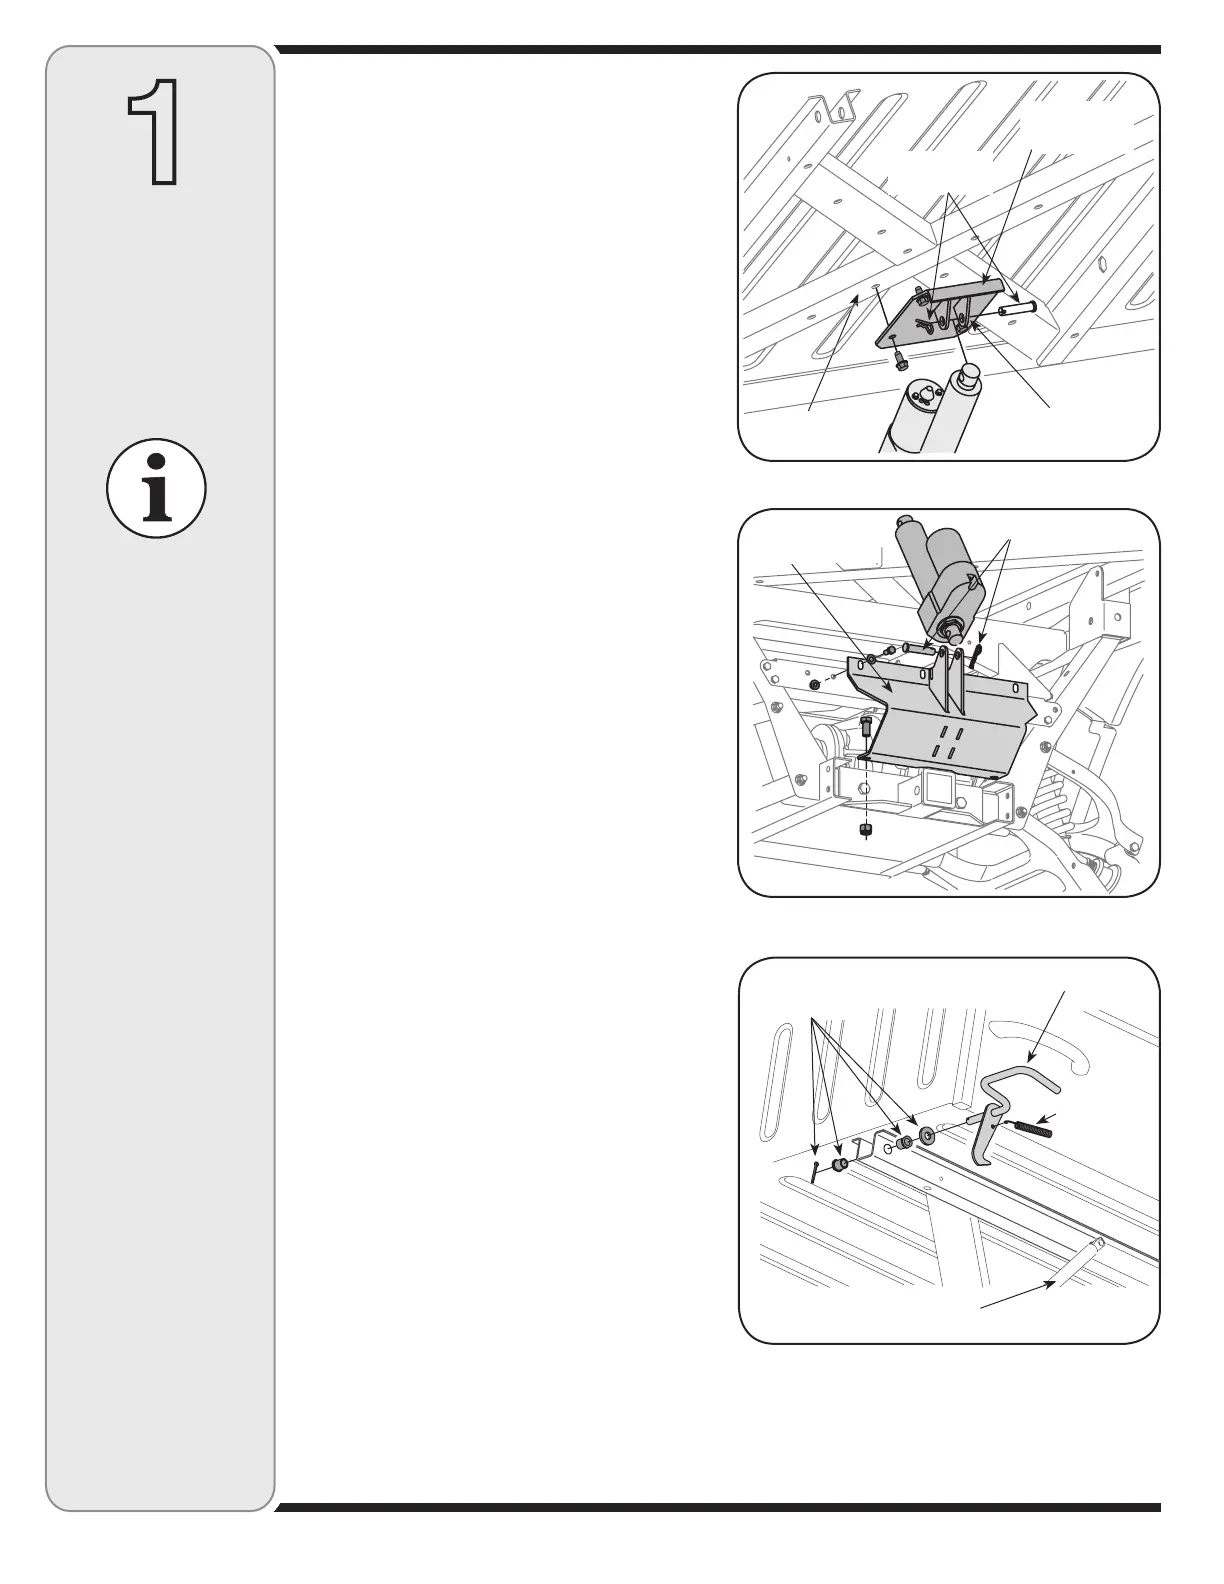
1. Remove the clevis pins and cotter pins securing the
mounting assemblies to the bed lift unit for ease of
installation. See Figure 1-1 and 1-2 for Clevis pin
identification and location.
2. Mount the upper bed lift assembly plate to the
bottom of the utility vehicle’s bed as seen in Figure
1-1. Use the 4 self-tapping 3/8-16 screws included
with the bed lift kit.
NOTE: The wider flange on the upper bed lift assembly
faces towards the front of the utility vehicle.
3. Attach the bottom bed lift assembly plate to the bot-
tom frame of the utility vehicle as seen in Figure 1-2.
Use two 1/2-13 x 1.25 bolts with two 1/2-13 lock nuts
to secure the lower portion of the assembly plate to
the vehicle’s lower frame. Insert the bolts through the
holes provided.
4. Mount the top portion of the lower bed lift assembly
plate to the cross-member of the frame in the holes
provided and shown in Figure 1-2. Use four 5/16-18 x
1.00 bolts and flat washers provided and secure with
four 5/16-18 hex lock nuts.
5. Remove the bed lift latch handle before attempting to
operate the electric bed lift. Remove cotter pin and
latch spring, then slide bed latch out, along with the
washer and two spacers. Retain hardware in safe
location in case of future needs. See Figure 1-3.
NOTE: The bed damper may be removed as well, but it
is not mandatory and will not affect the operation of your
electric bed lift accessory.
IMPORTANT: Do not attempt to operate the electric bed
lift without first removing the bed lift latch handle. Failure
to do so will result is serious damage to your accessory.
6. Install the electric bed lift motor to the bottom bed lift
assembly plate by inserting the clevis pin and cotter
pins into the mounting assembly. See Figure 1-2. Do
not attempt to attach the top of the motor unit to the
bottom of the bed at this time.
Figure 1-1
Figure 1-2
Utility Vehicle
Bottom-side
Bottom Bed Lift
Assembly Plate
IMPORTANT
Refer to your Cub Cadet
Owner’s Manual for
any information relating
to the use of your 4x4
unit. These instructions
are for assembly of
your new accessory to
further enhance your
4x4 experience.
Clevis Pin &
Cotter Pin
Clevis Pin & Cotter Pin
Figure 1-3
Top Bed Lift
Assembly Plate
NOTE:
You must have the
optional Electric Wiring
Harness accessory
(39A-209-100) to
complete installation
of this bedlift unit.
Wider Flange
Faces Foward
Damper
Latch Handle
Cotter Pin, Spacers
& Washer
Latch Spring
 Loading...