Rev. -, p. 6 of 19
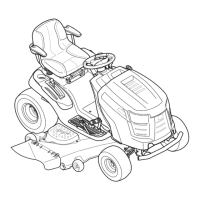
Fig. 4.1 (view from right rear side of tractor)
steel washer and
locknut inside
4. WINDSHIELD SUPPORT
4.1 Per fig. 4.1, install the windshield support to the
top front corner of the side frames. Orient the windshield
support so the bent flanges are down and the decals are
legible. Use the following hardware in the lower hole on
each side (note: the remaining holes will receive hard-
ware when the roof is installed): one 5/16-18 x 3/4” long
button head bolt, one plastic washer, two steel washers,
and one locknut. Locknuts to be on the inside of the cab.
Repeat for opposite side. Tighten these two bolts at this
time.
5. COWL
5.1 Per fig. 5.1, install the cowl with the bent flanges up
top and towards the inside of the cab. The arched piece
of bulb rubber sits in the gap between the hood and the
console as shown.
5.2 Per fig. 5.2, use the following hardware per side:
three 5/16-18 x 3/4” long button head bolts, three plastic
washers, and three steel washers. Leave loose. Repeat for
opposite side.
Fig. 5.1 (view from right front side of tractor)
bulb rubber to
be in this gap
as shown
Fig. 5.2 (view from right front side of tractor)
use plastic
washers here
 Loading...