This document outlines the calibration procedure for the Throttle Position Sensor (TPS) on the Cub Cadet Ultima ZT1 42E, an electrically powered zero-turn mower. The primary function of this procedure is to ensure the precise and satisfactory operation of the mower's drive system, particularly after initial setup or if the mower's handling feels unsatisfactory. The calibration process involves interacting with the Vehicle Control Module (VCM) buttons and manipulating the lap bars, which serve as the primary drive control levers.
Function Description
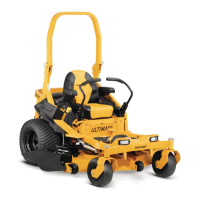
The Cub Cadet Ultima ZT1 42E is a zero-turn mower designed for efficient lawn maintenance. Its electrically powered drive motors rely on accurate input from the Throttle Position Sensor (TPS) to control speed and direction. The TPS calibration ensures that the mower's VCM correctly interprets the physical positions of the lap bars, translating them into appropriate motor commands. This is crucial for smooth acceleration, deceleration, turning, and overall maneuverability. The VCM itself features several buttons that control various functions and are integral to the calibration process. These include:
- PTO (Power Take-Off) Button: Engages or disengages the mower blades. During calibration, it is used as an input to confirm certain lap bar positions.
- ECO (Economy) Button: Likely controls an economy mode for power saving. During calibration, it is used in combination with the Headlight button to initiate the calibration sequence.
- Headlight Button: Controls the mower's headlights. During calibration, it is used in combination with the ECO button to initiate the calibration sequence.
- Start Button: Used to start the mower. During calibration, it confirms a specific lap bar position.
- Low Speed Precision Drive Button: Activates a mode for more precise, slower movements. During calibration, it confirms a specific lap bar position.
- Key Slot: Where the ignition key is inserted to power on the mower and begin operations, including calibration.
The VCM display provides visual feedback during operation and calibration, showing information such as battery charge, and during calibration, indicating the current step (e.g., "FNR" for Forward, Neutral, Reverse).
Usage Features
Before initiating the calibration, several pre-calibration steps are essential to ensure accurate results and safe operation. These include:
- Parking on a Flat Surface: The mower must be on a level surface, and the rear wheels should be chocked to prevent movement.
- Tire Pressure and Size Check: Maintaining equal air pressure and tire size is critical for zero-turn mowers, especially for the electrically powered ZT1 42E. Rear tires should be at 10 psi and front tires at 20 psi.
- Lap Bar Adjustment Bolt Check: Both lap bar drive control lever stop adjustment bolts must be adjusted all the way out, flush with the end of the Rivnut. This ensures the full range of motion for the lap bars.
- Lap Bar Alignment: The lap bars should be evenly aligned across from each other, adjustable via dedicated knobs.
- Initial Drive Test: Before full calibration, it's recommended to drive the mower in both "Low Speed Precision Drive" and "Standard Drive" modes in a large, clear area. This helps determine if calibration is necessary due to unsatisfactory operation.
The calibration process itself is a multi-step sequence involving specific interactions with the lap bars and VCM buttons:
- Initiating Calibration: Insert the key, ensure both lap bars are in the "OUTWARD" position, and then simultaneously press and hold the ECO and HEADLIGHT buttons for 7 seconds until "FNR" appears on the screen.
- Left Lap Bar Calibration - Forward: Move the left lap bar to the "NEUTRAL" position, then forward until it hits a hard stop. Press the LOW SPEED PRECISION DRIVE button. Release the lap bar to return to "NEUTRAL." The "F" on the screen will be boxed, indicating the forward position is calibrated.
- Left Lap Bar Calibration - Neutral: Place the left lap bar in the "OUTWARD" position. Press the START button. The "N" on the screen will be boxed, indicating the neutral position is calibrated.
- Left Lap Bar Calibration - Reverse: Move the left lap bar to the "NEUTRAL" position, then pull rearward until it hits a hard stop. Press the PTO button. Releasing the lap bar to "NEUTRAL" completes the left lap bar calibration, and the "FNR" display will disappear.
- Right Lap Bar Calibration: The process for the right lap bar mirrors that of the left. Both lap bars are placed in the "OUTWARD" position. The calibration sequence is re-initiated by simultaneously pressing and holding the PTO and HEADLIGHT buttons for 7 seconds until "FNR" appears. Then, steps similar to the left lap bar calibration (forward, neutral, reverse movements with corresponding button presses) are repeated for the right lap bar.
Throughout the calibration, it is crucial to keep the brake released and avoid touching the brake pedal. If an error code appears, the process must be restarted from the beginning after removing the key. If the VCM repeatedly fails to accept calibration inputs, contacting a Cub Cadet Service Dealer is recommended.
Maintenance Features
While the document primarily focuses on calibration, it implicitly highlights aspects related to maintaining optimal mower performance:
- Regular Tire Checks: The emphasis on maintaining correct and equal tire pressure (10 psi for rear, 20 psi for front) and tire size suggests that these are critical for the mower's handling and the longevity of its drive system. Regular checks are a simple maintenance task that directly impacts performance.
- Lap Bar Adjustment: The instruction to ensure lap bar adjustment bolts are fully out and that lap bars are evenly aligned points to the importance of maintaining the physical integrity and proper setup of the control mechanisms. These adjustments are part of routine maintenance to ensure the controls respond as expected.
- Troubleshooting Guidance: The advice to restart calibration if an error occurs and to contact a dealer if the VCM does not accept inputs serves as a basic troubleshooting guide, indicating that some issues may require professional attention beyond user-level adjustments.
- Feedback Mechanism: The invitation to email ElectricRidingMowers@mtdproducts.com for feedback or concerns suggests a commitment to ongoing product improvement and support, allowing users to contribute to the refinement of the mower's features and address any operational issues.
In summary, the Cub Cadet Ultima ZT1 42E's TPS calibration is a user-performable procedure designed to optimize the mower's drive system, ensuring precise and satisfactory control through its lap bars and VCM. Adherence to pre-calibration steps and the detailed calibration sequence is essential for achieving the best operational experience.