05
OPERATING INSTRUCTIONS
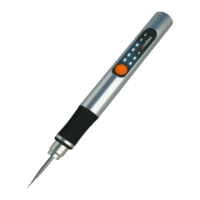
USING THE ENGRAVING PEN
CUSTOMIZER™
Thank you for purchasing the
Customizer™ Engraving Pen.
This product was designed by many DIY
lovers who needed a portable and
cordless engraving tool for everyday use.
This tool was designed to give you the
ultimate performance when working on
projects.
ENGRAVING PEN INTRODUCTION
The Engraving Pen has a small, powerful
electric universal motor, is comfortable in
the hand, and is made to accept a large
variety of accessories including abrasive
wheels, drill bits, wire brushes, polishers,
engraving cutters, router bits, cutting
wheels and attachments. Accessories
come in a variety of shapes and permit
you to do a number of different jobs.
As you become familiar with the range of
accessories and their uses, you will learn
just how versatile the Engraving Pen is.
You’ll see dozens of uses you hadn’t
thought of before.
The real secret of the Engraving Pen is its
speed and rechargeable battery.
To understand the advantages of its high
speed, you have to know that the
standard portable electric drill runs at
speeds up to 2,800 revolutions per
minute.
The Engraving Pen operates at speeds
up to 25,000 revolutions per minute. The
typical electric drill is a
low- speed, high torque tool; this
Engraving Pen is just the opposite – a
high-speed, low torque tool. The major
difference to the user is that in the
high-speed tools, the speed combined
with the accessory mounted in the collet
does the work. You don’t apply pressure
to the tool, but simply hold and guide it.
In the low-speed tools, you not only
guide the tool, but also apply pressure to
it, as you do, for example, when drilling a
hole.
This high speed, along with its compact
size and wide variety of special
accessories and attachments, that
makes the Engraving Pen different from
other tools. The speed enables it to do
jobs low-speed tools cannot do, such as
engraving steel, engraving glass, etc.
HOW TO USE THE CUSTOMIZER
1) Open the box.
2) Take out the Customizer and the
plastic tray to get the pieces below it.
3) Grab the USB type-C Charging Cable
and connect it to the Customizer.
4) Charge the Customizer before using it
for at least 8 hours. It’s recommended to
charge it with a phone charger.
5) Once charged, disconnect the
Customizer.
Warning: Before using the engraving tool read
carefully “Personal Safety Section”(Page 01).
6) Take the hex key included in the box
and loosen the Allen grub screw on the
chuck.
7) Select a bit and put it into the chuck.
8) Tighten the Allen grub screw with the
hex key.
9) Turn on the Customizer with the
Power Button on the display.
Warning: Make sure the bit is well tightened
before turning the engraving pen on.
10) Choose the speed you required and
use the Customizer.
 Loading...