The D-Link DCS-8350LH is a 2K QHD Indoor Wi-Fi Camera designed for home monitoring, offering advanced features for enhanced security and convenience. This camera provides vivid QHD 1440p resolution at 25 frames per second, ensuring clear and detailed video footage. It incorporates AI-based Person Detection to intelligently identify human motion, reducing false alerts by distinguishing between people and other moving objects. The camera also features enhanced sound and motion detection, along with built-in Bluetooth Low Energy (BLE) technology for easy setup.
Key Technical Specifications:
- Video Compression: H.265 & H.264
- Max. Resolution: 4 Megapixel (QHD)
- Max. Frame: 1440p (2560 x 1440)
- Image Sensor: 1/3" Progressive CMOS sensor
- Day & Night - IR LED: 7 m (23 ft)
- Focal Length: 2.97 mm
- Aperture: F1.6
- Angle of View: (D: 127° / H: 108° / V: 58°)
- Audio: Built-in microphone and speaker
- Audio Codec: MPEG-2 AAC LC
- Wireless IEEE Standard: 802.11n/ac wireless, 1T1R
- Wi-Fi Operation Band: Dual band 2.4 GHz & 5 GHz
- Security Protocol: WPA3, TLS
- Bluetooth: Bluetooth Low Energy 4.2
- Network Protocols: IPv4, IPv6, DHCP/DHCPv6 Client, Bonjour (mDNS and DNS-SD), ONVIF Profile S/T, RTSP, SRTP, RTPS, HTTPS
- Power Input: 100 to 240 V AC, 50/60 Hz
- Power Output: 5V 1.2A
- Max. Power Consumption: 4W
- Cable Length: 2m (6.56 ft)
- Indoor/Outdoor: For indoor use
- Operating Temperature: 0 to 40°C (32 to 104°F)
- Storage Temperature: -20 to 70°C (-4 to 158°F)
- Operating/Storage Humidity: Max. 90% non-condensing
- Weight: 122.5g (4.32oz)
- Dimensions: 66.7 x 65.7 x 111.4 mm (2.63 x 2.59 x 4.39 in)
- Certifications: CE, FCC, IC
Hardware Overview:
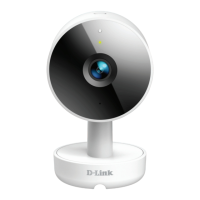
The front of the camera features a Speaker, Light Sensor, Status LED, IR LEDs, Camera Lens, and Microphone.
- Speaker: Transmits sound for two-way audio.
- Light Sensor: The IR-Cut removable sensor monitors lighting conditions and switches between color and infrared accordingly.
- Status LED: Indicates the camera's current status (see LED Behavior below).
- Camera Lens: Records video of the surrounding area.
- IR LEDs: Illuminates the device's field of view in low-light environments.
- Microphone: Picks up sound near the camera.
The bottom of the camera includes a Power Connector, Reset Button, and microSD Card Slot.
- Power Connector: Used to attach the power adapter to supply power to the device.
- Reset Button: A recessed button that, when held down until the Status LED turns red, resets the camera to factory default settings.
- microSD Card Slot: Supports microSD cards up to 256 GB for local storage.
LED Behavior:
The Status LED on the camera indicates its operational state:
- Solid Green: Connected to the network and mydlink.
- Solid Red: Booting up.
- Solid Amber: Ready for setup.
- Flashing Red/Amber: Firmware being updated - do not power off.
- Flashing Red: Timeout for setup - please power cycle the device.
- Flashing Amber: Wi-Fi connection lost.
Installation and Setup:
Before installation, ensure the camera is placed in a location with available power and that the power adapter is connected to an electrical outlet not controlled by a wall switch. The device should be firmly mounted.
The mydlink app is essential for setting up and controlling the camera.
- Download the mydlink app: Available on the App Store (iOS) or Google Play (Android). Ensure your device is wirelessly connected to the same network as the DCS-8350LH.
- Launch the mydlink app: Create a new account or sign in to your existing account. Allow the app to access your location and send notifications, and enable Bluetooth in your phone's settings.
- Power on the device: Wait for the Status LED to flash orange.
- Add Device: Place your device next to your mobile phone. A prompt will appear in the app to "Add Device."
Device Placement:
For optimal performance, place the camera 1.5 - 2 meters (4 to 6.5 feet) from the ground. Higher or lower installation points may decrease person detection accuracy. For person detection, the subject should be between 2 to 5 meters (6.5 - 16 feet) away from the camera.
Mounting Options:
The camera can be mounted on a pole or a wall.
Pole Mount:
- Place the mounting bracket against the pole with the arrow pointing upwards. The bracket is attached to the bottom of the device. Turn the mounting bracket counterclockwise to detach it.
- Thread cable ties through the slots on the mounting bracket. Secure the textured side of the cable ties against the pole to prevent slippage. Fasten the plastic ties around the pole.
- Align the arrow on the camera base with the dot on the mounting bracket and turn clockwise to secure them together.
Wall Mount:
- Align the mounting bracket so the arrow points up. Use a pencil to mark two holes.
- Use a 6 mm drill bit to drill two 26 mm deep holes over the pencil marks.
- Hammer in the plastic anchors to support the screws.
- Align the mounting bracket's holes over the plastic anchors. Drive the screws into the anchors to secure the mounting bracket.
- Align the arrow on the camera base with the dot on the mounting bracket and turn clockwise to secure them together.
- Adjust your camera by tilting and rotating it until you're satisfied with the view point.
Using the mydlink App:
The mydlink app provides various controls and settings for your device.
- Audio: Tap to disable audio. Tap to enable audio.
- Snapshot: Tap to take a snapshot of the video stream.
- Recording: Tap to enable video stream recording.
- Two Way Talk: Tap to send your voice to the camera's built-in speaker.
- Video Resolution: Tap 1440p to use 1440p resolution video. Tap 720p to use 720p resolution video.
Device Settings:
To access Device Settings:
- Tap the menu icon (three horizontal lines).
- Tap Device Settings.
- Tap the device you want to access the settings for.
The device page contains several options to configure your camera:
- Device Name: Tap to change the device's name.
- Privacy Mode: Tap to enable. Privacy mode will disable the camera feed.
- Motion and Person Detection: Tap to set the Motion and Person Detection area and sensitivity settings.
- Storage: Tap to change the video clips storage location from the microSD card to the cloud. You can also subscribe to mydlink Cloud from here and view your current subscription plan.
- Camera Microphone: Tap to enable or disable picking up sound near your camera in live view and recordings.
- Color Night Vision: Tap to change night vision detection to On, Off or Auto. Color Night Vision is enabled by default and allows you to see color images while viewing the live feed in low light scenarios.
- Anti-Flicker: Reduces flicker in the video. Tap 50 Hz or 60 Hz depending on the frequency of your lights.
- Invert Image: Enable this to invert the camera view.
- Status LED: Disabling this will turn off LED indicators.
- Designated Contact: Tap to add, remove, or edit designated contacts for quick phone call upon receiving a notification.
- Wi-Fi: Tap to change the wireless network this device will use to connect to the Internet. Note: The network must be the same as all your other mydlink devices that you wish to use the same account for.
- Time Zone: Select the time zone to calibrate your device to.
- Firmware: This displays the installed version of the firmware on your device. Tap to enter the update settings. You can choose the most suitable time for automatic updates.
- MAC ID: A unique physical address for identifying your device.
- Restart Device: Tap this button to restart the device.
- Remove Device: Tap this button to disconnect this device from your mydlink account.
Troubleshooting:
- Device not working properly: Reset the device and reinstall it. To reset your device, use a paper clip to press and hold the recessed Reset button until the LED turns solid red. Ensure your router is connected to the Internet and has Wi-Fi enabled, your mobile device has Bluetooth enabled, and your mydlink device is in range of your Wi-Fi network.
- Voice commands: The device works with both Amazon Alexa and the Google Assistant. For setup instructions, visit dlink.com/en/alexa and dlink.com/en/google-assistant.
- microSD card not working/not supported: The microSD card must be formatted with the correct file system (FAT32) before it can be used with this product. This can be done in the mydlink app by selecting the Format function in the storage menu under the Device Settings.
- ONVIF system username and password setup: To connect your device to an ONVIF system, enter "admin" as the username and use the PIN code of your mydlink device as the password. You can find the PIN code on your device's label.
Maintenance Features:
The DCS-8350LH is designed for easy maintenance. The mydlink app allows for remote firmware updates, ensuring the camera always has the latest features and security enhancements. The microSD card slot provides local storage, which can be managed directly through the app, including formatting. The reset button allows for quick troubleshooting and restoration to factory settings if needed. The device is intended for indoor use, which simplifies environmental maintenance compared to outdoor cameras. Regular cleaning with a damp towel is recommended, and users should avoid submerging the camera in liquids or using solvents. The product is designed to be user-replaceable, and components like the battery (if applicable) are intended for easy replacement.