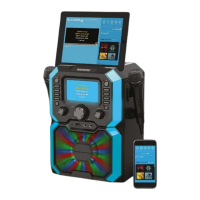
Using the Auxiliary Input Mode
The Auxiliary Input allows a direct wired connection of an external audio signal
source.
1. Insert a suitable 3.5mm jack lead (not supplied) into the 3.5mm AUX IN Jack
Socket (22) on the front of the unit.
2. Repeatedly press the POWER/MODE button (4) to select the AUX mode; “AUX”
will be shown on the Monitor (1).
3. Adjust the volume to the desire level using the MASTER VOL control (21).
4. Use your devices controls in the usual manner.
Using the Programming Function
1. While in the STOP mode (i.e. a CD or USB stick in the machine but not playing),
press the REPEAT/PROG button (14); ”PROG SET 01” will then show on the
Monitor (1) indicating the first track is ready to program.
2. Select the first track by using the SKIP (15) & SKIP (16) buttons.
3. Press the REPEAT/PROG button (14) again to confirm the entry.
4. Repeat to set up to 20 tracks into memory. When done, press the
PAIR/PLAY/PAUSE button (19) to start the selected tracks playback.
Notes on the Programming Function
• Press the STOP button (17) TWICE or switch off at the POWER/MODE button
(4) to stop and clear the program tracks.
• If more than 20 tracks are attempted to be programmed, “FULL” will appear in
the Monitor (1).
• The programming function is available only in CD and USB mode.
LED Decorative Lights (26 & 9)
Press the LIGHT MODE button (10) to select one of the three light modes on the
front of the unit as follows:
• Light Mode 1: The unit will synchronize to the music being played and Karaoke
vocals.
• Light Mode 2: The unit will light up with random colours and patterns.
• Light Mode 3: The light effect will be turned off.
Care and Use of your Karaoke Machine
• Always disconnect the Karaoke Machine from the mains power supply before
cleaning.
• Clean outside of the Karaoke Machine with a clean, soft dry cloth. Never clean
with harsh or abrasive cleaners.
• Do not clean with furniture wax or polish sprays.
• Do not submerge the Karaoke Machine or its Power Supply in water or any other
liquids.
 Loading...