Operating Instructions
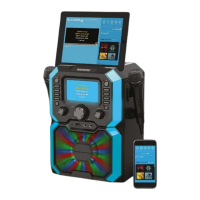
Using the Internal Monitor Screen
Press the Monitor on/off button (5) to switch the internal Monitor (1) on and off.
Playing a CD/Karaoke CD
1. Ensure the Mains Adaptor (37) is connected as described above.
2. Press the POWER/MODE button (4) the LED Power Indicator (3) will illuminate
to show the unit is powered up.
3. Lift up the CD Compartment (2) door, the Monitor (1) will show “OPEN” then
insert a CD by pressing it over the spindle with the label side uppermost.
4. “CD READING” will be shown on the Monitor (1) whilst searching the disc after
which the total number of tracks will be shown.
If no disc is in the machine “NO DISC” will appear on the Monitor (1).
CD’s that can be used with your Karaoke Machine:
Use only with standard CD’s (Audio only) or MP3+G/CD+G Karaoke CD’s There are
two types of Karaoke CD:
Type 1: CD+G (CD + Graphics) is the standard format for most karaoke discs,
these will play the audio backing track and display the words on the screen.
Type 2: MP3+G is the newest format for karaoke music utilizing the MP3’s small
file size. It will also play the audio backing track and display the words on the
screen as a CD-G disc.
1. Press the PAIR/PLAY/PAUSE button (19) to start playback, press the button
again to pause playback. Whilst playing a Karaoke disc, the lyrics will appear on
the Monitor (1).
2. Press SKIP (15) & SKIP (16) to choose the song that you want to play.
3. Adjust the volume to the desired level using the MASTER VOL control (21).
4. Connect the Microphone(s) (36) to the MIC Jack sockets (24) and (25) and slide
the ON/OFF switch on the Microphone to the ON position.
5. Rotate the MIC VOL control (11) clockwise to increase or anticlockwise to
decrease the microphone volume level as desired.
The MIC VOL control (11) will affect both microphones.
6. Press the ECHO + (7) & ECHO – (8) to add an echo effect to the Microphone
(36), the echo depth can be adjusted from 00 to 08, the ECHO level will be
shown on the Monitor (1).
The ECHO effect will be on both microphones.
 Loading...