This document is an operation manual for the Daikin Wireless Remote Controller Kit, covering models BRC082A41W, BRC082A42W, and BRC082A42S. It provides comprehensive instructions for safe and effective use, including names and functions of operating sections, handling precautions, operation procedures, troubleshooting, and maintenance information.
Function Description
The Daikin Wireless Remote Controller Kit is designed to operate Daikin air conditioning units, allowing users to control various functions such as power ON/OFF, temperature setting, operation mode selection (COOLING, HEATING, AUTOMATIC, FAN, DRY), fan speed adjustment, air flow direction, and program timer settings. The remote controller transmits signals to a receiver located on the indoor unit's decoration panel.
Important Technical Specifications
- Models Covered: BRC082A41W, BRC082A42W, BRC082A42S.
- Power Source: 2 AAA LR03 alkaline dry batteries.
- Battery Life: Approximately one year under normal use.
- Transmitting Distance: Approximately 23 feet (7 meters).
- Setting Temperature Range: 60°F (16°C) to 90°F (32°C).
- Program Timer: Can be set for a maximum of 72 hours for both start and stop times.
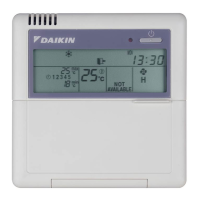
- Display Indications:
- Signal Transmission ( ): Lights up when a signal is transmitted.
- Operation Mode ( , , , , ): Shows the current operation mode.
- Set Temperature (H-M, 80): Displays the set temperature.
- Programmed Time (hr. hr.): Shows programmed start or stop time.
- Swing Flap ( ): Indicates air flow direction adjustment.
- Fan Speed ( , ): Shows the set fan speed.
- Inspection/Test Operation (TEST): Appears when the inspection/test operation button is pressed.
- Receiver Lamps (on decoration panel):
- Operation Lamp (Red): Stays lit during operation, blinks during trouble.
- Timer Lamp (Green): Stays lit when the timer is set.
- Air Filter Cleaning Time Indicator Lamp (Red): Lights up when filter cleaning is due.
- Defrost Lamp (Orange): Lights up when defrosting operation starts.
Usage Features
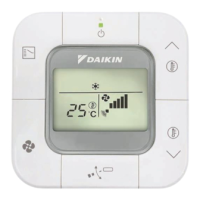
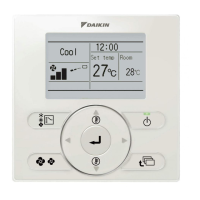
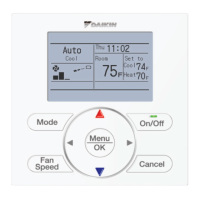
1. Names and Functions of the Operating Section (Figure 1A & 1B):
- ON/OFF Button (8): Starts or stops the system.
- Fan Speed Control Button (9): Selects LOW, MEDIUM, or HIGH fan speed.
- Temperature Setting Button (10): Adjusts the set temperature (up/down).
- Timer Mode Start/Stop Button (11): Used for setting the program timer.
- Timer Reserve/Cancel Button (12): Confirms or cancels timer programming.
- Air Flow Direction Adjust Button (13): Adjusts the air flow direction.
- Operation Mode Selector Button (14): Selects operation mode (COOLING, HEATING, AUTOMATIC, FAN, DRY).
- Filter Sign Reset Button (15): Resets the air filter cleaning indicator after cleaning.
- Inspection/Test Operation Button (16): For service personnel only.
2. Operation Procedure:
- Selecting Operation Mode: Press the OPERATION MODE SELECTOR button (14) repeatedly to cycle through COOLING, HEATING, AUTOMATIC, FAN, and DRY modes.
- COOLING: Standard cooling operation.
- HEATING: Standard heating operation.
- AUTOMATIC: System automatically switches between COOL/HEAT.
- FAN: Fan-only operation.
- DRY: Decreases humidity with minimal temperature decrease. Microcomputer automatically determines temperature and fan speed. DRY operation will not activate below 57°F (14°C).
- ON/OFF: Press the ON/OFF button (8) to start or stop the system. The OPERATION lamp (19) on the indoor unit will light up or go off.
- Temperature Adjustment: Use the TEMPERATURE SETTING buttons (10) to increase or decrease the set temperature by 1°F (0.56°C) per press. In AUTOMATIC mode, these buttons shift the setting to "H" (higher) or "L" (lower) side.
- Fan Speed Control: Press the FAN SPEED CONTROL button (9) to select LOW, MEDIUM, or HIGH fan speed. The microcomputer may override this setting to protect the unit.
- Air Flow Direction Adjustment: Press the AIR FLOW DIRECTION ADJUST button (13).
- One press: Continuous swing (display shows ).
- Subsequent presses: Fixes the air flow direction (display vanishes).
- The microcomputer may control the air flow direction differently from the display under certain conditions (e.g., during heating startup, when room temperature is higher than set, or during defrost operation to avoid blowing cold air).
- Program Timer Operation:
- Setting Stop/Start Time: Press the TIMER MODE START/STOP button (11) to select stop ( ) or start ( ) timer mode. The display will blink.
- Programming Time: Use the TEMPERATURE SETTING buttons (10) to adjust the time in 1-hour increments (up/down). The timer can be set up to 72 hours.
- Confirming Timer: Press the TIMER RESERVE button (12). The display will change from blinking to constant.
- Canceling Timer: Press the TIMER CANCEL button (4) to cancel programming. The display vanishes.
- Both start and stop times can be programmed simultaneously.
3. Emergency Operation (Figure 2):
- If the remote controller is not working (e.g., due to battery failure), an EMERGENCY OPERATION SWITCH (17) is located beside the discharge grille on the indoor unit.
- START: Press the switch once. The unit will run in the previous mode with the previously set air flow direction.
- STOP: Press the switch again to stop the unit.
4. Precautions for Group Control System or Two Remote Control System:
- Group Control: One remote controller controls up to 16 indoor units, all set equally.
- Two Remote Controllers: Two remote controllers control one indoor unit (or one group of indoor units). The unit follows individual operation.
- Wireless remote controllers cannot be used alone in a two-remote-controller system; one wired remote controller is required.
- Timer operation is not available with wireless remote controllers in a two-remote-controller system.
- Only the OPERATION lamp functions on the indoor unit display in these configurations.
Maintenance Features
1. Battery Replacement:
- Under normal use, batteries last about a year. Replace both AAA LR03 alkaline batteries when the display fades or transmission range shortens.
- Procedure: Slide off the back cover, insert new batteries with correct (+) and (-) polarity, then replace the cover.
- Note: Replace both batteries at the same time; do not mix new and old batteries. Remove batteries if the remote controller will not be used for a long time to prevent leakage.
2. Air Filter Cleaning:
- When the AIR FILTER CLEANING TIME INDICATOR lamp (21) on the receiver lights up, clean the air filter as instructed in the indoor unit's operation manual.
- After cleaning and reattaching the filter, press the FILTER SIGN RESET button (15) on the remote controller. The indicator lamp will then go out.
3. Troubleshooting:
- Emergency Stop (Figure 2): If the air conditioner stops unexpectedly and the OPERATION lamp (19) blinks, follow these steps to read the malfunction code:
- Press the INSPECTION/TEST button (16). "UNIT No." and the unit number will blink.
- Use the TEMPERATURE SETTING buttons (10) to change the unit number. Hold until the indoor unit emits 3 short beeps (proceed to steps 3-6), 1 short beep (proceed to steps 3 & 6), or 1 long beep (no trouble).
- Press the OPERATION MODE SELECTOR button (14). The left-hand of the malfunction code blinks.
- Use the TEMPERATURE SETTING buttons (10) to change the malfunction code. Press until the indoor unit makes 2 short beeps.
- Press the OPERATION MODE SELECTOR button (14). The right-hand of the malfunction code blinks.
- Use the TEMPERATURE SETTING buttons (10) to change the malfunction code. Press until the indoor unit makes a long beep to fix the code.
- Press the OPERATION MODE SELECTOR button (14) to reset the display to normal state.
- Notify your dealer with the malfunction code for repair.
- Other Issues:
- Unit not operating: Check for sunlight/strong light on the receiver, batteries in the remote controller, and matching indoor unit/remote controller numbers.
- Insufficient cooling/warming: Check set temperature, fan speed, and air flow angle.
- Burning odor: Immediately shut off power and contact the place of purchase.
- Operation lamp blinking, unit not working (Figure 5): Indicates a malfunction. Check the malfunction code (e.g., 81-UF) on the remote controller and inform your dealer.
- Symptoms Not Indicating Malfunction: The manual also lists several scenarios that might seem like malfunctions but are normal operations, such as delays in restarting after ON/OFF or temperature changes, repeated reception beeps (3 times), DEFROST lamp lighting during heating, outdoor unit stopping, and temporary changes in air flow rate or direction due to microcomputer control.
Safety Considerations:
The manual emphasizes reading all instructions carefully and observing all WARNINGs and CAUTIONs.
- WARNING: Prolonged direct exposure to cool/warm air can be harmful. Malfunctioning units (burning odor) require immediate power off and dealer contact. Do not attempt self-installation or repair. Do not place objects in air inlet/outlet. Consult dealer for relocation/reinstallation.
- CAUTION: Do not use for purposes other than intended (e.g., cooling precision instruments, food, plants, animals). Ensure adequate ventilation if other equipment (e.g., burners) is used. Do not expose plants/animals to direct airflow. Do not operate with wet hands. Do not place burners/heaters in airflow path. Do not use flammable sprays near the unit.