Do you have a question about the Daikin BRC230Z4B and is the answer not in the manual?
Procedure for setting the current time and day on the remote controller.
Instructions for initiating the air conditioner's operation in various modes.
Procedure for turning off the air conditioner unit.
How to adjust the desired temperature for cooling, heating, or auto modes.
Steps to set the timer for automatic ON and OFF operations.
Instructions for clearing previously set ON and OFF timer functions.
Example of setting sequential ON and OFF timers for combined operation.
Guide to setting a simple daily timer for 7 days a week.
Steps to disable or remove a simple 7-day timer program.
Method to copy timer settings from one day to another.
Procedure for setting a multi-day timer schedule with zones.
Instructions to temporarily suspend 7-day timer scheduling for absences.
Procedure to reactivate 7-day timer scheduling after disabling it.
How to choose specific zones for heating or cooling.
Procedure for deactivating a previously selected zone.
Steps to change the active temperature sensor for zone control.
Method for assigning custom names to zones or temperature sensors.
Procedure to reset all custom names back to their default settings.
How to clear the filter cleaning notification after maintenance.
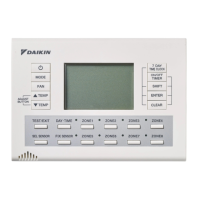
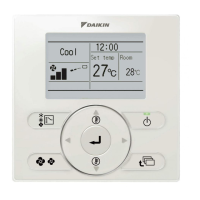
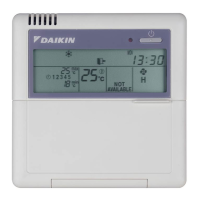
This document describes the operation of the Daikin Wired Remote Controller, covering its functions, usage, and maintenance. The remote controller is designed to manage Daikin air conditioning systems, offering a range of settings for optimal comfort and energy efficiency.
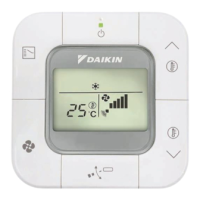
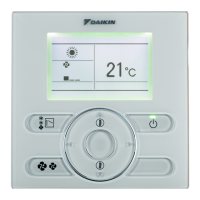
The Daikin Wired Remote Controller allows users to control various aspects of their air conditioning system. It features an ON/OFF button to power the unit on or off, and a MODE selector button to switch between AUTO, COOL, HEAT, DRY, and FAN modes. The FAN setting button adjusts the airflow rate, offering multiple levels of fan speed, including an AUTO fan mode. Temperature adjustment buttons allow users to set their desired temperature within a range of 16°C to 32°C for AUTO, COOL, and HEAT modes.
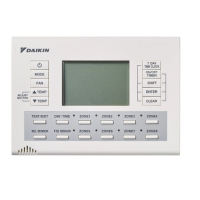
A key feature is the 7 DAY TIME CLOCK button, which provides access to both Simple and Multi 7 Day Timer settings. The ON/OFF TIMER button is for setting quick ON and OFF timers, useful for automatic operation at specific times of the day or night. The CLEAR button cancels settings, while the TEST/EXIT button exits programs. The DAY/TIME button allows for setting the current time and day.
For advanced control, the remote controller includes ZONE buttons (up to 8 zones) for managing air conditioning in specific areas. The SELECT SENSOR and FIXING SENSOR buttons are used for switching and fixing the temperature sensor detection position, especially when optional sensors are installed. The DISPLAY shows all current settings and operational status.
Basic Operation: To start operation, users press the MODE selector button to choose an operation mode (FAN, DRY, AUTO, COOL, HEAT), then press the ON/OFF button. The air conditioner will begin operating in the selected mode. To stop, the ON/OFF button is pressed again. Temperature settings can be adjusted using the temperature adjustment buttons, while airflow rates are selected via the FAN setting button. The AUTO fan mode automatically adjusts fan speed based on room temperature and active zones, especially when the "Indoor Sens" is selected and Airside function is active.
Time and Day Settings: Before using timer functions, the current time and day must be set. This is done by pressing the DAY/TIME button, then using the SHIFT and temperature adjustment buttons to set the day and time, and finally the ENTER button to confirm. These settings can be cancelled by pressing the DAY/TIME button and then holding the temperature adjustment button for at least 4 seconds.
Timer Operation: The remote controller offers several timer options:
Zone Control: For systems with multiple zones, the ZONE button allows users to select specific zones to heat or cool. When a zone is selected, its corresponding LED on the remote controller lights up green, and air is directed to that zone when operation starts. Zones can be switched on or off as needed. Names can be registered for each zone for easier identification.
Temperature Sensor Switching (Option): If optional temperature sensors are installed, the remote controller allows switching the detection position of the temperature sensor. This enables temperature control based on the selected room's temperature (e.g., living room, bedroom). Users can select between Indoor Unit, Optional Sensor 1, Optional Sensor 2, Master remote controller, or Optional sub remote controller as the temperature source.
Name Registration: Users can register custom names for each zone and temperature sensor. This is done by entering the name registration mode, selecting the item to name, and then using the temperature adjustment and SHIFT buttons to input characters.
Filter Cleaning Notice Reset: The remote controller provides a notification when the air filter requires cleaning. When "Filter" is displayed, users should check and clean the filter. After cleaning, the notice can be reset by pressing the temperature adjustment button for at least 4 seconds, returning the display to normal.
General Care: The manual emphasizes energy-saving tips, such as avoiding excessive cooling, maintaining moderate temperature settings, and using blinds or curtains to block sunlight. It also advises turning off the main breaker if the air conditioner will not be used for a long period, and ensuring it is switched on 6 hours before operation if it has been off for an extended time. The internal clock may become inaccurate due to power outages or breaker turns, requiring a reset of the time and day settings.
| Model | BRC230Z4B |
|---|---|
| Compatibility | Daikin Air Conditioners |
| Display | LCD |
| Power Source | Battery |
| Battery Type | AA |
| Functions | Temperature control, Mode selection, Fan speed control, Timer settings |